background image

10

UPPER

ROAST

LOCKED

WARM

BAKE

DELAY

CONV

BROIL

BROIL

TIMED

UPPER

TIMER

TIMER

REMOVE

LOWER

DOOR

RACKS

CLEAN

CONV

BROIL

TIMED

WARM

BAKE

DELAY

LOWER

ROAST

LOCKED

LOCKED

UPPER

ROAST

LOCKED

WARM

BAKE

DELAY

CONV

BROIL

TIMED

UPPER

TIMER

REMOVE

LOWER

LOWER

DOOR

RACKS

CLEAN

CONV

BROIL

TIMED

WARM

BAKE

DELAY

DELAY

LOWER

ROAST

LOCKED

LOCKED

UPPER

ROAST

LOCKED

WARM

BAKE

DELAY

CONV

BROIL

TIMED

UPPER

TIMER

REMOVE

LOWER

LOWER

DOOR

RACKS

CLEAN

CONV

BROIL

TIMED

WARM

BAKE

DELAY

DELAY

LOWER

ROAST

LOCKED

LOCKED

UPPER

ROAST

LOCKED

WARM

BAKE

DELAY

CONV

BROIL

TIMED

UPPER

TIMER

REMOVE

LOWER

LOWER

DOOR

RACKS

CLEAN

CONV

BROIL

TIMED

TIMED

WARM

BAKE

DELAY

LOWER

LOWER

ROAST

LOCKED

UPPER

ROAST

LOCKED

WARM

BAKE

DELAY

CONV

BROIL

TIMED

UPPER

TIMER

REMOVE

LOWER

LOWER

DOOR

RACKS

CLEAN

CONV

BROIL

TIMED

TIMED

WARM

BAKE

DELAY

LOWER

LOWER

ROAST

LOCKED

UPPER

ROAST

LOCKED

WARM

BAKE

DELAY

CONV

BROIL

TIMED

UPPER

TIMER

REMOVE

LOWER

DOOR

RACKS

CLEAN

CONV

BROIL

TIMED

TIMED

WARM

BAKE

DELAY

LOWER

LOWER

ROAST

LOCKED

UPPER

ROAST

LOCKED

WARM

BAKE

DELAY

CONV

BROIL

TIMED

UPPER

TIMER

TIMER

REMOVE

LOWER

DOOR

RACKS

CLEAN

CONV

BROIL

TIMED

WARM

BAKE

DELAY

LOWER

LOWER

ROAST

ROAST

LOCKED

Setting Timed Bake, Timed Convection Bake or Timed Convection Roast

The 

BAKE 

Bake


or 

CONVECTION BAKE


Conv
bake

 or 

CONVECTION ROAST 

Conv

roast


and 

BAKE TIME


Bake

time

  pads control the

Timed Bake feature. The automatic timer of the Timed Bake feature will turn the oven OFF after cooking for the desired
amount of time you selected.

Setting Oven Controls 

(continued)

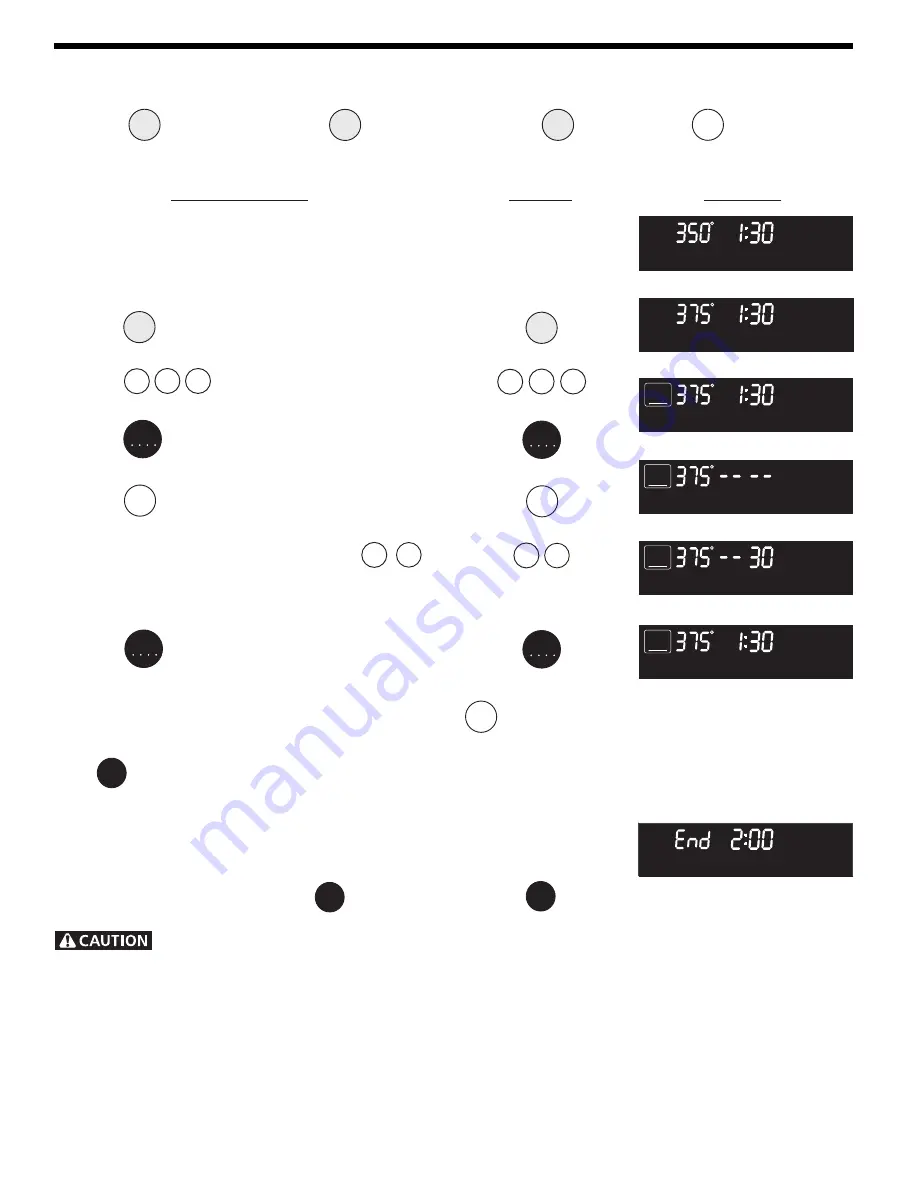
To program the oven to begin baking immediately and to shut off
automatically (example: BAKE at 375°F for 30 minutes):

1.

Be sure the clock is set for the correct time of day.

2.

Arrange interior oven rack(s) and place the food in the
oven.

3.

Press 

Bake

"UPPER", "BAKE"

 will flash and 

"350°"

will appear in the display (Fig. 1).

4.

Press 

3


7


5

"UPPER"

"BAKE"

 will continue

to flash and 

"375°"

 will appear in the display (Fig. 2).

5.

Press 

START

"375°", "UPPER"

 and

 "BAKE"

 stop

flashing and remain on in the display (Fig. 3).

6.

Press 

Bake

time

"UPPER"

 and 

"TIMED"

 start flashing and

"-- --"

 will appear in the display (Fig. 4).

7.

Enter the desired baking time by pressing 

3

0

.

"-- 30" 

will appear in the display (Fig. 5). 

Note

: Baking

time can be set for any amount of time between 1
minute to 11 hours and 59 minutes.

8.

Press 

START

. The display returns to the time of day

(Fig. 6).

INSTRUCTIONS

PRESS

DISPLAY

Fig. 1

Fig. 2

Fig. 4

Fig. 5

Fig. 6

Fig. 7

Fig. 3

Clear

/Off

 Use caution with the 

DELAYED TIME BAKE 

features. Use the automatic timer when cooking cured or

frozen meats and most fruits and vegetables. Foods that can easily spoil such as milk, eggs, fish, meat or poultry,
should be chilled in the refrigerator first. Even when chilled, they should not stand in the oven for more than 1 hour before
cooking begins, and should be removed promptly when cooking is completed. Eating spoiled food can result in sickness
from food poisoning.

Bake

3


7


5

START

Bake

time

3


0

START

Note: After the Timed Bake feature has been activated, press 

Bake

time

 to display the bake time remaining in the Timed Bake

mode. Once Timed Bake has started baking, a beep will sound when the oven temperature reaches the set temperature.

Press 

Clear

/Off

 when baking has finished or at any time to cancel the Timed Bake feature.

When the timed bake finishes:

1.

"

End

" and the time of day will show in display. The

oven will shut off automatically (Fig. 7).

2.

The control will beep 3 times. The control will continue to

beep 3 times every 30 seconds until 

Clear

/Off

 is pressed.

Summary of Contents for 318200138 (0610)

Page 1: ...MIN 11 59 HR MIN CONVECTIONBAKE 170 F 77 C 550 F 288 C CONVECTIONROAST 170 F 77 C 550 F 288 C Printed in United States UPPER OVEN LOWER OVEN 0 5 6 7 8 9 1 2 3 4 Upper Oven Clock Timer On Off Even Cook Convection Ovens Clean Broil Pre heat Speed clean Maxx clean Oven light Keep warm Bake Conv roast Conv convert START Start time Bake time Conv bake UPPER ROAST LOCKED WARM BAKE DELAY CONV BROIL TIMED...

Page 2: ...When the wall oven is first plugged in or when the power supply to the appliance has been interrupted the timer in the display will flash along with PF power failure See Fig 1 When PF appears in the display and 12 00 is flashing press Clear Off A beep will sound and PF will disappear To set the clock example below for 1 30 1 Press Clock CLO and the current time of day will appear in the display Fi...

Page 3: ...ROAST LOCKED UPPER ROAST LOCKED WARM BAKE DELAY CONV BROIL TIMED UPPER TIMER REMOVE LOWER DOOR RACKS CLEAN CONV BROIL TIMED WARM BAKE DELAY LOWER ROAST ROAST LOCKED UPPER ROAST LOCKED WARM BAKE DELAY CONV BROIL TIMED UPPER TIMER REMOVE LOWER DOOR RACKS CLEAN CONV BROIL TIMED WARM BAKE DELAY LOWER ROAST LOCKED UPPER ROAST LOCKED WARM BAKE DELAY CONV BROIL TIMED UPPER TIMER REMOVE LOWER DOOR RACKS C...

Page 4: ... Press and hold Clear Off for 3 seconds A beep will sound The oven icon UPPER LOC and will disappear from the display DOOR and LOCKED will flash in the display until the oven door has completely Setting Silent Control Operation The STARTTIME Start time and CLEAN Clean pads control the Silent Control operation feature The Silent Control operation feature allows the oven control to be operated witho...

Page 5: ...ep will sound will appear UPPER and BROIL will flash in the display Fig 1 After 6 seconds a beep will be heard and F Fig 2 or C Fig 3 will appear in the display If F appears the display is set to show temperatures in Fahrenheit Fig 2 If C appears the display is set to show temperatures in Celsius Fig 3 2 Press Clean to switch between Fahrenheit or Celsius display modes The display will show either...

Page 6: ...LAY LOWER ROAST LOCKED Fig 1 Fig 2 Fig 3 Fig 4 Fig 5 Fig 6 Fig 7 Fig 8 To set the Preheat temperature for 375 F 1 Arrange the interior oven racks 2 Press Pre Heat 350 will appear UPPER and BAKE will flash in the display Fig 1 3 Press 3 7 5 375 will appear in the display Fig 2 4 Press START UPPER and BAKE stop flashing and remain in the display PRE will appear in the display The oven icon appears i...

Page 7: ... Also convection fan and convection element will turn on to help the oven reaching the desired temperature faster A beep will sound once the oven temperature reaches 375 F the convection fan and convection element will turn off Fig 4 Pressing Clear Off will cancel the Bake feature at any time To change the Bake Temperature example changing from 375 F to 425 F 1 After the oven has already been set ...

Page 8: ...ols continued Setting Convection Bake The CONVECTION BAKE Conv bake pad controls the Convection Bake feature Use the Convection Bake feature when cooking speed is desired The oven can be programmed for Convection baking at any temperature between 170 F 77 C to 550 F 288 C Benefits of Convection Bake Some foods cook up to 30 faster saving time and energy Multiple rack baking No special pans or bake...

Page 9: ...ed reduced temperature in display Convection Convert may ONLY be used with a Conv Bake Timed Bake or a Delay Start Delayed Timed Bake setting When used with a Timed Bake or a Delayed Timed Bake setting the Convection Convert feature will display a CF for check food when the bake time is 75 complete At this time the oven control will sound one long beep at regular intervals until baking has finishe...

Page 10: ... Be sure the clock is set for the correct time of day 2 Arrange interior oven rack s and place the food in the oven 3 Press Bake UPPER BAKE will flash and 350 will appear in the display Fig 1 4 Press 3 7 5 UPPER BAKE will continue to flash and 375 will appear in the display Fig 2 5 Press START 375 UPPER and BAKE stop flashing and remain on in the display Fig 3 6 Press Bake time UPPER and TIMED sta...

Page 11: ...select in advance Note If your clock is set for normal 12 hour display mode the Delayed Timed Bake or Delayed Timed Convection Bake cycle can never be set to start more than 12 hours in advance INSTRUCTIONS PRESS DISPLAY To program the oven for a delayed BAKE start time and to shut off automatically example baking at 375 F starting at 5 30 and baking for 30 minutes 1 Be sure that the clock is set ...

Page 12: ...UCTIONS PRESS DISPLAY To set Keep Warm 1 Arrange interior oven racks and place food in oven 2 Press Keep Warm UPPER WARM will flash and will appear in the display Fig 1 Note If no pad is touched within 25 seconds the request to turn ON Keep Warm feature will be cancelled 3 Press START UPPER WARM will stop flashing HLd and the oven icon will appear in the display Fig 2 4 To turn the Keep Warm OFF a...

Page 13: ...KS CLEAN CONV BROIL TIMED WARM BAKE DELAY DELAY LOWER ROAST LOCKED Fig 5 Broiling Times Use the following table for approximate broiling times Increase or decrease broiling times or move the broiling pan to a different rack position to suit for doneness If the food you are broiling is not listed in the table follow the instructions provided in your cookbook and watch the item closely Electric Rang...

Page 14: ...than BAKE while the Sabbath feature is active ONLY the following key pads will function after setting the Sabbath feature 0 to 9 Bake START Clear Off ALL OTHER KEYPADS will not function once the Sabbath feature is properly activated INSTRUCTIONS PRESS DISPLAY To Program the Oven to Begin Baking Immediately activate the Sabbath feature example baking at 375 F 1 Be sure that the clock is set with th...

Page 15: ...r changes once the oven is set for the Sabbath feature 9 The oven may be turned OFF at any time by first pressing Clear Off pad this will turn the oven OFF only To turn OFF the Sabbath feature press and hold both the Bake time and Start time pads for at least 3 seconds This also turns off the oven SAb will disappear from the display Should you experience a power failure or interruption the oven wi...

Page 16: ...ir or steam to escape DO NOT force the oven door open This can damage the automatic door locking system Use caution and avoid possible burns when opening the door after the Self Cleaning cycle has completed The oven may still be VERY HOT INSTRUCTIONS PRESS DISPLAY Clean Speed clean or Maxx clean START 1 Be sure the clock is set with the correct time of day and the oven door is closed 2 Press Clean...

Page 17: ... longer displayed the oven door can then be opened INSTRUCTIONS PRESS DISPLAY UPPER ROAST LOCKED WARM BAKE DELAY CONV BROIL TIMED UPPER TIMER REMOVE LOWER DOOR RACKS CLEAN CONV BROIL TIMED WARM BAKE DELAY DELAY LOWER ROAST LOCKED Fig 2 Fig 1 UPPER ROAST LOCKED WARM BAKE DELAY CONV BROIL TIMED UPPER TIMER REMOVE LOWER DOOR RACKS CLEAN CONV BROIL TIMED WARM BAKE DELAY DELAY LOWER ROAST LOCKED UPPER ...

Page 18: ...0 and then press Clean Fig 3 The temperature may be decreased as much as 35 F 19 C 3 Press START to accept the temperature change and the display will return to the time of day Press Clear Off to reject the change if necessary NOTE Each oven may be adjusted individually UPPER ROAST LOCKED WARM BAKE DELAY CONV BROIL TIMED UPPER TIMER REMOVE LOWER DOOR RACKS CLEAN CONV BROIL TIMED WARM BAKE DELAY LO...

Page 19: ...19 Notes ...

Page 20: ...20 Notes ...

Reviews: