background image

6

Assembly of the Surface Burner Heads, Burner Caps and Burner Grates

It is very important to make sure that all of the Surface Burner
Heads, Surface Burner Caps and Surface Burner Grates are
installed correctly and at the correct locations.
1. Be sure to follow the Installation Instructions before installing

and using your new cooktop.

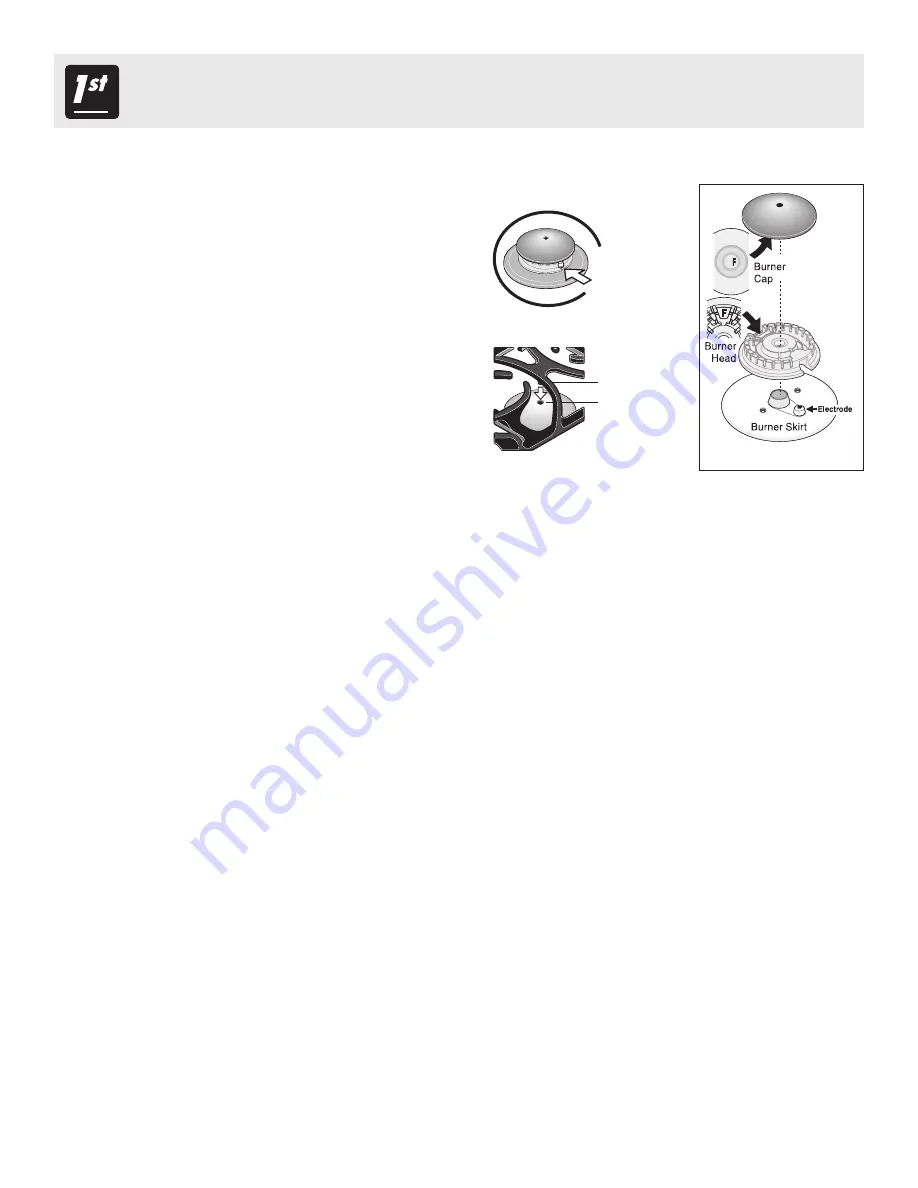
2. Remove all packing tape from cooktop. Remove Burner Caps

and Burner Heads (See Figure 3).

3. Discard all packing material located under all Burner Heads (if

applicable).

4. To replace Burner Heads & Caps, match the letters located

under center of Burner Caps with the letters located inside
Burner Head (See Figure 3). Place all Burner Heads & Caps
on the cooktop while carefully aligning the Electrodes into
slots or holes of the Burner Heads (Figure 1). Note: The
Burner Heads should sit flat on Cooktop Burner Skirts.

5. Unpack Burner Grates. NOTE: Do not force End Burner

Grates down on cooktop. Be careful to line up the 2 Grate
Pins located on each of the 2 End Burner Grates into the
Pilot holes located on top of the Burner Caps (See Figure 2).
Position Burner Grates on cooktop and check that all the Burner Grate legs lie on the glass surface.

REMEMBER —

 DO NOT ALLOW SPILLS, FOOD, CLEANING AGENTS OR ANY OTHER MATERIAL TO ENTER THE

GAS ORIFICE HOLDER OPENING. 

Always keep the Burner Caps and Burner Heads in place whenever the surface burners

are in use.

Before Setting Surface Controls

Grate Pin

Burner
Cap
Pilot hole

Electrodes must
align into slot or
hole for each
Burner Head.

Figure 4

Figure 3

Figure 5

Figure 3

Figure 2

Figure 1

Summary of Contents for 318200682 (0604) Rev

Page 1: ...D AND SAVE THESE INSTRUCTIONS Questions 1 800 944 9044 United States 1 800 668 4606 Canada Gas Gas Gas Gas Gas Cooktop Warranty 12 Before You Call 11 Care Cleaning 8 11 Solutions to Common Problems ImportantSafetyInstructions 3 5 Welcome 2 Setting Surface Controls 7 Before Setting Surface Controls 6 ...

Page 2: ...ns general operating instructions for your appliance and feature information for several models Your product may not have all the described features The graphics shown are representative The graphics on your appliance may not look exactly like those shown These instructions are not meant to cover every possible condition and situation that may occur Common sense and caution must be practiced when ...

Page 3: ...k your dealer to recommend a qualified technician and an authorized repair service Know how to shut off gas supply at the meter and disconnect the electrical power to the cooktop at the circuit breaker or fuse box in case of an emergency UserServicing Donotrepairorreplaceanypartofthe appliance unless specifically recommended in the manuals All other servicing should be done only by a qualified tec...

Page 4: ...burnsfromsteam Donotletthe pot holders touch the flame or burners Do not use a towel or other bulky cloth instead of a pot holder Do Not Heat Unopened Food Containers Buildup of pressure may cause container to burst and result in injury Know which knob controls each surface burner Always turn the knob to the LITE position when igniting the burners Visually check that the burner has lit Then adjust...

Page 5: ...nd properly grounded DO NOT operate the cooktop using a 2 prong adapter or an extension cord If a 2 prong wall receptacle is the only available outlet it is the personal responsibility of the consumer to have it replaced with a properly grounded 3 prong wall receptacle installed by a qualified electrician See the INSTALLATION INSTRUCTIONS packaged with this cooktop for complete installation and gr...

Page 6: ...the cooktop while carefully aligning the Electrodes into slots or holes of the Burner Heads Figure 1 Note The Burner Heads should sit flat on Cooktop Burner Skirts 5 Unpack Burner Grates NOTE Do not force End Burner Grates down on cooktop Be careful to line up the 2 Grate Pins located on each of the 2 End Burner Grates into the Pilot holes located on top of the Burner Caps See Figure 2 Position Bu...

Page 7: ...ometer and adjust the surface control knob accordingly If the fat is too cool the food will absorb the fat and be greasy If the fat is too hot the food will brown so quickly that the center will be undercooked Do not attempt to deep fat fry too much food at once as the food will neither brown nor cook properly Note Settings are based on using medium weight metal or aluminum pans Settings may vary ...

Page 8: ... the knob into place Gentle scouring with a soapy scouring pad will remove most spots Rinse with a 1 1 solution of clear water and ammonia If necessary cover difficult spots with an ammonia soaked paper towel for 30 to 40 minutes Rinse with clean water and a damp cloth and then scrub with a soap filled scouring pad Rinse and wipe dry with a clean cloth or paper towel Remove all cleaners or the por...

Page 9: ...y an authorized Service Center Cleaning the Cooktop Burner Heads Caps Grates The cooktop is designed to make cleaning easier Because the gas Burners are sealed cleanups are easy when spillovers are cleaned up immediately The cooktop Burner Heads and Caps should be routinely cleaned Keeping the Burner Head Ports clean will prevent improper ignition and an uneven flame Refer to the following instruc...

Page 10: ...10 ...

Page 11: ... slots 4 Power cord is disconnected from outlet electric ignition models Be sure cord is plugged securely into outlet 5 Electrical power outage electric ignition models Burners can be lit manually See Setting Surface Controls in this Owner s Guide 1 Burner ports or slots are clogged With the burner off clean ports with a small gauge wire or needle to clean ports or slots 2 Moisture is present afte...

Page 12: ...ce companies or external causes such as abuse misuse inadequate power supply accidents fires or acts of God DISCLAIMER OF IMPLIED WARRANTIES LIMITATION OF REMEDIES CUSTOMER S SOLE AND EXCLUSIVE REMEDY UNDER THIS LIMITED WARRANTY SHALL BE PRODUCT REPAIR OR REPLACEMENT AS PROVIDED HEREIN CLAIMS BASED ON IMPLIED WARRANTIES INCLUDING WARRANTIES OF MERCHANTABILITY OR FITNESS FOR A PARTICULAR PURPOSE AR...

Reviews: