background image

NOTE

For additional instructions, see Storage 

Features section.

12

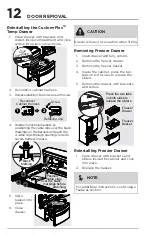
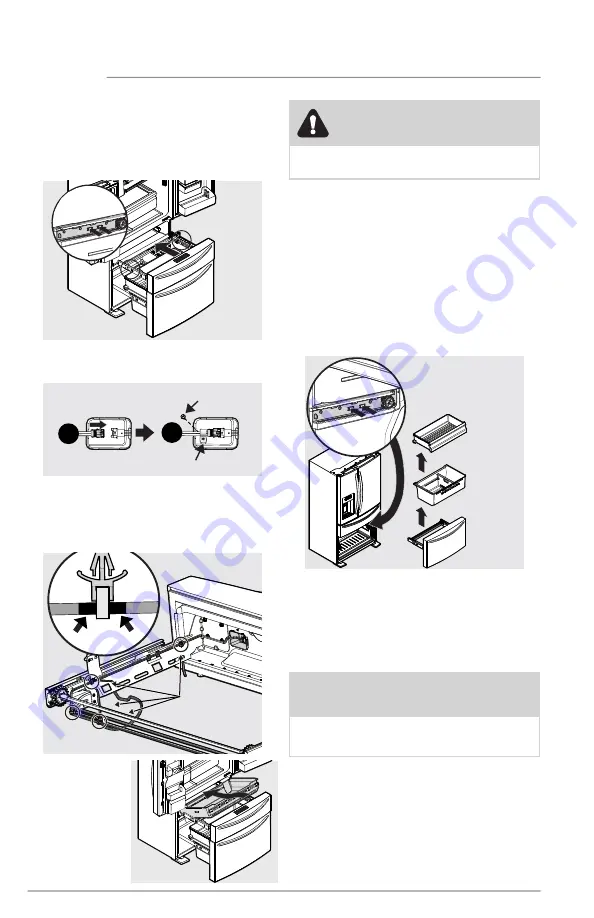
Removing Freezer Drawer

1.  Open drawer and fully extend.
2.  Remove the freezer drawer.
3.  Remove the freezer basket.
4.  Inside the cabinet, press the two 

tabs on both sides to release the 

sliders.

5.  Remove the drawer with brackets 

and sliders.

DOOR REMOVAL

Freezer

Drawer

Freezer

Basket

Press the two tabs

on both sides to

release the sliders 

Reinstalling Freezer Drawer

1.  Place drawer with brackets and 

sliders inside the cabinet and click 

into place. 

2.  Replace the basket.

CAUTION

Drawer is heavy. Use caution when lifting.

Reinstalling the Custom-Flex

TM


Temp Drawer

1.  Place drawer with brackets and 

sliders inside compartment and click 

sliders into place on each side.

2.  Reconnect cabinet harness.
3.  Replace retaining clip and secure with screw.

Retaining Clip

Reconnect 

Cabinet Harness

Screw

1

2

4.  Reattach electrical harness by 

positioning the cable clips over the black 

markings on the harness and push the 

4 cable clips through openings in rail to 

secure harness in place.

Black

Marking

      Position

      cable clips

over the black

  markings before

             attaching.

5.  Slide 

basket into 

place.

6.  Close 

drawer.

Click

Into Place

Summary of Contents for A16492301

Page 1: ...atures 6 Installation 8 Door Removal 10 Door Handle Installation 13 Water Supply Connection 15 Controls and Settings 17 Automatic Ice and Water Dispenser 26 Storage Features 30 Storing Food and Saving Energy 34 Normal Operating Sounds 35 Filter Replacement 36 Care and Cleaning 38 Troubleshooting 40 Limited Warranty 45 A16492301 October 2019 ...

Page 2: ... This manual is your resource for the use and care of your product Please read it before using your appliance Keep it handy for quick reference If something doesn t seem right the troubleshooting section will help you with common issues FAQs helpful tips and videos cleaning products and kitchen and home accessories are available at www frigidaire com We are here for you Visit our website chat with...

Page 3: ...NTS Cancer and Reproductive Harm www P65Warnings ca gov 3 IMPORTANT SAFETY INFORMATION WARNING Please read all instructions before using this refrigerator DANGER DANGER Risk of fire or explosion Flammable refrigerant used Do not use mechanical devices to defrost refrigerator Do not puncture refrigerant tubing DANGER Risk of fire or explosion Flammable refrigerant used To be repaired only by traine...

Page 4: ...ators or freezers are still dangerous even if they will sit for just a few days When disposing of an old refrigerator or freezer please follow the instructions below to help prevent accidents Proper Disposal of Refrigerators Freezers We strongly encourage responsible appliance recycling disposal methods Check with the utility company or visit www energystar gov recycle for more information on recy...

Page 5: ...connecting refrigerator to a Ground Fault Interrupter GFI circuit Do not use an extension cord or adapter plug If the power cord is damaged it should be replaced by an authorized service technician to prevent any risk Never unplug the refrigerator by pulling on the power cord Always grip the plug firmly and pull straight out from the receptacle to prevent damaging the power cord Unplug the refrige...

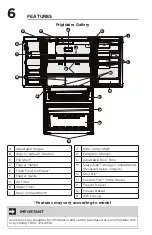
Page 6: ...stable Hinges B Auto CrispSeal Drawers C Flip Shelf D Flipper Mullion E Fresh Food Ice Maker F Flipper Guide G Air Filter H Water Filter I Dairy Compartment J Slide Under Shelf K Cantilever Shelves L Adjustable Door Bins M SnackZone Storage Compartments Recessed below Crispers N Door Bin O Custom Flex Temp Drawer P Freezer Drawer Q Freezer Basket R Anti tip Leg A B C D E F G H I J K L M N O P Q R ...

Page 7: ... SnackZone Storage Compartments Recessed below Crispers B Adjustable Hinges C Auto CrispSeal Drawers D Flip Shelf E Flipper Mullion F Fresh Food Ice Maker G Flipper Guide H Air Filter I Water Filter J Dairy Compartment K Slide Under Shelf L Cantilever Shelves M Adjustable Door Bins N Door Bin O Custom Flex Temp Drawer P Ice Maker Q Freezer Basket R Anti tip Leg A B C D E F G H I J K M N O P Q R L ...

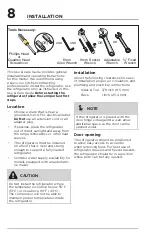
Page 8: ...rical outlet Do Not use an extension cord or an adapter plug If possible place the refrigerator out of direct sunlight and away from the range dishwasher or other heat sources The refrigerator must be installed on a floor that is level and strong enough to support a fully loaded refrigerator Consider water supply availability for models equipped with an automatic ice maker Installation Allow the f...

Page 9: ... Slightly open freezer drawer 2 Lower anti tip legs until they are both touching the floor Use a pair of pliers to adjust To raise unit turn leg clockwise To lower unit turn leg counterclockwise Raise Flipper Mullion Adjust Flipper Mullion for proper connection with the mullion guide by ensuring the flipper mullion is folded and perpendicular to the fresh food door If the mullion guide is not in t...

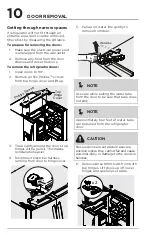
Page 10: ...od from the door shelves and close the doors To remove the refrigerator doors 1 Open doors to 90 2 Remove all five PhillipsTM screws from top hinge cover and lift up Phillips Screws Top Hinge Cover 5 Pull up on water line gently to remove from door Waterline 3 Trace lightly around the door s top hinges with a pencil This makes reinstallation easier 4 Disconnect electrical harness running from door...

Page 11: ...tion for more details and replace the top hinge cover 8 To reinstall doors reverse procedure 7 To gain access to lower hinge drawer will need to be extended Unscrew the three lower hinge screws and slide the hinge inwards To remove the Custom FlexTM Temp Drawer 1 Fully open drawer 2 Remove basket from drawer 3 Unsnap the 4 cable ties by pressing clip sides together and pushing through opening 4 Re...

Page 12: ...abinet and click into place 2 Replace the basket CAUTION Drawer is heavy Use caution when lifting Reinstalling the Custom FlexTM Temp Drawer 1 Place drawer with brackets and sliders inside compartment and click sliders into place on each side 2 Reconnect cabinet harness 3 Replace retaining clip and secure with screw Retaining Clip Reconnect Cabinet Harness Screw 1 2 4 Reattach electrical harness b...

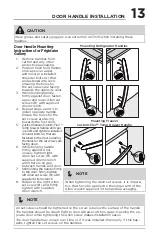
Page 13: ...nst door fasten upper and lower Allen set screws B with supplied Allen wrench 4 Repeat steps 2 and 3 to install opposite handle Ensure the holes for the set screws are facing towards the first door 5 Position freezer Custom FlexTM Temp Drawer handle end caps over left and right pre installed shoulder bolts A that are fastened to the door ensuring the holes for the set screws are facing down 6 Whil...

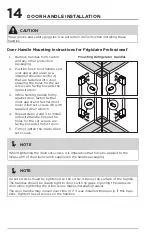
Page 14: ...le tightening the Allen screw makes installation easier The door handle may loosen over time or if it was installed improperly If this hap pens tighten the set screws on the handles 1 Remove handles from carton and any other protective packaging 2 Position fresh food handle end over upper and lower pre installed shoulder bolts A that are fastened into door ensuring the holes for the set screws are...

Page 15: ... supply line con nections comply with all local plumbing codes To install the water supply line the following are needed Basic Tools adjustable wrench flat blade screwdriver and PhillipsTM screwdriver Access to a household cold water line with water pressure between 30 and 100 psi A water supply line made of 1 4 inch 6 4 mm OD copper or braided stainless steel tubing To determine the length of tub...

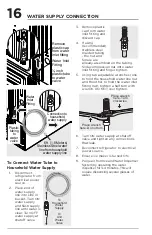
Page 16: ...alve To Household Water Supply To Unit Water Valve Place wrench here Do not turn Place wrench here Turn clockwise 6 Turn ON water supply at shutoff valve and tighten any connections that leak 7 Reconnect refrigerator to electrical power source 8 Ensure ice maker is turned ON 9 Purge air from Ice and Water Dispenser System by operating the water dispenser for 3 4 minutes This will require dispensin...

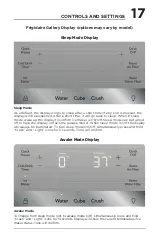
Page 17: ...r a short time If any icon is pressed the display will be awakened After a short time it will go back to sleep When in sleep mode wake up the display to confirm ice maker is On Off Sleep mode can be turned off to have the display on full time awake mode When sleep mode is Off the display will always be illuminated To turn sleep mode On Off simultaneously press and hold Crush and Light icons for 5 ...

Page 18: ...off When indicator is lit ice maker is on When ice maker is OFF ice maker OFF indicator is lit When ice maker is in the OFF state it will stop making ice When sleep mode is enabled wake the display to confirm ice maker is on off see Sleep Mode section While off ice dispensing can continue as long as there is ice in the bucket When ice maker is off and ice is dispensing indicator above ice maker bu...

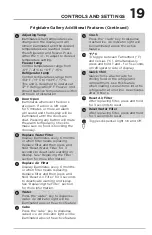
Page 19: ...or 3 seconds to deactivate warning on display See Replacing the Filter section for more information 9 Replace Air Filter Display illuminates every 6 months or when filter needs replacing Replace filter and then press and hold Reset Air Filter for 3 seconds to deactivate warning on display See Replacing the Filter section for more information 10 Water Press the water key to dispense water An indica...

Page 20: ...n a kitchen is 37 F for the fresh food compartment and 0 F for the freezer IMPORTANT If food is freezing in the fresh food compartment increase the temperature setting 1 or 2 degrees IMPORTANT Food placed within 1 inch in front of the air ports may cause food to freeze CONTROLS AND SETTINGS ...

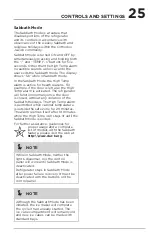
Page 21: ...model CONTROLS AND SETTINGS Sabbath Mode The Sabbath Mode is a feature that disables portions of the refrigerator and its controls in accordance with observance of the weekly Sabbath and religious holidays within the Orthodox Jewish community Sabbath Mode is turned ON and OFF by simultaneously pressing and holding both the freezer side and refrigerator side for five seconds Other than the High Tem...

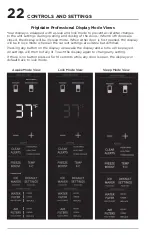
Page 22: ... in sleep mode When either door is first opened the display will be in lock mode where all the current settings are visible but dimmed Pressing any button on the display will awake the display and a tone will be played All settings will then be fully lit Touch the display again to change any setting If there is no button pressed for 10 seconds while any door is open the display will default back t...

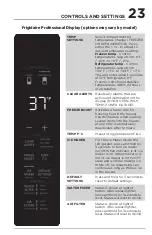
Page 23: ...er rate for freezing food in the freezer Use this feature when loading several items into the freezer at one time Automatically deactivates after 12 hours TEMP F C Press to toggle between F C ICE MAKER For the Ice Maker inside the refrigerator press and hold for 3 seconds to turn ice maker on off When indicator is lit ice maker is on When indicator is not lit ice maker is in the OFF state and will...

Page 24: ...edged While a power failure alert is displayed on the control panel the unit will continue normal operation The high temp alarm may also be illuminated until a safe operating range temperature has been reached Freezer Temp If the freezer temperature reaches 26 F or greater the alarm will sound and the tem perature will flash and the dispenser control will display HIGH TEMP DETECTED You can disable...

Page 25: ...y once the door is closed without any violation of the Sabbath Holidays The High Temp alarm is permitted when cabinet temperature is outside the safe zone for 20 minutes The alarm silences itself after 10 minutes while the High Temp icon stays lit until the Sabbath mode is exited For further assistance guidelines for proper usage and a complete list of models with the Sabbath feature please visit ...

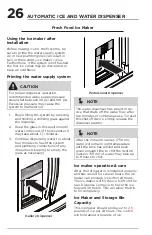
Page 26: ... ice bin will hold about 4 pounds of ice NOTE After the initial 26 ounces 750 ml water will remain room temperature until the tank has refilled and been given enough time to chill the next 26 ounces 750 ml of water May take up to 8 hours to chill Using the ice maker after installation Before making ice for the first time be sure to prime the water supply system Air in new plumbing lines can result...

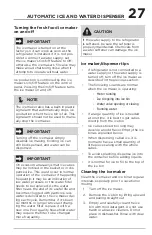
Page 27: ...al arm that automatically stops ice production when the ice bin is full This signal arm should not be used to manu ally stop the ice maker Ice production is controlled by the ice maker s On Off feature on the control panel Pressing the On Off feature turns the ice maker on and off AUTOMATIC ICE AND WATER DISPENSER Turning the fresh food ice maker on and off Ice maker dispenser tips If refrigerator...

Page 28: ...ning the ice maker on and off Press power button to turn Ice Maker on button should be illuminated 28 AUTOMATIC ICE AND WATER DISPENSER 4 Allow the ice bin to dry completely before replacing in the freezer 5 Replace the ice bin Turn the ice maker on Remove and empty the ice bin if An extended power failure one hour or longer causes ice cubes in the ice bin to melt and refreeze together after power...

Page 29: ...al or Quick Freeze Gallery Function Your refrigerator is equipped with a Freeze Boost Quick Freeze Function for freezing food at a faster rate but it can also increase ice production This function terminates automatically after 12 hours This function affects only the ice maker in the freezer IMPORTANT When removing or replacing the ice bin ensure that the ice bin is fully seated before closing the...

Page 30: ...lf 2 Lift the right side edge of shelf upwards and push to the left towards ice maker Flip Shelf Drawers The refrigerator includes a variety of storage drawers CrispSeal Drawer Crisper drawers are designed for storing fruits vegetables and other fresh produce Crispers have an auto humidity control on the side of each crisper under the humidity control cover Frigidaire Gallery Models To remove the ...

Page 31: ...ommend replac ing the auto humidity membrane unless it becomes damaged or ruined If the membrane becomes soiled it can be washed with soap and water Ensure membrane is dry before replacing in unit Frigidaire Professional Models To remove the auto humidity control membrane for cleaning 1 Reach to back of humidity control cover 2 Place fingers between the humidity control and the back wall pull up o...

Page 32: ...prevent any unwanted use To change the drawer s settings it first needs to be unlocked To unlock press and hold the UNLOCK icon for 3 seconds It will automatically lock after 10 seconds without any interaction NOTE It can be difficult to pull out the collapsible bin Some force may be required 1 2 3 4 5 6 Freezer 2 To change the drawer temperature when in the freezer temp setting use the control pa...

Page 33: ...ANT There are wheels on the bottom of the drawer Make sure all wheels are aligned on their respective tracks for proper function If drawer is not aligned properly it will cause problems with the door operation Adjustable Door Bins To move door bin side to side 4 Tilt bin up so the back of the bin is off the door but the hook is still engaged 5 Slide bin along rail to desired position 6 Lower bin b...

Page 34: ...ior to grocery shopping activate Quick Freeze Freeze Boost so newly purchased food designated for the freezer will be preserved as quickly as possible Activating Quick Freeze Freeze Boost also will help the freezer more efficiently maintain the selected temperature after placing new purchases with pre existing frozen foods Avoid adding too much warm food to the freezer at one time This overloads t...

Page 35: ... Ice maker fan water valve activation and refrigerant gas fluid may create sounds from its operation E Electronic control automatic defrost control These parts can produce a snapping or clicking sound when turning the cooling system on and off F Condenser fan Sounds of air being forced through the condenser may be heard G Compressor Modern high efficiency compressors run much faster than older mod...

Page 36: ...ress and hold Air Filter on the display for 3 seconds Status will reset to GOOD Ordering Replacement Water Filters Order replacement filters online at www frigidaire com store by calling 1 800 374 4432 or through the dealer from which the refrigerator was purchased Frigidaire recommends replacing filters at least once every six months Here is the product number to request when ordering PureSource ...

Page 37: ...housing and discard it 4 Unpackage the new filter cartridge Slide it into the filter housing as far as it will go with the grip end vertical The PureSource Ultra IITM ice and water filter system is tested and certified to NSF ANSI Standards 43 53 and 401 for the reduction of claims specified on the performance data sheet More about the Advanced Water Filter FILTER REPLACEMENT 5 Push lightly inward...

Page 38: ...cal power cord from the wall outlet before cleaning Remove adhesive labels by hand Do not use razor blades or other sharp instruments which can scratch the appliance surface Do not remove the serial plate Removal of the serial plate voids the warranty Before moving refrigerator raise the anti tip brackets so the rollers will work correctly This will prevent the floor from being damaged Refer to th...

Page 39: ...mmonia bleach or alcohol to clean handles Use a soft cloth to clean smooth handles or exterior DO NOT use a dry cloth to clean smooth doors Exterior Handles Stainless Steel Models Only Soap and water Stainless Steel Cleaners Never use CHLORIDE or cleaners with bleach to clean stainless steel Clean stainless steel front and handles with non abrasive soapy water and a dishcloth Rinse with clean wate...

Page 40: ...level in the bin at the appropriate time Turn on ice maker Fresh Food Ice Maker press and hold the ice maker button on the side user interface for 3 seconds The LED indicator will illuminate to indicate that the ice maker is ON Freezer Ice Maker press and release the power button on the front of the ice maker The LED indicator will illuminate to indicate that the ice maker is ON Connect the unit t...

Page 41: ...e Clean valve Replace valve if necessary Press FREEZE BOOST to temporarily increase ice production rate Freezer ice maker only Set freezer control to colder setting to improve performance of the ice maker freezer ice maker Allow 24 hours for temperature to stabilize Have someone turn up the cut off and cut on pressure on the water pump system well systems only It is normal for a reverse osmosis sy...

Page 42: ...nser will not dispense water Water filter not seated properly Water filter is clogged Household water line valve is not open Remove and reinstall the water filter For Puresource Ultra II be sure to rotate it to the right until it stops and the grip end is vertical Replace filter cartridge Be sure to rotate it to the right until it stops and the grip end is vertical Open household water line valve ...

Page 43: ...the door to close See Flipper Mullion section Drawers are difficult to move Food is touching shelf on top of drawer Track that drawers slide on is dirty Remove top layer of items in drawer Ensure drawer is properly installed on track Clean drawer rollers and track See Care Cleaning Running of Refrigerator Compressor does not run Refrigerator is in defrost cycle Plug at electrical outlet is disconn...

Page 44: ... additional condensation or drying out the air inside the crisper drawer works with various types of produce If excess moisture is noticed check to verify humidity membrane is not damaged and replace as necessary Water collects in bottom of drawer Washed vegetables and fruit drain while in the drawer Dry items before putting them in the drawer Water collecting in bottom of drawer is normal Water M...

Page 45: ...obtained from persons other than authorized service companies or external causes such as abuse misuse inadequate power supply accidents fires or acts of God DISCLAIMER OF IMPLIED WARRANTIES LIMITATION OF REMEDIES CUSTOMER S SOLE AND EXCLUSIVE REMEDY UNDER THIS LIMITED WARRANTY SHALL BE PRODUCT REPAIR OR REPLACEMENT AS PROVIDED HEREIN CLAIMS BASED ON IMPLIED WARRANTIES INCLUDING WARRANTIES OF MERCH...

Page 46: ...aire com 1 800 374 4432 Frigidaire ca 1 800 265 8352 owner support accessories service Our home is your home Visit us if you need help with any of these things registration See your registration card for more information ...

Reviews: