background image

14

SOLUTIONS TO COMMON PROBLEMS

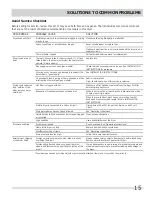
Common Drying Problems

Many drying problems involve poor cleaning results, poor soil and stain removal, residues of lint and scum, and fabric 

damage. For satisfactory drying results, follow these suggestions provided by The Soap and Detergent Association.

PROBLEM

POSSIBLE CAUSES

SOLUTIONS

PREVENTIVE MEASURES

Greasy, oily 

stains

•  Fabric softener sheet.

•  Rub fabric softener stains with 

bar soap. Rinse and rewash.

•  Add a few bath towels to small loads 

for proper tumbling.

•  Some “silk-like” fabrics should be air 

dried.

•  Use proper drying temperature.

•  Place fabric softener sheet on top of 

load before starting the dryer.

Lint

• Overloading.

•  Overdrying causes static 

electricity.

•  Lint screen not clean when 

cycle began.

•  Lint is attached to “pills.”

•  Reduce load size and rewash 

using liquid fabric softener in the 

fi nal rinse.

•  Or, add a fabric softener sheet 

and tumble without heat.

•  Use lint brush or roller to remove 

lint.

•  Do not overload dryer.

•  Use fabric softener in washer or dryer 

to reduce static electricity.

•  Remove items when they are slightly 

damp to avoid overdrying.

•  Check that lint fi lter is clean and in 

place.

Pilling

(Fibers break 

off, ball up and 

cling to fabric.)

•  Overdrying.

•  Use a lint brush or shaver to 

remove pills.

•  Use fabric softener to lubricate fi bers. 

•  When ironing, use spray starch or 

fabric fi nish on collars and cuffs.

•  Turn items inside out to reduce abra-

sion.

Shrinking

•  Temperature too high.

• Overdrying.

•  Irreversible condition.

•  Follow fabric care label directions.

•  If shrinking is a concern, check load 

often.

•  Remove items while slightly damp and 

hang or lay fl at to complete drying.

•  Block knits into shape.

Wrinkling

• Overloading.

•  Leaving items in dryer after 

cycle ends.

•  Reduce load size and tumble at 

medium or low heat for 5-10 

minutes.

•  Remove items immediately. Hang 

or fold.

•  Do not overload dryer.

•  Remove items as soon as cycle ends.

Summary of Contents for Affinity FAHE4044M W?

Page 1: ... 20 quieter operation Express Select Controls Easily select options with the touch of a button Bright Interior Light ENERGY STAR Available in Classic White W frigidaire com 14 Wash Cycles 3 4 Cu Ft D O E Fits More Washer Our new design lets you wash more in one load WaterFall Wash Technology with Immersion Care Action WaterFall Wash Technology thoroughly soaks the entire load while Immersion Care ...

Page 2: ...erature Selections Water Levels Spin Speed Selections Soil Level Selections Energy Saver Option Optional Accessories Mobile Home Installation Kit Drain Hose Extension Kit Certifications ENERGY STAR Specifications Power Supply Connection Location Water Inlet Connection Location Voltage Rating Connected Load kW Rating 120 Volts1 Watts 120 Volts Amps 120 Volts Minimum Circuit Required Amps Shipping W...

Page 3: ...ipping water or outdoor weather conditions or where gasoline or other flammables including automobiles are kept or stored Floor MUST be solid with 1 maximum slope To minimize vibration or movement reinforcement of floor may be necessary Do NOT install on carpeted surface Leveling legs supplied to level unit properly and reduce excessive noise and vibration H C water faucets MUST be installed withi...

Page 4: ...re ca Canada 1 800 265 8352 All about the Use Care of your Dryer Important Safety Instructions 2 4 Operating Instructions 5 12 Care and Cleaning 13 Solutions to Common Problems 14 15 Warranty 16 Français 17 Español 33 TABLE OF CONTENTS 137410200A 1111 ...

Page 5: ... not try to light any appliance Do not touch any electrical switch do not use any phone in your building Clear the room building or area of all occu pants Immediately call your gas supplier from a neighbor s phone Follow the gas supplier s instructions If you cannot reach your gas supplier call the fire department Installation and service must be performed by a qualified installer service agency o...

Page 6: ...ted can under certain circumstances produce fire by spontaneous combustion Clean the lint screen before or after each load The in terior of the dryer lint screen housing and exhaust duct should be cleaned approximately every 18 months by qualified service personnel An excessive amount of lint build up in these areas could result in inefficient drying and possible fire See Care and Cleaning Do not ...

Page 7: ... electrical supply before attempting any service or cleaning Failure to do so can result in electrical shock or injury Do not use any type spray cleanser when cleaning dryer interior Hazardous fumes or electrical shock could occur To prevent injury do not reach into the dryer if the drum is moving Wait until the dryer has stopped completely before reaching into the drum PREVENT INJURY AND DAMAGE T...

Page 8: ...an vary with load size and type C GAS VALVE Gas models only The flow of gas is controlled by electric solenoids During operation there may be a clicking sound as the valve opens and closes to control the gas flow D GAS BURNER Gas models only When the burner is operating there may be sounds generated as the air flow mixes with the gas flame This noise is normal and will only occur when the gas is i...

Page 9: ...ryness level buttons to scroll to the desired settings To select or delete an option press options then while the indicator is blinking press select The indicator will light when the option has been se lected It will no longer be lighted when the option has been deleted Operating Your Dryer continued 5 Start the cycle Close the dryer door The dryer will not operate with the door open Push in or tu...

Page 10: ...ad Moisture sensing bars at the back of the dryer drum sense the moisture level of the load as it tumbles through the heated air With Auto Dry cycles the load will automatically be dried at the selected temperature to the desired dryness level Auto Dry cycles save time and energy and protect fabrics The estimated drying time will be displayed for about 5 minutes Then the outside of the display wil...

Page 11: ...ge are not recommended for this cycle Timed Dry Cycles refresh Select refresh to help remove wrinkles from clean and dry items that were not taken from the dryer at the end of the cycle have been stored in crowded closets or drawers or unpacked from luggage following a trip It provides approximately 10 minutes of tumbling followed by a 5 minute cool down period quick dry Select this timed cycle to...

Page 12: ...ness levels are available with every cycle If a dryness level is not appropriate for the cycle it cannot be selected The dryness level selected for the cycle will be remembered and recalled each time that cycle is selected in the future Select the normal dry level for most Auto Dry cycles Occasionally a load may seem too damp or over dried at the end of the cycle To increase drying time for simila...

Page 13: ...matic moisture sensors and heat is radically reduced or eliminated cycle time will be lengthened As a result depending on moisture content of load overall energy consumption decreases delay start Press delay start to select a drying time convenient to your schedule or during off peak energy hours The delay time selected will be displayed and begin counting down when you push in the cycle selector ...

Page 14: ...timed dry 90 temp sanitize 9 9 9 9 9 9 high 9 9 9 9 9 9 9 9 9 9 9 9 normal 9 9 9 9 9 9 9 9 9 9 low 9 9 9 9 9 air dry 9 9 9 dryness level max 9 9 9 9 high 9 9 9 9 9 9 9 9 9 normal 9 9 9 9 9 9 9 low 9 9 9 9 damp 9 9 options energy saver 9 9 9 wrinkle release 9 9 9 9 9 9 9 9 9 9 9 shrink guard 9 9 9 chime 9 9 9 9 9 9 9 9 9 9 9 9 9 line dry 9 9 9 delay start 9 9 9 9 9 9 9 9 9 9 9 9 9 9 Available selec...

Page 15: ... or stop the dryer press options and select at the same time and hold for 10 seconds If you attempt to activate the dryer while it is locked the display will flash and error beeps will sound To remove the control lock press options and select again Estimated Time Remaining The initial drying time will be displayed for about 5 minutes after the start of a cycle Then in auto dry cycles the out side ...

Page 16: ...and dust over time An excessive amount of lint build up could result in inefficient drying and possible fire hazard OUTSIDE Clean the cabinet with mild soap and water Never use harsh gritty or abrasive cleansers If the cabinet becomes stained clean with diluted chlo rine bleach 1 part bleach to 8 parts water Rinse several times with clear water Remove glue residue from tape or labels with a mixtur...

Page 17: ...nal rinse Or add a fabric softener sheet and tumble without heat Use lint brush or roller to remove lint Do not overload dryer Use fabric softener in washer or dryer to reduce static electricity Remove items when they are slightly damp to avoid overdrying Check that lint filter is clean and in place Pilling Fibers break off ball up and cling to fabric Overdrying Use a lint brush or shaver to remov...

Page 18: ...ter is clogged with lint Make sure all lint has been removed from the dryer lint filter before starting each cycle Exhaust duct requirements have not been met Exhaust duct must be at least 4 inches in diameter and made of rigid or semi rigid metal When in place the duct must have no more than four 90 bends and must not exceed length listed in INSTALLATION INSTRUCTIONS Electric dryer is connected t...

Page 19: ...service companies use of parts other than genuine Electrolux parts or parts obtained from persons other than authorized service companies or external causes such as abuse misuse inadequate power supply accidents fires or acts of God DISCLAIMER OF IMPLIED WARRANTIES LIMITATION OF REMEDIES CUSTOMER S SOLE AND EXCLUSIVE REMEDY UNDER THIS LIMITED WARRANTY SHALL BE PRODUCT REPAIR OR REPLACEMENT AS PROV...

Reviews: