7
Be sure to wear gloves while reversing the door assembly.
You will need a #2 square head drive screwdriver, a Phillips head
screwdriver and pliers.
1.
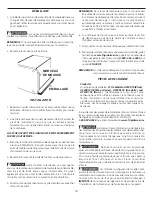
Open the dryer door.
2.
Remove the two screws that secure the door hinge to the front panel.
Remove the bottom screw first. Support the door assembly
firmly before removing the top screw.
3.
Hold the door near the top and bottom and lift to remove the door.
4.
Place door assembly face down on a padded, flat surface.
5.
Pull out the two round plugs and slide the rectangular plug up and out
of the front panel. Use care to avoid scratching the surface or damaging
the plugs. Reinstall the plugs in Step 9.
6.
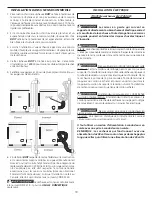
Remove the five longer screws (1 through 5) and the two shorter
screws (6 and 7) that attach the inner door to the outer door.
Do not
remove any other screws at this time.
Separate the inner door
from the outer door.
Remove bottom
screw first
Round plug
Round plug
Rectangular
plug
6
7
7.
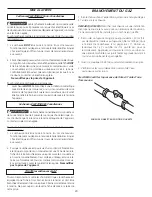
Remove the two hinge attachment screws, one square plug, two
round plugs and one metal strike from the inner door.
8.
Rotate the hinge and reattach it to the opposite side of the inner door.
9.
Dispose of the old metal strike and install the new strike (included in
the literature pack) in the opposite side of the inner door. Reinstall the
round plugs and square plug in the holes left by the hinge and hinge
screws.
10.
Remove the hinge cutout plug. Rotate it and install it on the opposite
side of the outer door.
11.
Reattach the inner door to the outer door using the seven screws
removed in Step 6.
12.
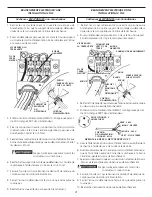
Holding the door at the top and bottom, insert the hinge post in the “T”
slot in the front panel and lower to align the screw holes. While
supporting the door, install the two screws removed in Step 2. Install
the top screw first.
13.
Close the door.
Hinge
cutout
plug
Hinge
attachment
screw
Square
plug
Hinge
attachment
screw
Round
plug
Metal
strike
Round
plug
"T"
Slot
Hinge
Post
DRYER DOOR REVERSAL INSTRUCTIONS


