background image

TIGHTEN
LOCK NUTS


INSTALLATION (CON'T)

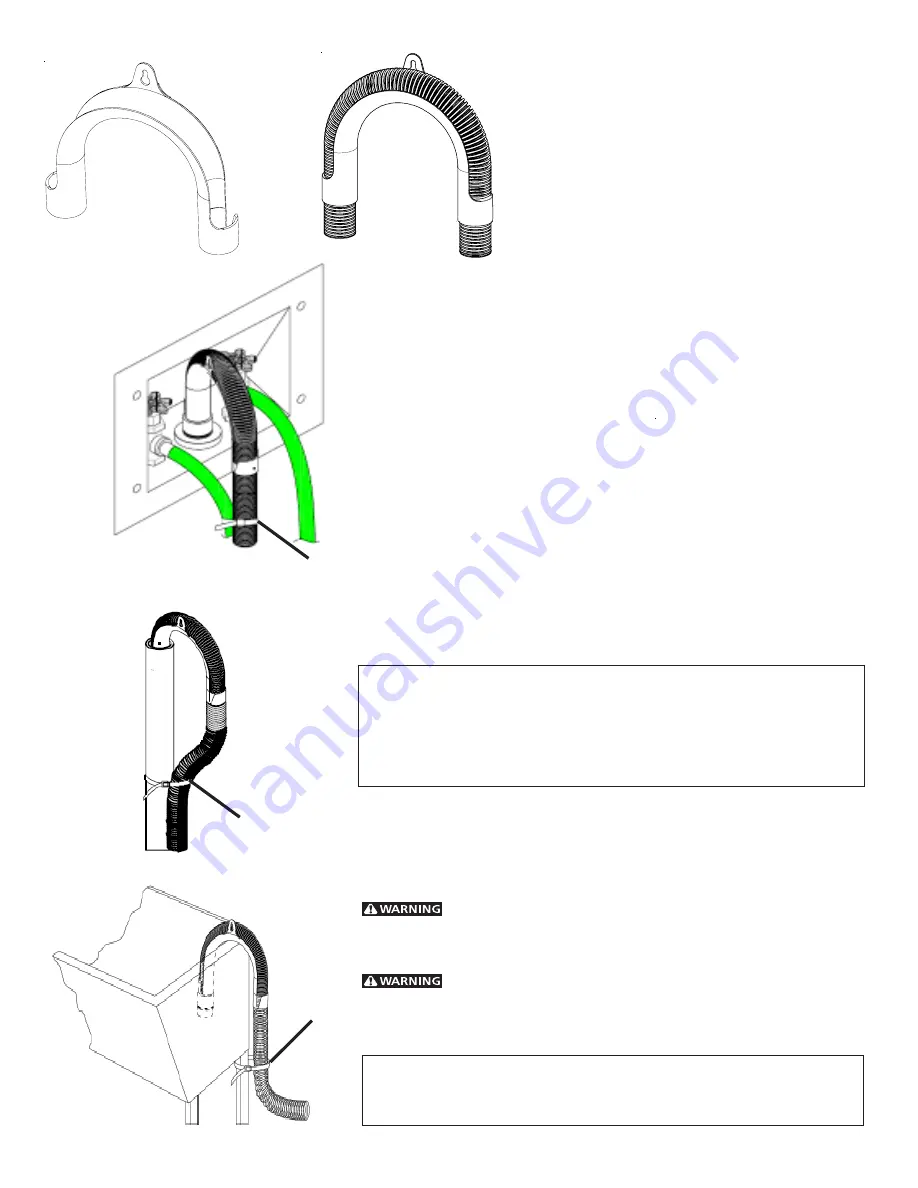
5.   Attach drain hose hanger (shipped in washer tub) to

drain hose.

6.

Place the hook end of the drain hose in the drain
opening. Secure the drain hose with the cable tie
(provided in the enclosure package) to the standpipe,
inlet hose, laundry tub, etc. so the hose does not pull
out from the force of the water.

7.

Plug the power cord into a grounded outlet.

NOTE:

Check to ensure the power is off at a circuit breaker/fuse box before
plugging the power cord into an outlet.

8.

Turn on the power at a circuit breaker/fuse box.

9.

Read the Operating Instructions and Owner’s Guide provided with the washer.
They contain valuable and helpful information that will save you time and
money.

10. Run the washer through a complete cycle. Check for water leaks and proper

operation.

11. If your washer does not operate, please review the “Avoid Service Checklist”

in your Owner’s Guide before calling for service.

12. Place these instructions in a location near the washer for future reference.

NOTE:

A wiring diagram and technical data sheet are located in an envelope
attached to the left hand side panel on the inside of the washer.

Pedestal

A pedestal accessory,

Model No.


APWD15W (White),  APWD15GB (Glacier

Blue), APWD15P (Platinum) and APWD15E (Black),

 specifically designed

for this washer may be used when elevating the washer for ease of use.
Failure to use accessories certified by the manufacturer could result in
personal injury, property damage or damage to the washer.

                                  REPLACEMENT PARTS

If replacements parts are needed for your washer, contact the source where you
purchased your washer, call 1-800-944-9044, or visit our website,
www.frigidaire.com, for the Frigidaire Company Authorized Parts Distributor
nearest you.

 Destroy the carton and plastic bags after the washer is unpacked.

Children might use them for play. Cartons covered with rugs, bedspreads, or
plastic sheets can become airtight chambers causing suffocation. Place all materials
in a garbage container or make materials inaccessible to children.

 The instructions in this manual and all other literature included with

this washer are not meant to cover every possible condition and situation that
may occur. Good safe practice and caution 

MUST

 be applied when installing,

operating and maintaining any appliance.

Maximum benefits and enjoyment are achieved when all the Safety and
Operating instructions are understood and practiced as a routine with your
laundering tasks.

Cable Tie

Cable Tie

Cable Tie

Summary of Contents for ATF6700FE - AffinityTM 3.5 cu. Ft. I.E.C. Capacity Washera

Page 1: ...on Of Your Washer 4 Unpacking 4 5 Installation 5 6 Replacement Parts 6 Printed in U S A P N 134965600 0708 For your safety the information in this manual must be followed to minimize the risk of fire or explosion or to prevent property damage personal injury or loss of life Do not store or use gasoline or other flammable vapors and liquid in the vicinity of this or any other appliance WHAT TO DO I...

Page 2: ... washer is equipped with a power supply cord having an equipment grounding conductor and a grounding plug the plug MUST be plugged into an appropriate copper wired receptacle that is properly installed and grounded in accordance with all local codes and ordinances or in the 24 in 61 cm Min 96 in 244 cm Max BACK absence of local codes with the National Electrical Codes ANSI NFPA 70 latest edition I...

Page 3: ...hes cm inches cm inches cm inches cm SIDE BACK NOTE For pedestal installations see additional installation instructions included with the pedestal For stacking installations see additional installtion instructions included with the stacking kit For under counter installations no special top is required 27 68 58 2 6 35 33 85 09 8 21 59 6 17 15 23 58 42 27 68 58 ...

Page 4: ...lope of 1 2 in per foot 1 27 cm per 30 5 cm To ensure vibration or movement does not occur reinforcement of the floor may be necessary IMPORTANT MINIMUM INSTALLATION CLEARANCES When installed in alcove or closet Sides Rear 0 in 0 cm Top 0 in 0 cm When installed in closet Front 1 in 2 54 cm Closet door ventilation required 2 louvered openings each 60 in2 387 cm2 3 in 7 6 cm from top and bottom of d...

Page 5: ...erature pack located in the drum and install them in the holes vacated by the packaging spacers NOTE If the washer is to be transported at a later date the shipping support hardware must be reinstalled to prevent shipping damage Washer Connections 1 Run some water from the hot and cold faucets to flush the water lines and remove particles that might clog up the water valve screens 2 Remove the inl...

Page 6: ...the washer Pedestal Apedestalaccessory ModelNo APWD15W White APWD15GB Glacier Blue APWD15P Platinum andAPWD15E Black specificallydesigned for this washer may be used when elevating the washer for ease of use Failure to use accessories certified by the manufacturer could result in personal injury property damage or damage to the washer REPLACEMENT PARTS If replacements parts are needed for your was...

Page 7: ...ant de la laveuse bas de la laveuse et serrer solidement avec une clé Piédestal Un accessoire de piédestal N de Modèle APWD15 Blanc APWD15P Graphite APWD15GB Bleu Glacier et APWD15E Noir a spécifiquement conçu pour cette laveuse peut être utilisé en élevant la laveuse pour la facilité d utilisation Le manque d utiliser des accessoires certifiés par le fabricant a pu avoir comme conséquence des ble...

Page 8: ...ES quatre jambes Gardez la prolonga tion de mise à niveau de jambe à un minimum pour la meilleure exécution de la laveuse 2 Pour des installations de piédestal Voir les instructions d installation additionnelles incluses avec le piédestal Raccordements De Laveuse 1 Ouvrir les robinets d eau chaude et d eau froide de façon à nettoyer la canalisation et à éliminer toute particule qui pourrait engorg...

Page 9: ...um de 1 27 cm par 30 5 cm 1 2 po par pied Pour éviter toute vibration ou tout mouvement il peut être nécessaire de renforcer le plancher IMPORTANT DÉGAGEMENTSMINIMAUXPOURL INSTALLATION Installation en alcôve ou armoire Côtés Arrière 0 cm 0 po Dessus 0 cm 0 po Installation en armoire Avant 2 54 cm 1 po Ventilation requise dans la porte du placard 2 ouvertures chacune 2 volets de 387 cm2 60 po2 chac...

Page 10: ...le piédestal NOTE Pour les installations de superposition Voir les instructions d installation supplémentaires incluses avec le kit de superposition NOTE Pour les Pour des installations d undercounter aucun dessus spécial n est exigé DIMENSIONS DE L EMPLACEMENT 23 60 33 24 60 96 22 55 88 25 65 09 5 8 28 71 76 1 4 2 6 67 5 8 3 9 21 5 8 27 68 58 2 6 35 33 85 09 8 21 59 6 17 15 23 58 42 27 68 58 Côté...

Page 11: ...isponinlrauService des pièces Imprimé aux États Unis 24 in 61 cm Min 96 in 244 cm Max BACK ARRIÈRE 2 Puisque cette laveuse est pourvue d un cordon d alimentationélectriquecomportantunconducteur et une fiche de terre la fiche DOIT être branchée dans une prise murale à conducteur en cuivre conven ablement raccordée au réseau et mise à la terreconformémentàtouslescodesetordonnances locaux ou s il n e...

Page 12: ...oucher aucun commutateur électrique ne pas utiliser le téléphone dans l immeuble Faire sortir tous les occupants de la pièce de l immeuble ou de la zone avoisinante Appleler la comgagnie de gaz immédiatement en utilisant le téléphone d un voisin Suivre les instructions de la compagnie de gaz S il est impossible de joindre la compagnie de gaz appeler les pompiers L installation et les réparations d...

Reviews: