


2
Before beginning installation, carefully read
these instructions. This will simplify the
installation and ensure the washer is
installed correctly and safely. Leave these
instructions near the washer after
installation for future reference.
NOTE: The electrical service to the washer
must conform with local codes and
ordinances and the latest edition of the
National Electrical Code, ANSI/NFPA 70.
Important Safety Instructions..........................................3
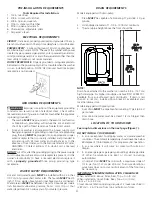
Pre-Installation Requirements.......................................4
Electrical Requirements.................................................4
Grounding Requirements..............................................4
Water Supply Requirements..........................................4
Drain Requirements........................................................4
Location Of Your Washer...............................................4
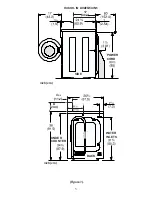
Rough-In Dimensions....................................................5
Record Coin Box
Key Number__________________________________________
Key number is on key and/or coin box.
You can be killed or seriously injured if you don't immediately follow instructions.
You can be killed or seriously injured if you don't follow instructions.
Product Record
For Frigidaire warranty information or to contact a Frigidaire
Service Center, call
1-866-738-1640
If you need SERVICE or PARTS for your Frigidaire coin-
operated dryer:
be ready to give the model number, serial
number and date of purchase. Record below.
Model number
________________________________________
Serial number
_________________________________________
Purchase date
_________________________________________
For your safety the information in this manual must be followed to minimize the risk of fire or explosion or to prevent
property damage, personal injury or loss of life.
- Do not store or use gasoline or other flammable vapors and liquid in the vicinity of this or any other appliance.
- WHAT TO DO IF YOU SMELL GAS
·
Do not try to light any appliance.
·
Do not touch any electrical switch; do not use any phone in your building.
·
Clear the room, building or area of all occupants.
·
Immediately call your gas supplier from a neighbor’s phone. Follow the gas suppliers instructions.
·
If you cannot reach your gas supplier, call the fire department.
Installation and service must be performed by a qualified installer, service agency or the gas supplier.
WASHER SAFETY
Your safety and the safety of others is very important. We have provided many important safety messages in the Installation
Instructions/Use & Care Guide and on your appliance. Always read and obey all safety messages.
This is the safety alert symbol. This symbol alerts you to hazards that can kill or hurt you or others. All safety messages will be
preceded by the safety alert symbol and the word "DANGER" or "WARNING". These words mean:
All safety messages will identify the hazard, tell you how to reduce the chance of injury, and tell you what can happen if the
instructions are not followed.
DANGER
TABLE OF CONTENTS
Unpacking.......................................................................6
Installation..................................................................6-7
Coin slide installation................................................7-9
Meter case instructions.................................................9
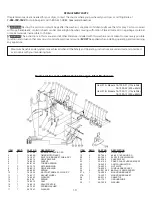
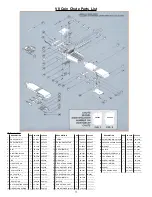
Replacement Parts..........................................................10
Parts lists....................................................................10-11
Warranty.........................................................................12
NOTE:
The instructions appearing in this
INSTALLATION AND SAFETY INSTRUCTIONS
manual are not meant to cover every possible
condition and situation that may occur. Common
sense and caution must be practiced when
installing, operating and maintaining any
appliance.
Your washer is equipped with a door safety interlock. Verify proper operation of interlock system daily, using the following procedure:
1. With the washer door open, insert the required number of coins and press the
START
button.
THE WASHER MUST NOT START!
2. Close the washer door. Press the
START
button again to start the machine. Attempt to open the door, without exerting excessive
force.
THE DOOR MUST NOT OPEN!
IF THE WASHER STARTS WITH THE DOOR OPEN, OR THE DOOR CAN BE OPENED WHILE THE WASHER IS OPERATING, THE
MACHINE MUST IMMEDIATELY BE TAKEN OUT OF SERVICE. DISCONNECT THE POWER CORD, AND MARK THE MACHINE "OUT
OF ORDER", UNTIL THE INTERLOCK SYSTEM IS REPAIRED, AND OPERATES AS DESCRIBED ABOVE.


