background image

5

Operating Instructions

2009 Electrolux Home Products, Inc.

All rights reserved.

Operating Instructions

(continued)

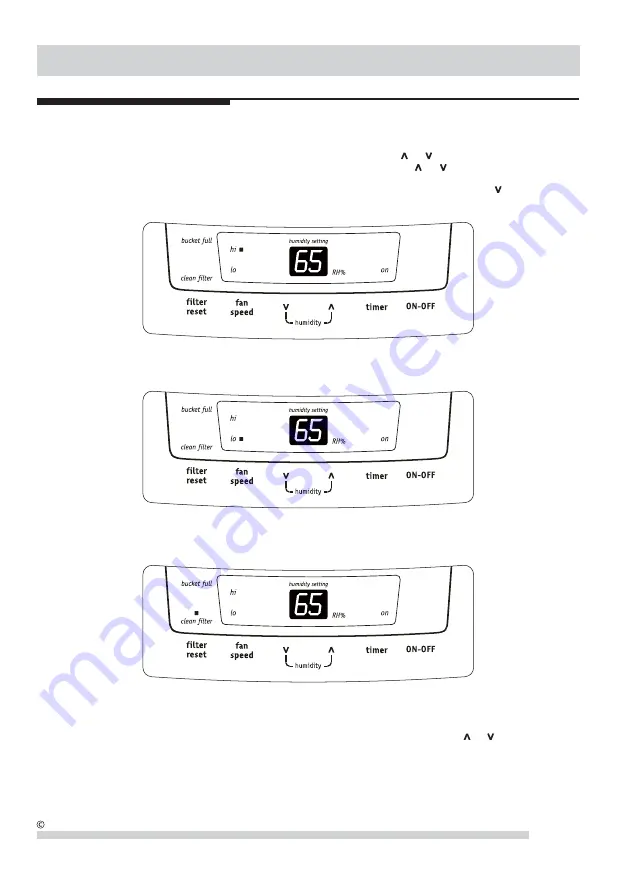
4. You can also use the FAN SPEED button to change the fan speed to HIGH or LOW. The indicator light will show the 

    setting you have selected. A higher fan speed will result in quicker moisture removal.

5. The CLEAN FILTER light will illuminate after 250 hours of operation. At this time refer to the care and cleaning 

    section to remove and clean the filter. Once the filter has been cleaned and replaced, simply press the FILTER button 

    to extinguish the light.

3. After a few days when the Relative Humidity has declined, press the HUMIDITY      or     buttons to choose a value 

    between 35% to 85%, so the room is kept at a comfortable humidity. Pressing the      or     buttons will change the 

    humidity selection in 5% increments. After you have set the desired humidity, the readout will display the actual 

    room humidity. If at any time you want to return to the CONTINUOUS Mode, pressing the HUMIDITY        button 

    will lower the Relative Humidity through the 5% increments until the display reads CO.

6. The TIMER function enables you to either Delay Start or Delay Stop the unit in the choice from 0.5 hour to 24 hours. 

    If the unit is running, then selecting Timer will turn the unit off in the hours that will be set (Delay Stop). If the unit is 

    off, then selecting Timer will turn the unit on in the hours that will be set (Delay Start).

      TIMER setting: First press TIMER button, then adjust timer setting, by tapping or holding the      or     button to 

    change the delay timer at 0.5 hour increments, up to 10 hours, then by 1 hour increments up to 24 hours. The 

    control will count down the time remaining (8,7.5,7, etc.) until the unit either starts or stops. For the Delay Start, the 

    fan speed and humidity maintained will be the same as previous setting. After TIMER setting finishes, pressing TIMER 

    button again at any time will stop the TIMER function. The Delay Start/Stop Feature will work until the unit either 

    starts or stops. Once that happens the above steps have to be repeated.

Summary of Contents for FAD504DWD

Page 1: ...65 8352 All about the Use Care of your Dehumidifier 49 9 3 3 3 3 June 2009 Loc cati ation 3 3 How It Wo Works 3 3 Im Important Safety Inst struc r tio tions ns s 2 Care And Cleaning 8 Storage Bef Bef B ore ore You Call 9 Maj Maj M or or App Applia liance ce nce Li Limit mi ed Warranty 10 8 8 4 8 8 Operating Instr structions ...

Page 2: ...ways grip the plug firmly and pull straight out from the receptacle Electrical Information Do not pinch bend or knot the power cord OTE NO SA DANGER Avoid Serious Injury or Death AFETY PRECAUTIONS SA Do not direct airflow at fireplaces or other heat related sources as this could cause flare ups Do not climb on or place objects on the unit Do not hang objects off the unit Do not place containers wi...

Page 3: ...ls condense or draw moisture from the air and air flows through the top louvers into the room as dry warm air Moisture removed from air is collected in a bucket on the front of the dehumidifier When the unit is started the fan begins to pull moisture laden air across the dehumidifying coils The Compressor circuit has an automatic 3 minute time delayed start if the unit is turned off and on quickly...

Page 4: ...T FULL light is on remove the bucket and re install to reset the float switch NOTE Unit must be upright for one hour prior to operating NOTE 2 To turn the unit on press the ON OFF button The unit will run in the factory setting of CONTINUOUS and high fan speed In the CONTINUOUS mode the unit will only display CO and not the room humidity It is recommended you leave the unit running in the CONTINUO...

Page 5: ...e you want to return to the CONTINUOUS Mode pressing the HUMIDITY button will lower the Relative Humidity through the 5 increments until the display reads CO 6 The TIMER function enables you to either Delay Start or Delay Stop the unit in the choice from 0 5 hour to 24 hours If the unit is running then selecting Timer will turn the unit off in the hours that will be set Delay Stop If the unit is o...

Page 6: ...Codes 1 If the display reads AS or ES a sensor has failed Contact your Authorized Frigidaire Service Center 2 If the display reads EC check the following operating conditions Outlet voltage should be 115V 10 and the surrounding temperature should be with in the range of 41 F to 96 F Unplug the unit and plug it in again under normal operating conditions If the EC code persists contact your Authoriz...

Page 7: ... Remove the bucket as shown in the photographs below and empty the bucket e Replace the empty bucket back into the unit and once seated correctly the unit will start up again f You should hear a click when the bucket is in the correct position Discard water from bucket Water is not potable and cannot be used for drinking WARNING If the bucket full light does not extinguish check that the float is ...

Page 8: ...e and a drain nearby to discharge the water into b Unscrew the drain cap on the back side of the unit fig 1 c Insert the female threaded end of the hose onto the drain connector of the unit fig 2 d Screw the garden hose onto the threaded portion of the drain connector fig 3 e Make sure the hose is secure so there are no leaks f Direct the hose toward the drain making sure that there are no kinks t...

Page 9: ...air to become dry Dehumidifier does not have sufficient clearance to operate Air flow to front grill is blocked See Selecting a Location Room temperature is too low Unit will not operate satisfactorily if the room temperature is below 41 F 5 C See Operating Conditions Refer to causes under DEHUMlDIFIER RUNS TOO MUCH FROST APPEARS ON COILS ABOVE BUCKET Dehumidifier has been turned on recently This ...

Page 10: ...IS WRITTEN LIMITED WARRANTY OR ANY IMPLIED WARRANTY SOME STATES AND PROVINCES DO NOT ALLOW THE EXCLUSION OR LIMITATION OF INCIDENTAL OR CONSE QUENTIAL DAMAGES OR LIMITATIONS ON THE DURATION OF IMPLIED WARRANTIES SO THESE LIMITATIONS OR EXCLUSIONS MAY NOT APPLY TO YOU THIS WRITTEN WARRANTY GIVES YOU SPECIFIC LEGAL RIGHTS YOU MAY ALSO HAVE OTHER RIGHTS THAT VARY FROM STATE TO STATE If You Need Servi...

Reviews: