background image

20

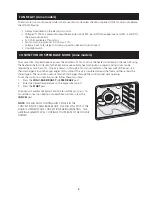
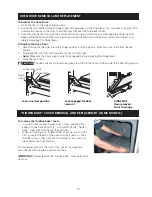
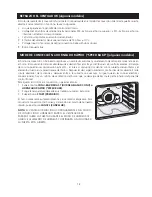
Para retirar la puerta del horno:

1.

Abra la puerta completamente.

2.

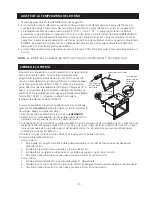
Tire el cierre situado en cada una de las bisagras de ambos lados y colóquelo en las palancas de las bisagras. Tendrá
que aplicar una pequeña presión hacia abajo sobre la puerta para poder retirar el cierre de sus ganchos.

3.

Tome la puerta de cada lado, tire la base de la puerta para arriba y hacia Ud. para  desalojarla de sus soportes.
Siga tirando la base de la puerta hacia Ud, y haciendo un movimiento de rotación de la parte superior hacia la cocina
para desalojar completamente de las bisagras.

Para remplazar la puerta del horno:

1.

Tome la puerta por los lados; coloque los soportes sobre las ranuras de las bisagras. Abra la puerta completamente.

2.

Desaloje el cierre de la palanca de las bisagras de ambos lados.

Nota: 

Asegúrese que los soportes de las bisagras estén completamente en posición antes de liberar las palancas

de las bisagras.

3.

Cierre la puerta del horno.

 La puerta es pesada. Luego de retirarla, colóquela a tierra con la parte interior hacia abajo.

Cierre en posición
normal

Cierre en posición enganchada,
para sacar la puerta

Agujero para la bisagra
puerta quitada del horno

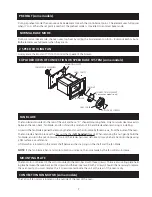
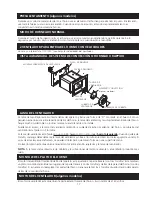
REMOCIÓN Y CAMBIO DE LA CUBIERTA “HIDDEN BAKE”  (ALGUNOS MODELOS)

Para retirar  la cubierta “hidden bake” :

1.

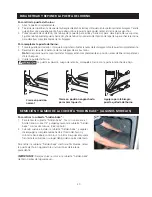
Para retirar la cubierta “hidden bake”, tira con una mano el
borde trasero sobre 1/2“ pulgada y levanta la cubierta “hidden
bake” con las dos manos. (Vea la photo)

2.

Cuándo vuelve a instalar la cubierta “hidden bake”, asegurar
de empugarla completamente hasta el fondo del horno y
colocarla hacia abajo contra los 2 tornillos. Despúes empuje la
frente de la cubierta en su lugar debajo del soporte delantero.

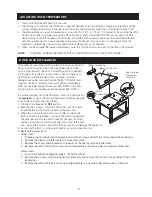
Para retirar la cubierta “hidden bake” del horno fácilmente, retirar
la puerta del horno siguiendo las instrucciónes de la etapa
precedente.

IMPORTANTE: 

Siempre volver a colocar la cubierta “hidden bake”

del horno antes del siguiente uso.

  PARA RETIRAR Y REPONER LA PUERTA DEL HORNO

Summary of Contents for FEB30T7DCB

Page 1: ...fety device 4 USE ONLY REPLACEMENT PARTS SPECIFIED FOR THIS APPLIANCE SUBSTITUTIONS MAY DEFEAT COMPLIANCE WITH SAFETY STANDARDS SET FOR HOME APPLIANCES 5 GROUNDING The standard color coding for safety ground wires is GREEN OR GREEN WITH YELLOW STRIPES Ground leads are not to be used as current carrying conductors IT IS EXTREMELY IMPORTANT THAT THE SERVICE TECHNICIAN REESTABLISH ALL SAFETY GROUNDS ...

Page 2: ... Lower Oven 0 5 6 7 8 9 1 2 3 4 Upper Oven Speed clean Clean Maxx clean Clean Maxx clean Even Cook Convection Ovens Clock Timer On Off Oven light Broil Pre heat Keep warm Bake Conv roast Conv convert Oven light Broil Pre heat Keep warm Bake Conv roast Conv convert Controls START Start time Bake time Clear Off Controls START Start time Bake time Clear Off Conv bake Conv bake Speed clean P R B PM CO...

Page 3: ...seconds per minute Broil element is on 19 seconds per minute Convection roast Bake element is on for 50 seconds per minute Broil element is on for 9 seconds per minute Clean mode Bake element is on for 60 seconds per minute and broil element is off Models with hidden Bake element is on for 20 seconds per minute bake Broil element is on for 40 seconds per minute NOTE SELF CLEANING CYCLE CANNOT BE S...

Page 4: ...L 2 L 1 K8 K1 P8 P25 P31 2 P31 1 P33 4 P18 P11 P10 P9 P1 P24 Lower Conv Fan K15 Lower Cooling Fan K14 Upper Conv Fan K12 Lower Conv Ring K11 Lower Bake K10 Lower Broil K9 P33 2 P33 1 P32 3 P17 P4 P3 P2 OR P34 P32 1 L1 L1 P33 5 OR P19 Upper Cooling Fan K7 Upper Light K6 Lower Light K5 Upper Conv Ring K4 Upper Bake K3 Upper Broil K2 Lower MDL K16 Upper MDL K13 P31 4 P33 7 N Power Board Flash N L 1 P...

Page 5: ...onnect power If oven continues to oveheat when power is reapplied replace EOC Severe overheating may require the entire oven to be replaced should damage be extensive Press Clear or Cancel key Press Clear or Cancel key Disconnect power wait 30 seconds ad reapply power If fault returns upon power up replace EOC Press Clear or Cancel key Replace Relay board Press Clear or Cancel key Verify connectio...

Page 6: ...Door Open Door Closed X X X X X X X X X X NC NO NO NC NO NC NC NO Denotes Top heat Relay will operate in this condition only X X X X X RTD SCALE Temp F Temp C Resistance ohms 32 1 9 0 0 1 1 1000 4 0 75 2 5 23 9 1 4 1091 5 3 250 4 4 121 1 2 4 1453 8 9 350 5 4 176 7 3 0 1654 10 8 450 6 9 232 2 3 8 1852 13 5 550 8 2 287 8 4 6 2047 15 8 650 9 6 343 3 5 3 2237 18 5 900 13 6 482 2 7 6 2697 24 4 ELECTRIC...

Page 7: ...place with a hex nut that has left handed threads When removing this nut gently hold the fan blade and turn the nut clockwise If one of the blades becomes deformed it may be bent back into shape using a flat surface as a reference A flat washer is located on the motor shaft between the snap ring on the shaft and the fan blade NOTE If the fan blade is bent and motor vibrations increase the noise ma...

Page 8: ...ed temperature on the keypad set point 3 Press the START pad The oven will automatically start and the fan will begin to run To cancel the convection baking or speed bake function press the CANCELpad NOTE THE FAN RUNS CONTINUOUSLY WHILE IN THE CONVECTION OR SPEED BAKE MODE THE FAN WILL STOP IF THE DOOR IS OPENED WHILE CONVECTION BAKING ROASTING THE HEATING ELEMENTS WILL CONTINUE TO OPERATE IF THE ...

Page 9: ...pper Oven 1 To have access to the door latch assembly remove the 3 screws under the control panel which are fixing it 2 Remove the electronic plate located on the access plate 3 Remove the access plate located on the upper air channel by removing the screw 4 Replace the motor latch with a new one and reassemble in opposite order and manner of removal Lower Oven 1 Pull out the appliance approximate...

Page 10: ...ock from the hinge lever hooks on both sides Note Make sure the hinge supports are fully engaged before unlocking the hinge levers 3 Close the oven door The door is heavy After removing door lay it flat on the floor with the inside of the door facing down Lock in normal position Lock engaged for door removal HINGE SLOT Door removed from the range Hinge support Hinge lever To remove the hidden bake...

Page 11: ...no pueden ser utilizados como conductores ES MUY IMPORTANTE QUE EL TECNICO ESTABLEZCA LA SEGURIDAD DE LA PUESTA TIERRA ANTES DE TERMINAR EL SERVICIO EL NO HACERLO PUEDE CREAR MUCHO PELIGRO 6 Antes de devolver el aparato al servicio asegúrese que Todas las conexiones electricas estan bien conectadas y aseguradas Todos los cables de tierra deben estar bien asegurados lejos de elementos afilados lejo...

Page 12: ... Oven Speed clean Clean Maxx clean Clean Maxx clean Even Cook Convection Ovens Clock Timer On Off Oven light Broil Pre heat Keep warm Bake Conv roast Conv convert Oven light Broil Pre heat Keep warm Bake Conv roast Conv convert Controls START Start time Bake time Clear Off Controls START Start time Bake time Clear Off Conv bake Conv bake Speed clean P R B PM CONV DELAY CLEAN CONV DELAY CLEAN BROIL...

Page 13: ...o La parrilla se enciende 19 segundos por minuto Doradoporconvección El elemento de hornear se enciende 50 segundos por minuto La parrilla se enciende 9 segundos por minuto Modo de limpieza El elemento de hornear se enciende 60 segundos por minuto y la parrilla se apaga Modelos con horneado oculto El elemento de hornear se enciende 20 segundos porminuto La parrilla se enciende 40 segundos por minu...

Page 14: ...8 P28 9 L 2 L 1 K8 K1 P8 P25 P31 2 P31 1 P33 4 P18 P11 P10 P9 P1 P24 Lower Conv Fan K15 Lower Cooling Fan K14 Upper Conv Fan K12 Lower Conv Ring K11 Lower Bake K10 Lower Broil K9 P33 2 P33 1 P32 3 P17 P4 P3 P2 OR P34 P32 1 L1 L1 P33 5 OR P19 Upper Conv Fan K7 Upper Light K6 Lower Light K5 Upper Conv Ring K4 Upper Bake K3 Upper Broil K2 Lower MDL K16 Upper MDL K13 P31 4 P33 7 N Power Board Flash N ...

Page 15: ...calentamiento extremo necesitaría el remplazo del horno entero si el daño es más importane Pulse el boton CLEAR o CANCEL Pulse el boton CLEAR o CANCEL Desconecte el suministro eléctrico espere 30 segundos y conecte el suministro Si la falla se repite remplace CHE EOC Pulse el boton CLEAR o CANCEL Pulse el boton CLEAR o CANCEL Verificar las conexiones entre los 2 tableros P1 y J1 Pulse el boton CLE...

Page 16: ...IS DE CIRCUITO PARA HORNO SUPERIOR Hornear P3 Conv P4 Interr MotorCierre A Honear Asar Limpiar Abrido Cerrando Cerrado Abriendo Honear Conv X X X X P27 3 P27 7 Cerradura depuerta P27 5 P27 3 COM NO X Asar P2 ELEMENTOS VentConv P33 4 Luz P33 1 Motor Puerta P33 7 P27 3 P27 6 Asando Conv Luz Puerta Abierta Puerta Cerrada X X X X X X X X X X NC NO NO NC NO NC NC NO Denota el calor del elemento superio...

Page 17: ...ndo esta encendido Cuando se alcanza el punto el modo de precalentamiento es convertido a un modo normal de horneo MONTAJE PARA MOTOR DE VENTILADOR PLACA DE MONTAJE CAVIDAD DE HORNO PALA DE VENTILADOR TUERCA DE VENTILADOR ELEMENTO CONVECCIÓN algunos modelos CUBIERTA DE VENTILADOR TORNILLOS DE CUBIERTA La lama del ventilador esta montada detrás del aparato y tiene una forma de D montada en el hueco...

Page 18: ...nga la temperatura deseada en el tablero numérico setpoint 3 Pulse el boton START PRENDIDO El horno comenzará automaticamente y el ventilador empezará Para cancelar la convección del horneo y del asado o el modo de horneado rápido pulse el boton CANCEL CANCELAR NOTA EL VENTILADOR FUNCIONA CONTINUAMENTE EN EL MODO DE CONVECCIÓN O HORNEADO RÁPIDO EL VENTILADOR SE PARARÁ SI ABRA LA PUERTA DURANTE EL ...

Page 19: ... horno 5 Cambio de la traba del motor Hornosuperior 1 Para acceder al conjunto de la traba de la puerta extraiga los 3 tornillos de fijación ubicados debajo del panel de control 2 Extraiga la placa electrónica ubicada en la placa de acceso 3 Extraiga la placa de acceso ubicada en el canal de aire superior quitando el tornillo 4 Cambie la traba del motor por una nueva y vuelva a armar en orden inve...

Page 20: ...as palancas de las bisagras 3 Cierre la puerta del horno La puerta es pesada Luego de retirarla colóquela a tierra con la parte interior hacia abajo Cierre en posición normal Cierre en posición enganchada para sacar la puerta Agujero para la bisagra puerta quitada del horno REMOCIÓN Y CAMBIO DE LA CUBIERTA HIDDEN BAKE ALGUNOS MODELOS Para retirar la cubierta hidden bake 1 Para retirar la cubierta ...

Reviews: