

6
OVEN
TEMPERATURE
SENSOR
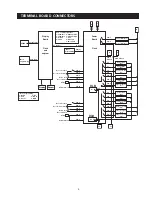
DLB
L2 out
P24
X
X
X
X
X
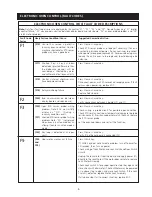
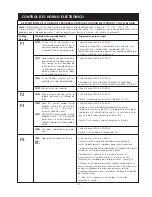
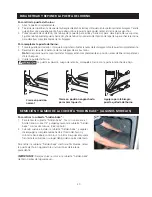
UPPER OVEN CIRCUIT ANALYSIS MATRIX
Bake
P3
Conv.
P4
Lock Motor Switches
A
Bake
Broil
Clean
Unlocked
Locking
Locked
Unlocking
X
X
X
X
P27-3
&
P27-7
Door Switch
P27-5 / P27-3
COM-NO
X
Broil
P2
ELEMENTS
Conv.Fan
P33-4
Light
P33-1
Door Motor
P33-7
P27-3
&
P27-6
Conv. Roast
Light
Door Open
Door Closed
X
X*
X
X*
X
X
X
X
X
X
NC
NO
NO
NC
NO
NC
NC
NO
* Denotes Top heat
Relay will operate in this condition only
DLB
L2 out
P25
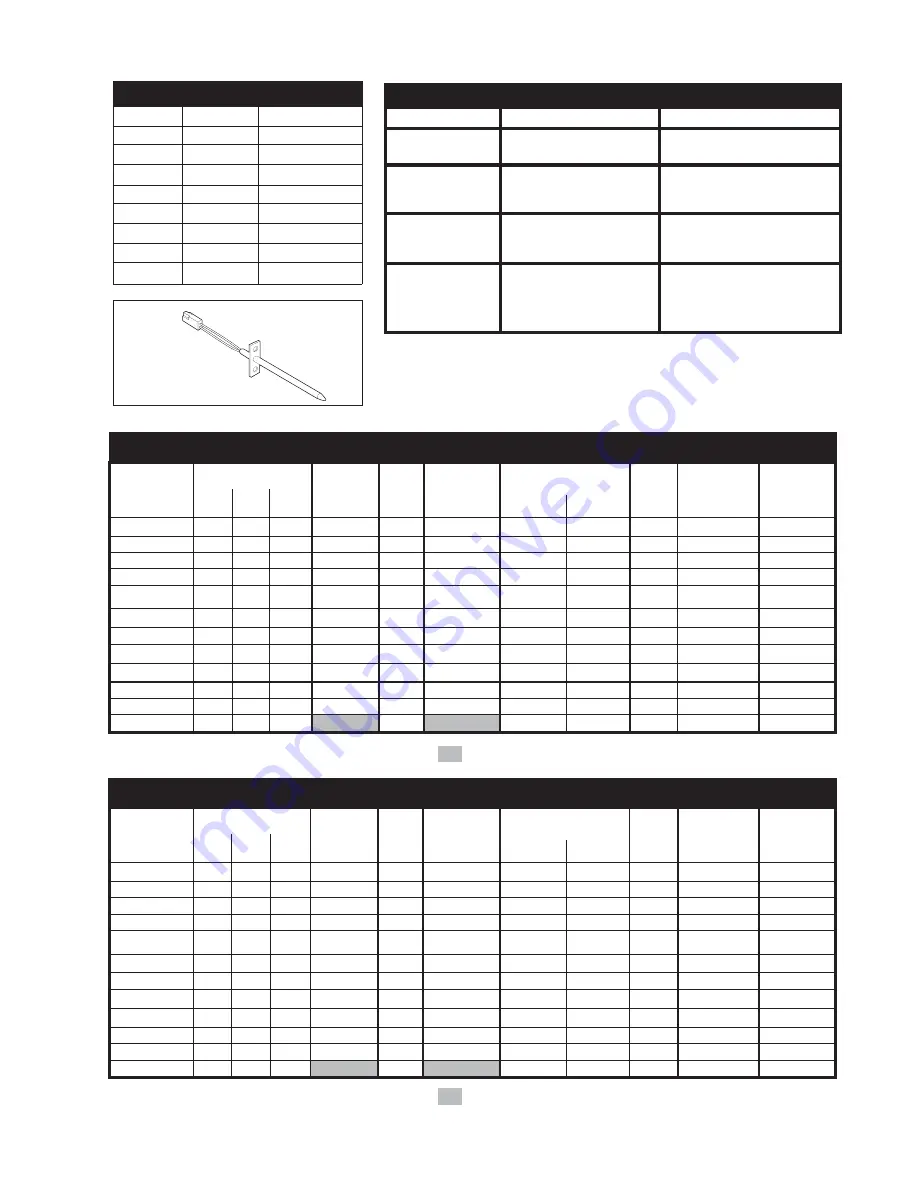
LOWER OVEN CIRCUIT ANALYSIS MATRIX
Bake
P10
Conv.
P11
Lock Motor Switches
A
Bake
Broil
Clean
Unlocked
Locking
Locked
Unlocking
Conv. Bake
X
X
X
X
P28-3
&
P28-7
Door Switch
P28-3 / P28-4
COM-NO
X
Broil
P9
ELEMENTS
Conv.Fan
P31-2
Light
P32-3
Door Motor
P31-4
P28-3
&
P28-6
Conv. Roast
Light
Door Open
Door Closed
X
X*
X
X*
X
X
X
X
X
X
NC
NO
NO
NC
NO
NC
NC
NO
* Denotes Top heat
Relay will operate in this condition only
X
X
X
X
X
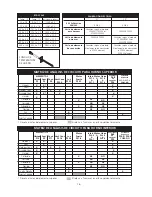
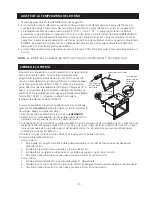
RTD SCALE
Temp. °F
Temp. °C
Resistance (ohms)
32 ± 1.9
0.0 ± 1.1
1000 ± 4.0
75 ± 2.5
23.9 ± 1.4
1091 ± 5.3
250 ± 4.4
121.1 ± 2.4
1453 ± 8.9
350 ± 5.4
176.7 ± 3.0
1654 ± 10.8
450 ± 6.9
232.2 ± 3.8
1852 ± 13.5
550 ± 8.2
287.8 ± 4.6
2047 ± 15.8
650 ± 9.6
343.3 ± 5.3
2237 ± 18.5
900 ± 13.6
482.2 ± 7.6
2697 ± 24.4
ELECTRICAL RATING
27"
30"
KW rating
240/208
8.2/6.2
8.2/6.2
Bake Element
Vary depending on model:
Wattage
2300W/17820W or
3400W/2554W
2700W/2028W
Broil Element
3400W/2554W
Vary depending on model:
Wattage
2750W/2065W or
4000W/3004W
Convection
Vary depending on model:
Vary depending on model:
Element
No convection element
No convection element
Wattage
or 350W element
or 350W element
2500W element
Cooling
Fan
P33-2
Low Speed
Low Speed
Low Speed
Low Speed
Low & High
Speed
Conv. Bake
Cooling
Fan
P31-1
Low Speed
Low Speed
Low Speed
Low Speed
Low & High
Speed


