background image

9

Care & Cleaning

 Never immerse a surface element in water.

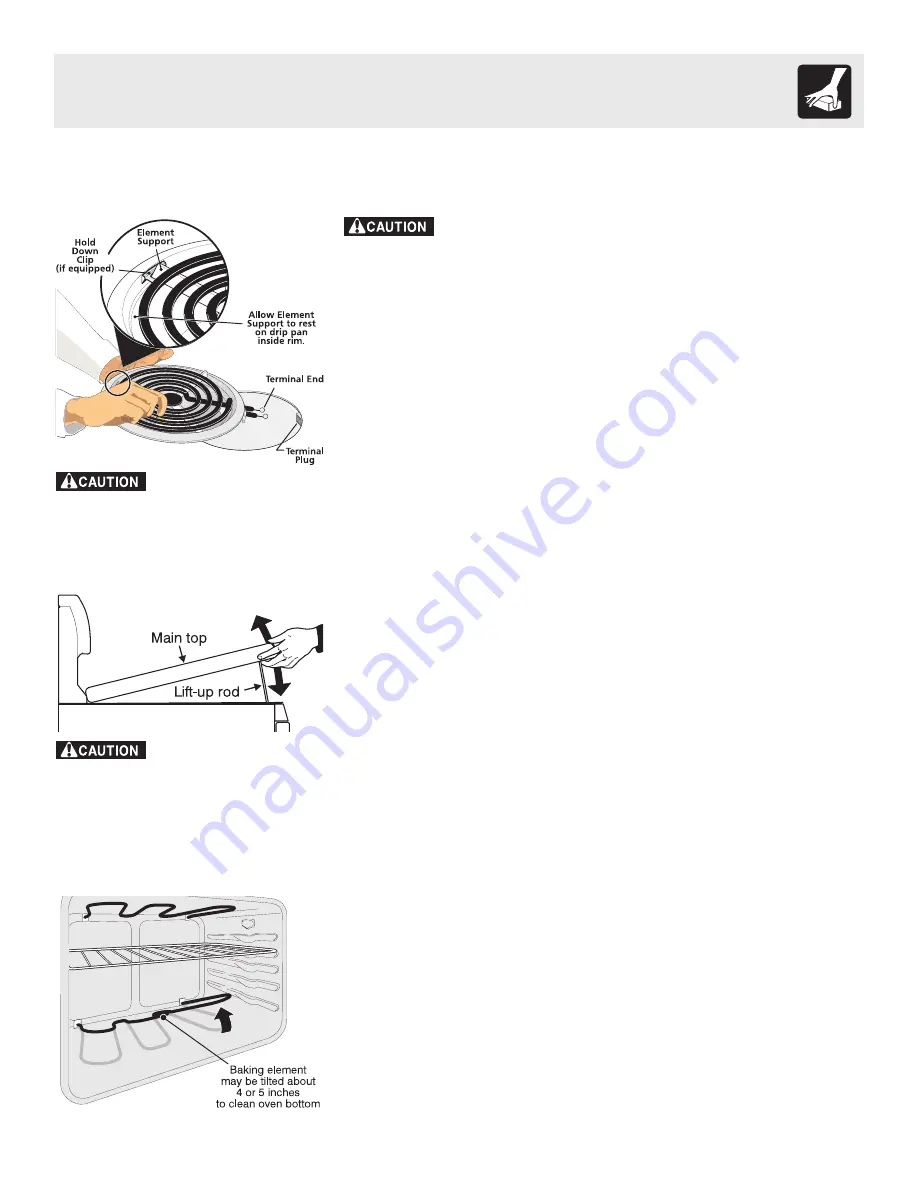
To Remove the Surface Elements and Drip Bowls
1.

Lift the edge of the drip bowl across from the terminal end. Lift the surface
element and drip bowl together
 just enough to clear the cooktop.

2.

While holding the drip bowl and surface element, gently pull the terminal end
out from the terminal plug. If equipped, DO NOT remove the hold down clip from
the drip bowl.

To Clean Drip Bowls
Wash in hot, soapy water or in the dishwasher. Rinse and dry while still warm. Hard
to remove, burned on soil can be removed by soaking the drip bowls for about 20
minutes in a lightly diluted liquid cleanser or a solution of ammonia and water (1/
2 cup ammonia to 1 gallon of water). A nylon scrubber may be used after soaking.
DO NOT use abrasive cleaners or steel wool, as they will scratch the surface.
Always rinse with clean water and polish dry with a soft cloth.

To Replace Drip Bowls and Surface Elements
1.

Slide the terminal end on the element through the opening in the drip bowl.

2.

Align the element support to rest on the rim inside the drip bowl. If your drip
bowl is equipped with a hold down clip, align the element support opposite the
terminal end with the slot in the hold down clip, and snap into place.

3.

After the element is positioned in the drip bowl, line up the terminal end with
the terminal plug as shown.

4.

Hold the surface element and drip bowl together as level as possible and firmly
push the terminal end into the terminal plug. Make sure element terminal is
seated properly into terminal plug. Make sure the surface element is level to
reduce the hazard of pans sliding off the element.

To Raise the Top for Cleaning
1.

Grasp the sides and lift from the front. Lift-up rods will support the top in a
raised position. Only lift the top far enough to allow the support rods to snap
into place.

2.

Clean underneath using a clean cloth and hot, soapy water.

3.

To lower the top, gently push back on each rod to release the notched support.
Hold the range top and slide the lift rods down into the range frame.

Surface Elements and Drip Bowls

 - Surface elements can be unplugged and removed to make cleaning the drip pans

easier. The surface elements clean themselves when they are turned on. Food spilled on a hot element will burn off. Food spilled
on a cool element may be cleaned with a damp cloth—any remaining soil will burn off the next time the element is used.

The bake element is designed to be gently tilted up using your hand from the front
of the bake element. This will allow easier access to the oven bottom for cleaning.
Be careful not to raise the element more than 4 or 5 inches from the resting position.

Cleaning Oven Bottom

 Be sure the range is cool

before removing elements or drip bowls.
Be careful not to bend terminal ends when
replacing elements after cleaning.

 When lowering the lift-up

range top, grasp the sides with finger-tips
only. Be careful not to pinch fingers. DO
NOT  
drop or bend the range top when
raising or lowering. This could damage
the surface.

Summary of Contents for FEF316BS - Electic Coil Range

Page 1: ...p n 316257127 rev A 0512 Questions 1 800 944 9044 United States 1 800 668 4606 Canada ...

Page 2: ...Common sense and caution must be practiced when installing operating and maintaining any appliance Please record your model and serial numbers below for future reference Model Number Serial Number Purchase Date Register Your Product Theself addressedPRODUCT REGISTRATION CARD should be filled in completely signed and returned to Electrolux Home Products Product Registration some models The product ...

Page 3: ...e seriously injured Never Use Your Appliance for Warming or Heating the Room Storage in or on Appliance Flammable materials should not be stored in an oven warmer drawer near surface units or in the storage drawer This includes paper plastic and cloth items such as cookbooks plasticware and towels as well as flammable liquids Do not store explosives such as aerosol cans on or near the range Do Not...

Page 4: ...severe burns Also do not place plastic or heat sensitive items on or near the oven vent These items could melt or ignite Placement of Oven Racks Always place oven racks in desired location while oven is cool If rack must be moved while oven is hot use extreme caution Use potholders and grasp the rack with both hands to reposition Do not let potholders contact the hot heating elements in the oven R...

Page 5: ...et the 3 Button Minute Timer 1 Slide switch C CLOCK TIMER to the TIMER position 0 59 59 MINUTES will appear in the display window The timer can be set for any amount of time from 1 minute to 1 hour and 59 minutes 2 To set a time more than 59 minutes push in and release button A HOUR The display will show the maximum 1 hour and 59 minutes The time can now be adjusted down by pushing in and holding ...

Page 6: ...therangewhenitisinuse Theseitemscouldmeltorignite Potholders towelsorwoodenspoonscouldcatchfireifplaced too close to the surface elements Setting Clock Minute Timer some models To Set the 4 Button Time of Day Clock some models When the range is first plugged in or when the power supply to the range has been interrupted 12 00 will flash in the display window 1 Push 2 Push in and hold or until the c...

Page 7: ...ile oven is still cool For rare meats position the broiler pan closer to the element upper oven rack positions Forwell donefoodssuchaschicken lobstertailsorthickcutsofmeat positionthepanfurtherfromtheelement lower oven rack positions 2 Turn the Oven Control to Broil Most foods can be broiled at the Broil setting To sear rare steaks allow the element to become red hot about 2 minutes before placing...

Page 8: ...ntrol Knobs Painted Control Panels Display areas Cooktop Surface Below Cooktop Broiler Pan Insert some models Broiler Drawer some models Door Liner Oven Bottom How to Clean Surfaces Oven Racks Oven Door Remove oven racks See Removing Replacing Oven Racks under Before Setting Oven Controls Use a mild abrasive cleaner following the cleaner s recommendations Rinse with clean water let dry After clean...

Page 9: ...getheraslevelaspossibleandfirmly push the terminal end into the terminal plug Make sure element terminal is seated properly into terminal plug Make sure the surface element is level to reduce the hazard of pans sliding off the element To Raise the Top for Cleaning 1 Grasp the sides and lift from the front Lift up rods will support the top in a raised position Only lift the top far enough to allow ...

Page 10: ...nto each hinge See B Fig 2 4 Close oven door until the door stops Do not force the door to close any further The placement of these screws should keep door open in about a 45 degree position 5 Grasp oven door firmly on both sides and slide door up and off hinges at the same angle See Fig 3 6 To clean oven door follow the instructions provided in the Cleaning Chart at the beginning of the Care Clea...

Page 11: ...e element Preheat the broil element for searing 4 Meat not properly prepared Remove excess fat from meat Cut fatty edges to prevent curling but do not cut into lean 5 Insert on broiler pan wrong side up grease not draining Always place grid on the broiler pan with ribs up slots down to allow grease to drip into pan some models 6 Grease has built up on oven surfaces Regular cleaning is necessary wh...

Page 12: ...vice companies or external causes such as abuse misuse inadequate power supply accidents fires or acts of God DISCLAIMER OF IMPLIED WARRANTIES LIMITATION OF REMEDIES CUSTOMER S SOLE AND EXCLUSIVE REMEDY UNDER THIS LIMITED WARRANTY SHALL BE PRODUCT REPAIR OR REPLACEMENT AS PROVIDED HEREIN CLAIMS BASED ON IMPLIED WARRANTIES INCLUDING WARRANTIES OF MERCHANTABILITY OR FITNESS FOR A PARTICULAR PURPOSE ...

Reviews: