background image

8

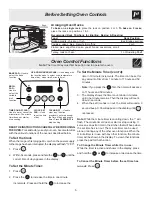
Oven Racks

Oven Door

Remove racks. See "Removing & Replacing Oven Racks" under Before Setting Oven Controls. Use a
mild, abrasive cleaner, following the cleaner’s recommendations. Rinse with clean water & let dry. After
cleaning the racks, rub the sides of the racks with wax paper or a cloth containing a small amount of baby
oil or salad oil (this will make the racks glide easier into the oven rack positions).

Use soap & water to thoroughly clean the top, sides & front of the oven door. Rinse well. You may use a
glass cleaner on the outside glass of the oven door. DO NOT immerse the door in water. DO NOT spray
or allow water or the glass cleaner to enter the door vents.
 DO NOT use oven cleaners, cleaning
powders or any harsh abrasive cleaning materials on the outside of the oven door. DO NOT clean the oven
door gasket. The oven door gasket is made of a woven material, on Self-Cleaning models, which is
essential for a good seal. Care should be taken not to rub, damage or remove this gasket.

Clean stainless steel with hot soapy water & a dishcloth. Rinse with clean water and a cloth. DO NOT use
cleaners with high conecentrations of chlorides or chlorines. DO NOT use harsh scrubbing cleaners. Only
use kitchen cleaners that are especially made for cleaning stainless steel. Always be sure to rinse the
cleaners form the surface as bluish stains may occur during heating that cannot be removed.

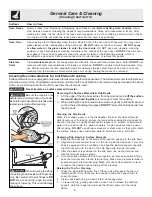
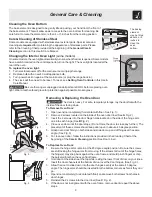
Removing the Surface Elements & Drip Bowls
1.

Lift the edge of the drip bowl across from the terminal end. Lift the surface
element & drip bowl together
 just enough to clear the cooktop.

2.

While holding the drip bowl and surface element, gently pull the terminal end
out from the terminal plug. If equipped, DO NOT remove the hold down clip from
the drip bowl.

Cleaning the Drip Bowls
Wash in hot soapy water or in the dishwasher. Rinse & dry while still warm.
Hard to remove or burned on soil can be removed by soaking the drip bowls for
about 20 minutes in a lightly diluted liquid cleanser or a solution of ammonia &
water (1/2 cup ammonia to 1 gallon of water). A nylon scrubber may be used
after soaking. DO NOT use abrasive cleaners or steel wool, as they will scratch
the surface. Always rinse with clean water & polish dry with a soft cloth.

Replacing Drip Bowls & Surface Elements
1.

Slide the terminal end on the element through the opening in the drip bowl.

2.

Align the element support to rest on the rim inside the drip bowl. If your drip
bowl is equipped with a hold down clip, align the element support opposite
the terminal end with the slot in the hold down clip & snap into place.

3.

After the element is positioned in the drip bowl, line up the terminal end
with the terminal plug as shown.

4.

Hold the surface element & drip bowl together as level as possible & firmly
push the terminal end into the terminal plug. Make sure element terminal is
seated properly into terminal plug. Make sure the surface element is level
to reduce the hazard of pans sliding off the element.

Raising the Top for Cleaning
1.

Grasp the sides &lift from the front. Lift-up rods will support the top in a
raised position. Only lift the top far enough to allow the support rods to
snap into place.

2.

Clean underneath using a clean cloth & hot soapy water.

3.

To lower the top, gently push back on each rod to release the notched
support. Hold the range top and slide the lift rods down into the range

frame.

 Be sure the range is cool

before removing elements or drip bowls.
Be careful not to bend terminal ends when
replacing elements after cleaning.

Cleaning Recommendations for Coil Element Cooktop

Surface elements can be unplugged and removed to make cleaning the drip pans easier. The surface elements clean themselves
when they are turned on. Food spilled on a hot element will burn off. Food spilled on a cool element may be cleaned with a damp
cloth—any remaining soil will burn off the next time the element is used.

  Never immerse a surface element in water.

 When lowering the lift-up

range top, grasp the sides with finger-tips
only. Be careful not to pinch fingers. DO
NOT 
drop or bend the range top when
raising or lowering. This could damage
the surface.

General Care & Cleaning

(Cleaning Chart cont’d)

How to Clean

Surfaces

Stainless
Steel

Summary of Contents for FEF326AB - FEF326B - 30 Electric Range

Page 1: ...Visit the Frigidaire Web Site at http www frigidaire com READ AND SAVE THESE INSTRUCTIONS Welcome 2 Important Safety Instructions 2 4 Before Setting Oven Controls 4 5 Oven Control Functions 5 Setting Surface Controls 6 Setting Oven Controls 6 7 General Care Cleaning 7 9 Before You Call Solutions to Common Problems 10 Warranty Back Page ...

Page 2: ...should be filled in completely signed and returned to Electrolux Home Products Product Registration Congratulations on your purchase of a new range At Electrolux Home Products we are very proud of our product and are completely committed to providing you with the best service possible Your satisfaction is our number one priority We know you ll enjoy your new range and Thank You for choosing our pr...

Page 3: ... fire if allowed to become too hot Use Only Dry Potholders Moist or damp potholders on hot surfaces may result in burns from steam Do not let potholders touch hot heating elements Do not use a towel or other bulky cloth instead of a potholder DoNotHeatUnopenedFoodContainers Buildupofpressure may cause container to burst and result in injury Removetheovendoorfromanyunusedrangeifitistobestored or di...

Page 4: ...ware that excess residue from cleaners and aerosols may ignite causing damage and injury Clean Ventilating Hoods Frequently Grease should not be allowed to accumulate on the hood or filter Follow manufacturer s instructions for cleaning IMPORTANT SAFETY NOTICE The California Safe Drinking Water and Toxic Enforcement Act requires the Governor of California to publish a list of substances knowntothe...

Page 5: ... during any of the other oven functions When the minute timer is in use with any other function the minute timer will be shown in the display To view other functions press the pad for that function To Change the Minute Timer while it is in use While the timer is active and shows in the display press and hold the or to increase or decrease the time To Cancel the Minute Timer before the set time has...

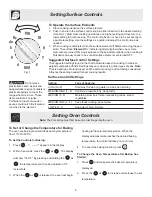
Page 6: ...d pepper shakers spoon holders or plastic wrappings on top of the range when it is in use These items could melt or ignite Potholders towels or wooden spoons could catch fire if placed too close to the element Setting Type of Cooking HIGH HI 9 Start most foods bring water to a boil pan broiling MEDIUM HIGH 7 8 Continue a rapid boil fry deep fat fry MEDIUM 5 6 Maintain a slow boil thicken sauces gr...

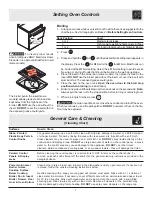
Page 7: ...celain Enamel Burner Grates Cooktop Surface Below Cooktop Broiler Pan Insert Broiler Drawer Door Liner Oven Bottom How to Clean Surfaces The broiler pan the insert some models allows grease to drain and be kept away from the high heat of the broiler DO NOT use the pan without the insert DO NOT cover the insert with foil the exposed grease could ignite Broiling 1 Arrangeovenrackwhileovenisstillcool...

Page 8: ... solution of ammonia water 1 2 cup ammonia to 1 gallon of water A nylon scrubber may be used after soaking DO NOT use abrasive cleaners or steel wool as they will scratch the surface Always rinse with clean water polish dry with a soft cloth Replacing Drip Bowls Surface Elements 1 Slide the terminal end on the element through the opening in the drip bowl 2 Align the element support to rest on the ...

Page 9: ...the bottom corners as far as they can go 4 Open door completely horizontal with floor and remove both screws from holes in doorhinges 5 Reinstall the 2 screws into the door liner See C Fig 2 6 If the door is not in alignment with the oven frame remove door repeat the above steps Fig 2 Fig 1 Changing the Interior Oven Light some models Onsomemodels theovenlightautomaticallyturnsonwhenthedoorisopene...

Page 10: ...to lean 5 Insert on broiler pan wrong side up grease not draining Always place grid on the broiler pan with ribs up slots down to allow grease to drip into pan some models 6 Grease has built up on oven surfaces Regular cleaning is necessary when broiling frequently Old grease or food spatters cause excessive smoking Poor baking results Many factors affect baking results Make sure the proper oven r...

Page 11: ...11 Notes ...

Page 12: ...ice be required If service is performed it is in your best interest to obtain and keep all receipts This written warranty gives you specific legal rights You may also have other rights that vary from state to state Service under this warranty must be obtained by contacting Electrolux Home Products Inc or Electrolux Canada Corp FULLONE YEAR WARRANTY LIMITED 2ND 5TH YEARWARRANTY Glass Smoothtop Seal...

Reviews: