background image

8

CARE & CLEANING 

(Cleaning Chart)

CLEANING VARIOUS PARTS OF YOUR COOKTOP

Before cleaning any part of the cooktop, be sure all controls are turned OFF and the cooktop is COOL. REMOVE 

SPILLOVERS AND HEAVY SOILING AS SOON AS POSSIBLE. REGULAR CLEANING WILL REDUCE THE NUMBER OF 

MAJOR CLEANING LATER.

Surfaces

How to Clean

Aluminum (Trim Pieces) & 

Vinyl

Use hot, soapy water and a cloth. Dry with a clean cloth. 

Glass, Painted and Plastic 

Control Knobs, Body 

Pieces, and Decorative 

Trim

Using a soft cloth, clean with mild dish detergent and water or a 50/50 solution of 

vinegar and water. Follow by rinsing the area with clean water; dry and polish with a 

soft cloth. Glass cleaners may be used if sprayed on a soft cloth fi rst. 

DO NOT

 spray 

liquids directly on the control pad and display area. Do not use large amounts of 

water on the control panel - excess water on the control area may cause damage to 

the appliance. Do not use other liquid cleaners, abrasive cleaners, scouring pads, or 

some paper towels - they will damage the fi nish.

Control Panel

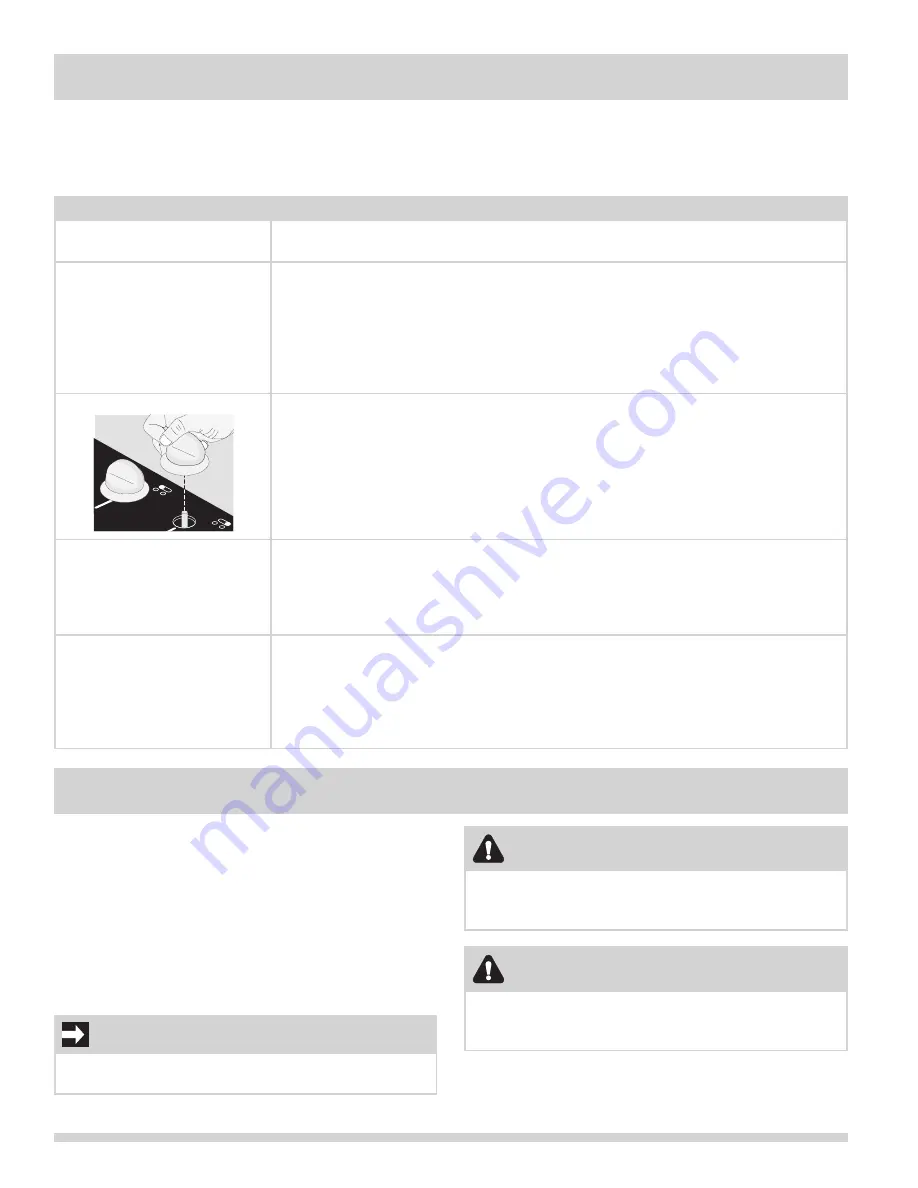
Wipe the control panel clean after each use. Before cleaning the control panel, turn 

all controls to OFF and remove the control knobs. To remove, pull each knob straight 

off the shaft. Clean using hot, soapy water and a cloth. Be sure to squeeze excess 

water from the cloth before wiping the panel; especially when wiping around the 

controls. Excess water in or around the controls may cause damage to the appliance. 

To replace knobs after cleaning, line up the fl at sides of both the knob and the shaft; 

then push the knob into place.

Stainless Steel, Chrome 

Decorative Trim (some 

models)

Clean 

stainless steel

 with hot, soapy water and a dishcloth. Rinse with clean water 

and a cloth. 

Do not use cleaners with high concentrations of chlorides or 

chlorine. 

Do not use harsh scrubbing cleaners. Only use kitchen cleaners that are 

especially made for cleaning stainless steel. Always be sure to rinse the cleaners 

from the surface as bluish stains may occur during heating that cannot be removed.

Porcelain Enamel

Burner Grates, Burner Rings 

(some models), Cooktop 

Surface (some models)

Gentle scouring with a soapy scouring pad will remove most spots. Rinse with a 

1:1 solution of clear water and ammonia. If necessary, cover diffi cult spots with 

an ammonia-soaked paper towel for 30 to 40 minutes. Rinse with clean water and 

a damp cloth, and then scrub with a soap-fi lled scouring pad. Rinse and wipe dry 

with a clean cloth or paper towel. Remove all cleaners or the porcelain may become 

damaged during future heating. 

DO NOT

 use spray oven cleaners on the cooktop.

CLEANING THE COOKTOP, BURNER CAPS 

& GRATES

The cooktop is designed to make cleaning easier. Because 

the gas Burners are sealed, cleanups are easy when 

spillovers are cleaned up immediately. 
The cooktop, Burner Heads and Caps should be routinely 

cleaned. Keeping the Burner Head Ports clean will 

prevent improper ignition and an uneven fl ame. Refer to 

the following instructions:

IMPORTANT

THE COOKTOP IS NOT REMOVABLE.

 Do not 

attempt to remove or lift the cooktop.

CAUTION

Pay attention to not damage electrodes. Damaged 

electrodes may cause a delayed ignition or prevent the 

burner from igniting.

CAUTION

Any additions, changes or conversions required in order 

for this appliance to perform satisfactorily must be 

made by an authorized Service Center.

CARE & CLEANING

Summary of Contents for FFGC3626SB

Page 1: ...0 265 8352 All about the Use Care of your Cooktop Welcome Congratulations 2 Important Safety Instructions 3 Before Setting Surface Controls 6 Setting Surface Controls 7 A01704503 July 2015 Rev A Care Cleaning Cleaning Chart 8 Care Cleaning 8 Before You Call 9 Major Appliance Warranty 10 ...

Page 2: ...D AND SAVE THESE INSTRUCTIONS This Use Care Manual contains general operating instructions for your appliance and feature information for several models Your product may not have all the described features The graphics shown are representative The graphics on your appliance may not look exactly like those shown These instructions are not meant to cover every possible condition and situation that m...

Page 3: ...c bags after unpacking the cooktop Never allow children to play with packaging material Do not remove the model serial plate attached to the cooktop Proper Installation Be sure your appliance is properly installed and grounded by a qualified technician in accordance with the National Fuel Gas Code ANSI Z223 1 latest edition and CAN CGA B149 2 and the National Electrical Code ANSI NFPA No 70 latest ...

Page 4: ...ers touch the flame or burners Do not use a towel or other bulky cloth instead of a pot holder Do Not Heat Unopened Food Containers Buildup of pressure may cause container to burst and result in injury Know which knob controls each surface burner Always turn the knob to the LITE position when igniting the burners Visually check that the burner has lit Then adjust the flame so it does not extend beyo...

Page 5: ...lectrical outlet that is correctly polarized and properly grounded DO NOT operate the cooktop using a 2 prong adapter or an extension cord If a 2 prong wall receptacle is the only available outlet it is the personal responsibility of the consumer to have it replaced with a properly grounded 3 prong wall receptacle installed by a qualified electrician See the INSTALLATION INSTRUCTIONS packaged with ...

Page 6: ...ace cooking needs 3 The POWER burner is best used for bringing large quantities of liquid rapidly up to temperature or when preparing larger quantities of food Figure 1 Model FFGC3010 Figure 4 Model FGGC3047 Figure 5 Model FFGC3610 Figure 6 Model FGGC3645 Figure 7 Model FFGC3626 Figure 2 Model FGGC3045 Figure 3 Model FFGC3026 1 1 1 1 1 1 2 2 2 2 2 2 2 2 2 2 2 2 3 3 3 3 3 1 2 2 3 1 2 2 2 3 ...

Page 7: ...n to a lower one to complete the process Use the recommendations below as a guide for determining proper flame size for various types of cooking The size and type of utensil used and the amount of food being cooked will influence the setting needed For deep fat frying use a thermometer and adjust the surface control knob accordingly If the fat is too cool the food will absorb the fat and be greasy I...

Page 8: ...ess Steel Chrome Decorative Trim some models Clean stainless steel with hot soapy water and a dishcloth Rinse with clean water and a cloth Do not use cleaners with high concentrations of chlorides or chlorine Do not use harsh scrubbing cleaners Only use kitchen cleaners that are especially made for cleaning stainless steel Always be sure to rinse the cleaners from the surface as bluish stains may ...

Page 9: ...or the porcelain cooktop may become damaged during future heating DO NOT use spray oven cleaners on the cooktop CARE AND CLEANING OF STAINLESS STEEL Stainless Steel models only Some models are equipped with stainless steel exterior parts Special care and cleaning are required for maintaining the appearance of stainless parts Please refer to the table provided at the beginning of the General Care C...

Page 10: ...arranties including warranties of merchantability or fitness for particular purpose are limited to one year or the shortest period allowed by law but not less than one year Electrolux shall not be liable for consequential or incidental damages such as property damage and incidental expenses resulting from any breach of this written limited warranty or any implied warranty Some states and provinces...

Reviews: