background image

7

OPERATING INSTRUCTIONS

Operating Your Dryer

(Mesh bag not included.)

1  Prepare load for drying.

•  Dry items of similar fabric, weight and construction 

in the same load.

•  Separate dark items from light-colored items. Sepa-

rate items that shed lint from those that attract lint.

•  Check for stains which may not have been removed 

in washing. Repeat stain removal process and wash 

again before drying. Dryer heat may permanently 

set some stains.

•  Place delicate or small items in a mesh bag.

•  Be sure buckles, buttons and trim are heatproof 

and won’t damage the drum fi nish. Close zippers; 

fasten hooks and Velcro

®

-like fasteners. Tie strings 

and sashes to prevent snagging and tangling.

WARNING

To reduce the risk of fi re, electric shock or injury to 

persons, read the IMPORTANT SAFETY INSTRUCTIONS 

in this Use and Care Guide before operating your dryer.

CAUTION

Do not continue to use the dryer if you hear squeaking, 

grinding, rubbing or other unusual noises. This could 

be a sign of mechanical breakdown and lead to fi re or 

serious injury. Contact a qualifi ed technician immediately.

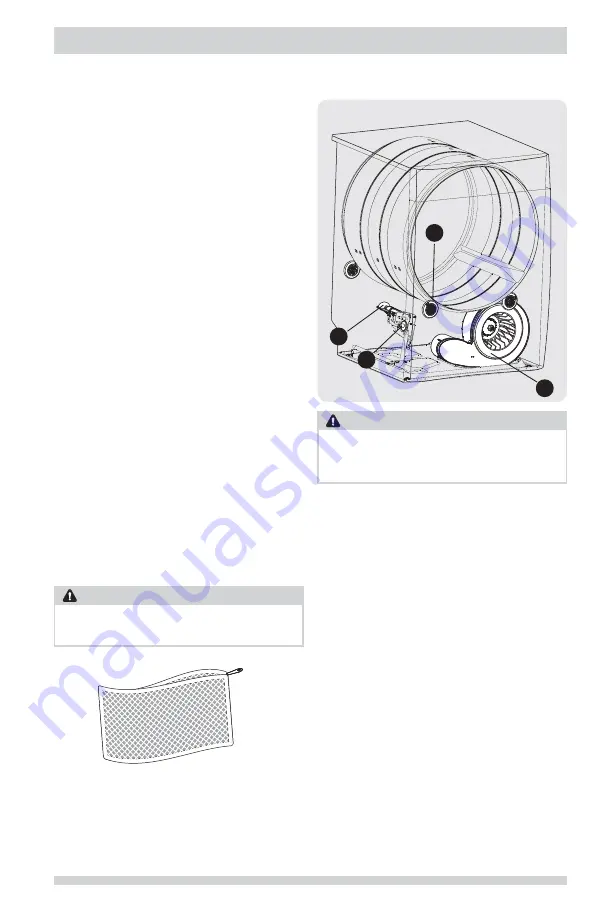
Normal Operating Sounds

You may or may not hear the following sounds from your 

new dryer:

A. SUSPENSION ROLLERS The dryer drum is 

supported by a set of suspension rollers. At times 

there may be a thumping or rolling sound when the 

dryer starts. This may happen if the dryer has not 

been in use for a period of time, or after a heavy 

load has remained in the dryer drum for an extended 

period, creating a temporary fl at spot on the edge 

of the roller. The noise should dissipate as the dryer 

operates and the fl at spots smooth out.

B. AIR FLOW SYSTEM Your dryer is equipped with a 

high volume air handling system. In some installations 

there may be some sounds associated with air 

movement throughout the dryer, including the air 

duct, blower, and exhaust system. This is normal and 

can vary with load size and type.

C. GAS VALVE (Gas models only.) The fl ow of gas is 

controlled by electric solenoids. During operation there 

may be a clicking sound as the valve opens and closes to 

control the gas fl ow.

D. GAS BURNER (Gas models only.) When the burner 

is operating, there may be sounds generated as the 

air fl ow mixes with the gas fl ame. This noise is normal 

and will only occur when the gas is ignited in the 

combustion tube.

A

B

C

D

Summary of Contents for FFQE5000QW

Page 1: ...e of your Dryer Important Safety Instructions 2 5 Features 6 Operating Instructions 7 13 Care and Cleaning 14 Solutions to Common Problems 15 16 Warranty 17 Notes 18 Français 19 Español 37 TABLE OF CONTENTS 137619700A 1304 ...

Page 2: ...vicinity of this or any other appliance WHAT TO DO IF YOU SMELL GAS Do not try to light any appliance Do not touch any electrical switch do not use any phone in your building Clear the room building or area of all occupants Immediately call your gas supplier from a neighbor s phone Follow the gas supplier s instructions If you cannot reach your gas supplier call the fire department Installation an...

Page 3: ...uation which if not avoided will result in death or serious injury Save these instructions for future reference NOTE The instructions appearing in this Use and Care Guide are not meant to cover every possible condition and situation that may occur Common sense and cau tion must be practiced when installing operating and maintaining any appliance Read all instructions before using this appliance Th...

Page 4: ...ances produce fire by spontaneous combustion Clean the lint screen before or after each load The in terior of the dryer lint screen housing and exhaust duct should be cleaned approximately every 18 months by qualified service personnel An excessive amount of lint build up in these areas could result in inefficient drying and possible fire See Care and Cleaning Do not operate the dryer if the lint ...

Page 5: ...pipe Do not use an extension cord or an adaptor plug ALWAYS disconnect the dryer from the electrical supply before attempting any service or cleaning Failure to do so can result in electrical shock or injury Do not use any type spray cleanser when cleaning dryer interior Hazardous fumes or electrical shock could occur To prevent injury do not reach into the dryer if the drum is moving Wait until t...

Page 6: ...They may be purchased as accessories Control Lock LED Display Drum Light Exhaust Channel Outlet Heavy Duty Drying Rack Reversible Door Door Latch Cycle Selector Door Strike Lint Filter Large Surface Moisture Sensor Adjustable Leveling Legs Stacking Kit for Mounting on Matching Washer ...

Page 7: ...d technician immediately Normal Operating Sounds You may or may not hear the following sounds from your new dryer A SUSPENSION ROLLERS The dryer drum is supported by a set of suspension rollers At times there may be a thumping or rolling sound when the dryer starts This may happen if the dryer has not been in use for a period of time or after a heavy load has remained in the dryer drum for an exte...

Page 8: ...lected It will no longer be lighted when the option has been deleted Operating Your Dryer continued 5 Start the cycle Close the door and press START to begin the cycle The dryer will not operate with the door open To interrupt the cycle press pause press START to resume the cycle Press cancel to stop the cycle If changes to the cycle temperature dryness level or options are attempted after the cyc...

Page 9: ...rinkling and makes items easier to handle during unloading Drying time varies depending on size and dampness of load and fabric type If the load is too small or almost dry the moisture sensing bars may not detect enough moisture to continue the cycle and the cycle may end after a few minutes If this occurs select a Timed Dry cycle Room temperature and humidity type of installation and electrical v...

Page 10: ...le release if this option is selected The signal has an adjustable volume level or can be turned off Drying Temperature To change the preset temperature press the temp button to scroll to the desired setting To protect your fabrics not all temperatures are available with every cycle The temperature selected for the cycle will be remembered and recalled each time that cycle is selected in the futur...

Page 11: ... for 10 seconds LOC will be displayed To remove the control lock press Options and Select again Status Display Status Lights The estimated total cycle time will be displayed when the cycle is selected The estimated remaining cycle time is displayed during the cycle The following indicators may be lighted during the cycle Drying Cool Down Wrinkle Release Drum Light The drum light will come on whene...

Page 12: ...le with the following cycles bulky normal casual timed dry 30 90 temp max 9 9 high 9 9 normal 9 9 low 9 air dry 9 dry level high 9 normal 9 9 9 low 9 damp 9 options wrinkle release 9 9 9 9 chime 9 9 9 9 9 Available selections Cycle defaults Non modifiable presets Dryer Settings Chart ...

Page 13: ...ser residue before drying the next load Every 18 months an authorized servicer should clean the dryer cabinet interior and exhaust duct These areas can collect lint and dust over time An excessive amount of lint build up could result in inefficient drying and possible fire hazard OUTSIDE Clean the cabinet with mild soap and water Never use harsh gritty or abrasive cleansers If the cabinet becomes ...

Page 14: ...nal rinse Or add a fabric softener sheet and tumble without heat Use lint brush or roller to remove lint Do not overload dryer Use fabric softener in washer or dryer to reduce static electricity Remove items when they are slightly damp to avoid overdrying Check that lint filter is clean and in place Pilling Fibers break off ball up and cling to fabric Overdrying Use a lint brush or shaver to remov...

Page 15: ...ter is clogged with lint Make sure all lint has been removed from the dryer lint filter before starting each cycle Exhaust duct requirements have not been met Exhaust duct must be at least 4 inches in diameter and made of rigid or semi rigid metal When in place the duct must have no more than four 90 bends and must not exceed length listed in INSTALLATION INSTRUCTIONS Electric dryer is connected t...

Page 16: ...service companies use of parts other than genuine Electrolux parts or parts obtained from persons other than authorized service companies or external causes such as abuse misuse inadequate power supply accidents fires or acts of God DISCLAIMER OF IMPLIED WARRANTIES LIMITATION OF REMEDIES CUSTOMER S SOLE AND EXCLUSIVE REMEDY UNDER THIS LIMITED WARRANTY SHALL BE PRODUCT REPAIR OR REPLACEMENT AS PROV...

Reviews: