background image

10

Some upright freezers are frost-free and defrost 

automatically, but should be cleaned occasionally.

Between Defrostings

To avoid frequent defrosting, occasionally use 

a plastic scraper to remove frost. Scrape with a 

pulling motion. Never use a metal instrument to 

remove frost.

Defrosting

It is important to defrost and clean the freezer 

when ¼ to ½ inch of frost has accumulated. Frost 

may tend to accumulate faster on the upper part 

of the freezer due to warm, moist air entering the 

freezer when the door is opened. Remove food and 

leave the door open when defrosting the freezer.

To Defrost Upright Models with 

Defrost Drain:

•  Remove the drain plug on the inside floor 

of the freezer by pulling it straight out.

• 

To access external drain tube on models with 

a base panel, first remove the two screws 

from the base panel. Locate the drain tube 

near the left center under the freezer.

• 

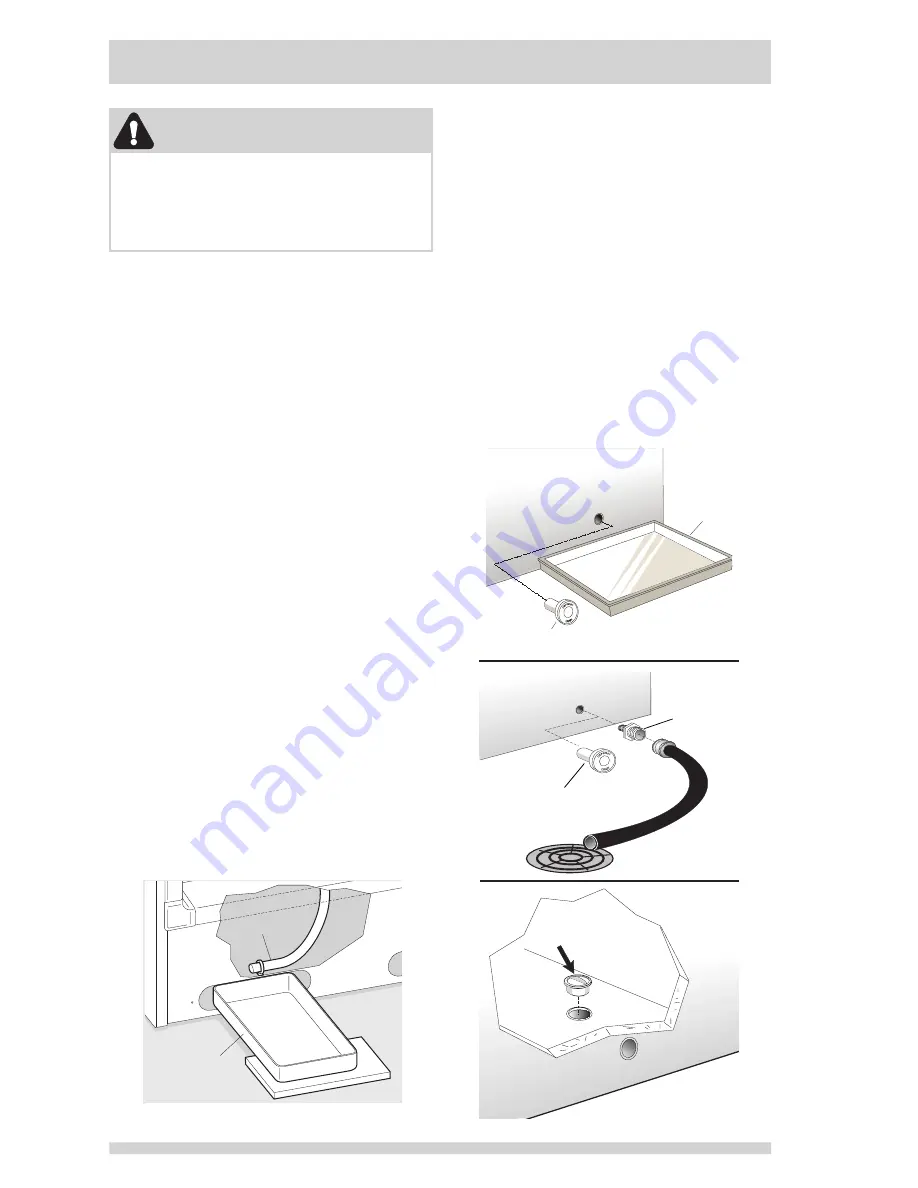
Place a shallow pan under the drain tube. 

Defrost water will drain out. Check the pan 

occasionally so water does not overflow 

(see figure 1).

• 

A ½ inch garden hose adapter can be used to 

drain the freezer directly into a floor drain. If 

your model is not equipped with an adapter, 

one can be purchased at most hardware stores.

• 

Replace the drain plug when defrosting and 

To Defrost Chest Models with 

Defrost Drain:

• 

Place a shallow pan or the Divider/Drain 

Pan (if equipped) beneath the drain outlet. 

Pull out the outside drain plug (see figure 

2). A ½ inch garden hose adapter can be 

used to drain the freezer directly into a 

floor drain (see figure 3). If your model is 

not equipped with an adapter, one can be 

purchased at most hardware stores.

• 

Pull out the drain plug inside the freezer (see 

figure 4). Defrost water will drain out. Check 

pan occasionally so water does not overflow.

• 

Replace the drain plugs when defrosting 

and cleaning are completed. If the drain is 

left open, warm air may enter the freezer.

CARE AND CLEANING

CAUTION

Damp objects stick to cold metal surfaces. Do 

not touch interior metal surfaces with wet or 

damp hands.

Freezer must be unplugged (to avoid electrical 

hazard) from power source when defrosting unit.

cleaning are completed. If the drain is left 

open, warm air may enter the freezer.

Drain Pan

Drain Tube

Figure 1

Defrost

Drain Plug

Pan

Figure 2

Hose

Adaptor

Defrost

Drain

Plug

Figure 3

Drain

Plug

Figure 4

Summary of Contents for FFUH17F2NW

Page 1: ...52 All about the Use Care of your Freezer Important Safety Instructions 2 Installation 4 Energy Saving Tips 6 Setting the Temperature Control 6 Freezer Optional Features 8 297281400 October 2008 Care and Cleaning 10 Power Failure Freezer Failure 11 Before you Call 12 Major Appliance Warranty 14 ...

Page 2: ...rned ON Front filter must be flush with filter housing select models Final Checks Shipping material removed Freezer temperatures set Registration card sent in Installation Checklist CAUTION CAUTION indicates a potentially hazardous situation which if not avoided may result in minor or moderate injury IMPORTANT SAFETY INSTRUCTIONS For Your Safety DO NOT store or use gasoline or other flammable liqu...

Page 3: ...plug If the power cord is damaged it should be replaced by an authorized service technician to prevent any risk Never unplug the freezer by pulling on the power cord Always grip the plug firmly and pull straight out from the receptacle to prevent damaging the power cord Unplug the freezer before cleaning and before replacing a light bulb to avoid electrical shock Performance may be affected if the...

Page 4: ... of the freezer for adequate circulation 3 75 mm 3 75 mm 3 75 mm Installation Installation 3 AIR SPACE 3 75 mm 3 75 mm 3 75 mm 1 75 mm Leveling The freezer must have all bottom corners resting firmly on a solid floor The floor must be strong enough to support a fully loaded freezer INSTALLATION NOTE The exterior walls of the freezer may become quite warm as the compressor works to transfer heat fr...

Page 5: ...p hinge from cabinet 7 Remove door and bottom hinge from cabinet 8 To replace door reverse the above order and securely tighten all screws to prevent hinge slippage Plastic Leveling Feet Crating Screw Discard The 4 Crating Screws And 2 Wood Bases Turn Left To Raise Turn Right To Lower Unpacking and Leveling Upright Models Shelf Front Door Removal electronic models If door must be removed Door hing...

Page 6: ...Control some upright frost free models The standard electronic temperature control is located outside the freezer see Figure 2 Temperature is factory preset to provide satisfactory food storage temperatures To adjust the temperature setting move the UP symbol for colder temperatures and DOWN v symbol for warmer temperatures on the control panel Allow several hours for the temperature to stabilize ...

Page 7: ...zer press the ALARM RESET button If a malfunction causes the temperature inside the freezer to rise above 23 F the HI TEMP light will turn on and the buzzer will sound The buzzer will sound every five minutes until the freezer temperature is below 23 F To silence the buzzer press the ALARM RESET button Door Ajar Alarm This feature provides a warning if the door is open for more than five minutes T...

Page 8: ... pops out of the lock after it has been turned Slide Out Basket some upright models A Slide Out Basket some models located at the bottom of the freezer provides separate storage space for items that are difficult to store on freezer shelves To remove the basket pull out and lift up Interior Light The light comes on automatically when the door is opened To replace the light bulb turn the temperatur...

Page 9: ...ookend some upright models Glass Shelf Bookend Use these handy bookends to keep the various boxed items stored neatly in your freezer To adjust location simply slide where desired Wire Shelf Bookend Use these handy bookends to keep the various boxed items stored neatly in your freezer To adjust location simply unsnap the bookend from the wire shelf and snap into the next desired location Chest Div...

Page 10: ...n be used to drain the freezer directly into a floor drain If your model is not equipped with an adapter one can be purchased at most hardware stores Replace the drain plug when defrosting and To Defrost Chest Models with Defrost Drain Place a shallow pan or the Divider Drain Pan if equipped beneath the drain outlet Pull out the outside drain plug see figure 2 A inch garden hose adapter can be use...

Page 11: ...the cabinet with warm water and mild liquid detergent Rinse well and wipe dry with a clean soft cloth Replace parts and food Do not use razor blades or other sharp instruments which can scratch the freezer surface when removing adhesive labels Any glue left from the tape can be removed with a mixture of warm water and mild detergent or touch the residue with the sticky side of the tape already rem...

Page 12: ... longer in order to maintain desired temperatures Interior freezer tem perature is too cold Freezer control is set too low Set freezer control to a warmer setting Allow several hours for temperature to stabilize Interior freezer temperature is too cold Freezer control is set too warm Doors are opened too frequently or too long Door may not be seating properly Large amounts of warm or hot food has ...

Page 13: ... seat ing properly Door is opened too often or too long The rate of frost buildup and internal sweat ing increases This is normal See DOOR PROBLEMS Open door less often WATER MOISTURE FROST OUTSIDE FREEZER Moisture collects on outside of freezer Door may not be seat ing properly causing cold air from inside freezer to meet warm air from outside See DOOR PROBLEMS ODOR IN FREEZER Odors in freezer In...

Page 14: ...ectrolux parts or parts obtained from persons other than authorized service companies or external causes such as abuse misuse inadequate power supply accidents fires or acts of God DISCLAIMER OF IMPLIED WARRANTIES LIMITATION OF REMEDIES CUSTOMER S SOLE AND EXCLUSIVE REMEDY UNDER THIS LIMITED WARRANTY SHALL BE PRODUCT REPAIR OR REPLACEMENT AS PROVIDED HEREIN CLAIMS BASED ON IMPLIED WARRANTIES INCLU...

Reviews: