background image

30" GAS RANGE INSTALLATION INSTRUCTIONS

(For Models with Electric Ignition or Standing Pilot)

8

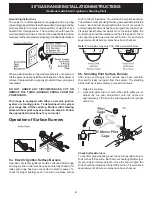
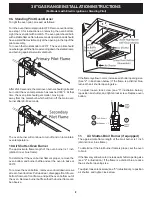
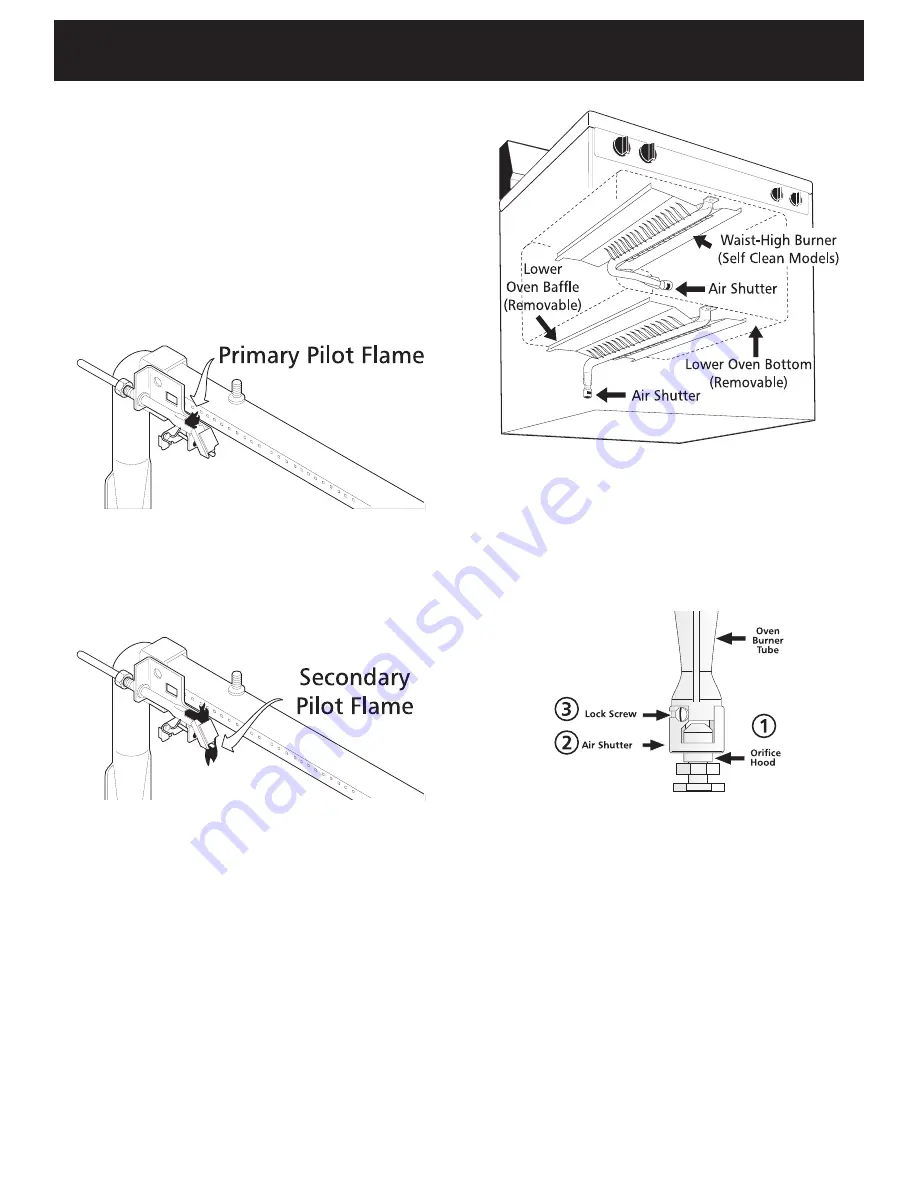
9b.  Standing Pilot Oven Burner

To light the oven pilot, proceed as follows:

Turn the oven thermostat knob to OFF. Remove oven bottom,
see step 10 for instructions on removing the oven bottom.
Light the oven pilot with a match. The oven pilot should burn
with a stable flame after a few seconds operation and should
have a small flame visible only at the opening in the top of the
pilot assembly.
Turn oven thermostat knob to 300°F. The oven pilot should
now be larger with the flame extending down the slanted ramp
and burning against a small metal bulb.

After 20-40 seconds, the main oven burner should ignite and
burn until the oven temperature has reached 300°F. At that
time, the oven pilot should get smaller, moving up
away from the metal bulb which will turn off the main oven
burner after 20-40 seconds.

The oven burner will continue to turn off and on to maintain
oven temperature.

10. Air Shutter-Oven Burner

The approximate flame length of the oven burner is 1 inch
(distinct inner, blue flame).

To determine if the oven burner flame is proper, remove the
oven bottom and burner baffle and set the oven to bake at
300°F.

To remove the oven bottom, remove oven hold down screws
at rear of oven bottom. Pull up at rear, disengage front of oven
bottom from oven front frame, and pull the oven bottom out of
the oven. Remove burner baffle so that the burner flame can
be observe.

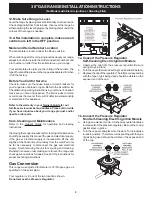
If the flame is yellow in color, increase air shutter opening size.
(See "2" in illustration below.) If the flame is a distinct blue,
reduce the air shutter opening size.

To adjust loosen lock screw (see "3" illustration below),
reposition air shutter, and tighten lock screw. Replace oven
bottom.

11.

Air Shutter-Broil Burner (if equipped)

The approximate flame length of the broil burner is 1 inch
(distinct inner, blue flame).

To determine if the broil burner flame is proper, set the oven
to broil.

If the flame is yellow in color, increase air shutter opening size
(see "2" in illustration.) If the flame is a distinct blue, reduce
the air shutter opening size.

To adjust, loosen lock screw (see "3" in illustration), reposition
air shutter, and tighten lock screw.

Summary of Contents for FGF316ASA

Page 1: ...njury or death FOR YOUR SAFETY Do not store or use gasoline or other flammable vapors and liquids in the vicinity of this or any other appliance WHAT TO DO IF YOU SMELL GAS Do not try to light any appliance Do not touch any electrical switch do not use any phone in your building Immediately call your gas supplier from a neighbor s phone Follow the gas supplier s instructions If you cannot reach yo...

Page 2: ...h local codes or in the absence of local codes with the National Fuel Gas Code ANSI Z223 1 latest edition when installed in the United States When installed in Canada installation must conform withCAN CGA B149 1andCAN CGA B149 2 ThisrangehasbeendesigncertifiedbyCSAInternational As with any appliance using gas and generating heat there are certain safety precautions you should follow You will find ...

Page 3: ...brackets must also be moved and installed with the range Instructions are provided for installation in wood or cement fastened to either the floor or wall When installed to the wall make sure that screws completely penetrate dry wall and are secured in wood or metal When fastening to the floor or wall be sure that screws do not penetrate electrical wiring or plumbing A LocatetheBracketUsingtheTemp...

Page 4: ...typeoffuel is being used Caremustbetakenduringinstallationofrangenottoobstruct the flow of combustion and ventilation air For proper operation the maximum inlet pressure to the regulator should be no more than 14 inches of water column pressure The inlet pressure to the regulator must be at least 1 inch greater than regulator manifold pressure Examples If regulator is set for natural gas 4 inch ma...

Page 5: ...r column pressure approximately 1 2 psig If it should be necessary to check the manifold gas pressure connectmanometer watergauge orotherpressuredeviceto thetopburnerrightrearorifice Usingarubberhosewithinside diameter of approximately 1 4 hold tubing down tight over orifice Turn burner valve on Foranaccuratepressurecheckhaveatleasttwo 2 othertop burners burning Be sure the gas supply inlet pressu...

Page 6: ...nnectors have been carefully checked for leaks and range has been connected to electric power To check for proper lighting push in and turn a surface burner knob to the LITE position You will hear the igniter sparking Thesurfaceburnershouldlightwhengasisavailabletothetop burner Each burner should light within four 4 seconds in normal operation after air has been purged from supply lines Visually c...

Page 7: ...tion Burners Operation of electric igniters should be checked after range and supply line connectors have been carefully checked for leaks and range has been connected to electric power The oven burner is equipped with an electric control system as well as an electric oven burner igniter If your model is equipped with a waist high broil burner it will also have an electric burner igniter These con...

Page 8: ...r Oven Burner The approximate flame length of the oven burner is 1 inch distinct inner blue flame To determine if the oven burner flame is proper remove the oven bottom and burner baffle and set the oven to bake at 300 F To remove the oven bottom remove oven hold down screws atrearofovenbottom Pullupatrear disengagefrontofoven bottom from oven front frame and pull the oven bottom out of the oven R...

Page 9: ...o order parts Care Cleaning and Maintenance Refer to the Owner s Guide for operating and cleaning instructions Ifremovingtherangeisnecessaryforcleaningormaintenance shut off gas supply Disconnect the gas and electrical supply If the gas or electrical supply is inaccessible lift the unit slightly at the front and pull out away from the wall Pull only as far as necessary to disconnect the gas and el...

Page 10: ...imately 2 1 2 turns This increases the flow of gas around the metering pin 3 Convert Oven Burner Spud a Remove oven bottom and oven burner baffle located on topofburner Toremoveovenbottom removeovenhold down screws at rear of oven bottom Pull up at rear disengage front to oven bottom from oven front frame andpulltheovenbottomstraightoutoftheoven Remove nut attaching burner baffle to oven burner b ...

Reviews: