background image

Summary of Contents for FPUH17D7KF0

Page 1: ...2 2 3 3 4 4 Looking inside 5 Food Storage Energy Saving Tips 5 6 Ice Service 6 Care Cleaning 7 Warranty 8 Before You Call 9 10 S READ AND SAVE THESE INSTRUCTIONS pIN297o814oo J o2oo6 ...

Page 2: ...ur Common sense and caution must be practiced when installing operating and maintaining any appliance Please record your model and serial numbers below for future reference This information is found on your serial plate located inside the freezer comparlment READ ALL INSTRUCTIONS BEFORE USING THIS FREEZER Model Number Serial Number Purchase Date PROPER DISPOSAL OFYOUR REFRIGERATOR FREEZER Model an...

Page 3: ...urrounding temperatures willnotdrop Allow thefollowing clearances forease of _stallation proper aircircufation andelectrical connections Sides 3 8 Back Top 1 DoNot block thetoegrille onthelower lront ofyour freeze_ Sufficient aircirculation isessential fortheproper operation efyourlreeze_ OTHER PRECAUTIONS Todefrost freezer always unplug unitflJst Never unplug thefreezer bypulling onthecord AbTays...

Page 4: ...e second unit to properly align units in a built in application DOOR REMOVAL If door must be removed 1 Geotly lay freezer on its back on a rug oJ blankeh 2 Remove two base 9cre_ 9 al_d base pan L 3 Remove bottom Mnge screws 4 Remove plastic top Mnge coveL 5 Remove screws from top Mnge 6 Remove top hinge from cabinet 7 Remove door and bottom hinge from cabinet 6 To replace door reverse the above oJ...

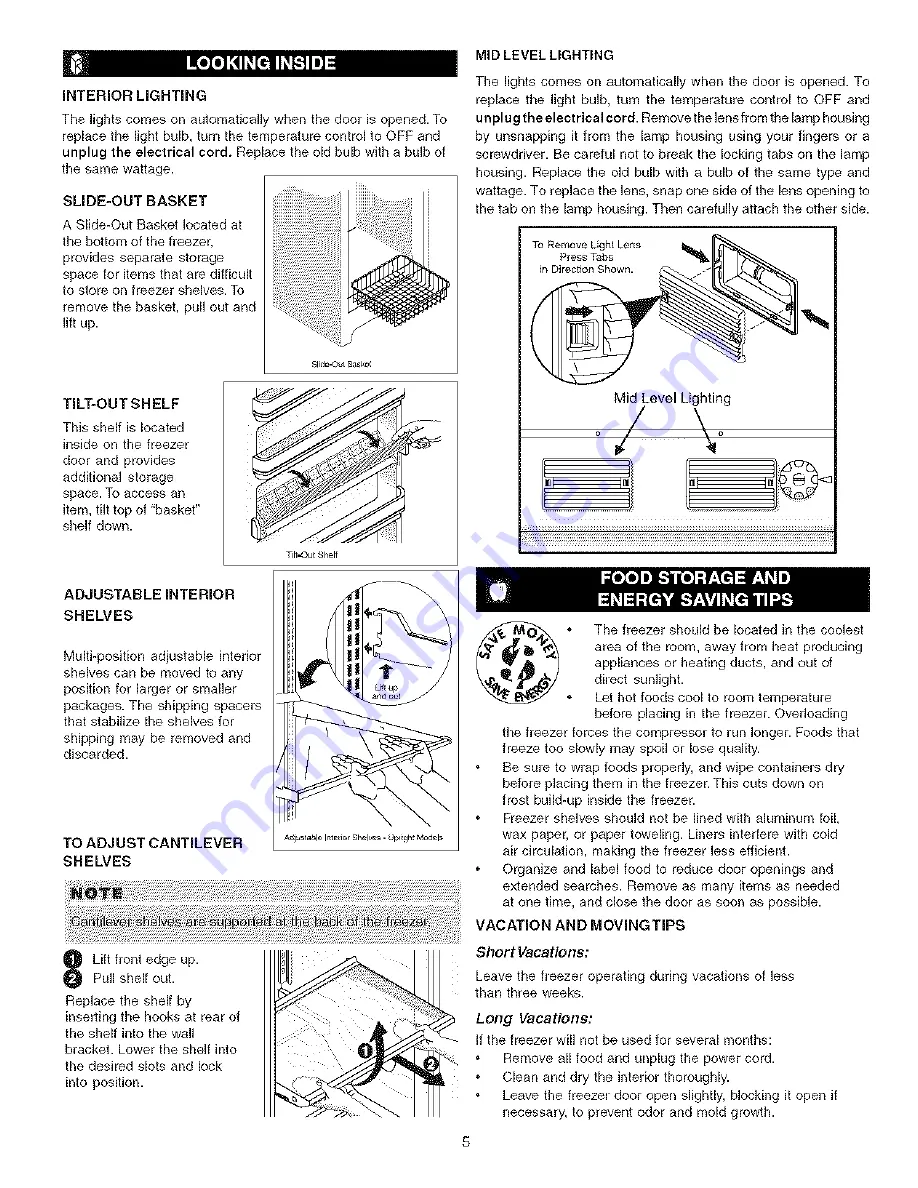
Page 5: ...r larger or smaller packages The shipping spacers that stabilize the shelves for shipping may be removed and discarded TO ADJUST CANTILEVER SHELVES Lift front edge up Pull shelf out Replace the shelf by inserting the hooks at rear of the shelf into the wall bracket Lower the shelf into the desired slots and lock into position The freezeJ should be located in the coolest area of the room away from ...

Page 6: ...r has an automatic ice maken _twill provide a sufficient supply of ice for normal use During the initial _ariup of your freezer however no ice will be produced during tbe first 24 hours of operation Automatic ice makers are also optional accessories that may be in ailed in some models at any time Call your local dealer for information TURNINGYOUR ICE MAKER ON After the plumbing connections have be...

Page 7: ...wring excess water out of sponge or cloth before cleaning around controls light bulb or any electrical part Wipe gaskets with a clean soft cloth Do not wash any removable items bins drawers etc in dishwasher Allow glass to warm to room temperature before immersing in warm water Do not use commercial bouseboH cleaners amn3onia or alcohol to clean handles Use a soft cloth to clean smooth handles Do ...

Page 8: ...rvice companies or external causes such as abuse misuse nadequate power supply accidents fires or acts of God DISCLAIMER OF IMPLIED WARRANTIES LIMITATION OF REMEDIES CUSTOMER S SOLE AND EXCLUSIVE REMEDY UNDER THIS LIMITED WARRANTY SHALL BE PRODUCT REPAIR OR REPLACEMENT AS PROVIDED HEREIN CLAIMS BASED ON IMPLIED WARRANTiES_ INCLUDING WARRANTIES OF MERCHANTABiLiTY OR FITNESS FOR A PARTICULAR PURPOSE...

Page 9: ... to a warmer setting Allow several hours for the temperature to stabilize Clean or change gasket Leaks in the door seal will cause freezer to run longer in order to maintain desired temperature Interior Freezer temperature is Temperature Control is set too Turn the control to a warmer setting Allow several hours too cold low for the temperature to stabilize Temperature Control is set too warfT Doo...

Page 10: ...pen the door less oilen is opened too h equently WATER MOISTURE FROST OUTSIDE FREEZER Moisture forms on ouside of Door may not be seating See DOOR PROBLEMS Section freezer properly causing the cold air from inside the freezel to meet warm moist air from outside ODOR IN FREEZER Odors in freezer Interior needs to be cleaned Clean interior with sponge warm water and baking Foods with strong odors are...

Reviews: