


20
General Cleaning
(Continued)
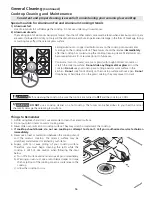
To Remove and Replace Oven Door
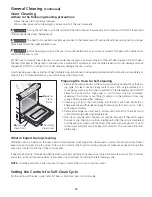
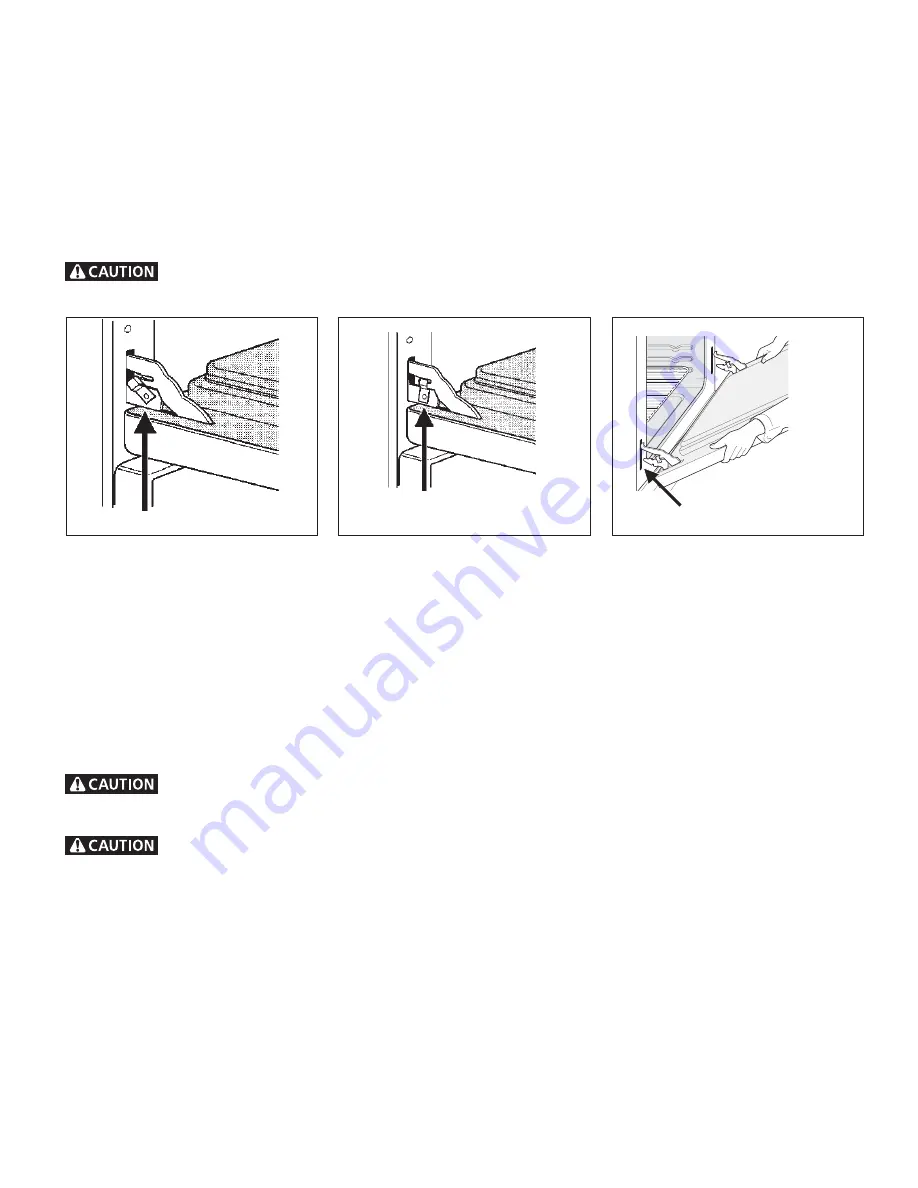
1. Open the door to the fully opened position.
2.
Pull up the lock located on both hinge supports and engage it in the hook of the hinge levers. You may have to apply a
little downward pressure on the door to pull the locks fully over the hooks.
3.
Grab the door by the sides, pull the bottom of the door up and toward you to disengage the hinge supports.
Keep pulling the bottom of the door toward you while rotating the top of the door toward the range to completely
disengage the hinge levers.
4.
Proceed in reverse to reinstall the door.
Make sure the hinge supports are fully engaged before unlocking the hinge levers.
The door is heavy. For safe, temporary storage, lay the door flat with the inside of the door facing down.
HINGE SLOT Door re-
moved from the range
Lock in normal position
Lock engaged
for door removal
Removable Outer Door Glass Panel
(some models)
Applicable only to models with an external glass panel not held with a frame. This design allows you to clean the inside face of
the exterior door panel as well as the hidden face of the door inner glass. There are two different kinds of glass panel; one with
a lower metal trim fixed on the underside of the glass panel and the other one with a lower metal support rail.
To remove the external door glass panel:
1. Pull the door off the range as per instructions under
“To Remove and Replace Oven Door”
in “Cleaning the Appliance”
section and lay the door flat.
2. Using a screwdriver, remove the screws fastening the glass lower metal trim or the glass assembly.
3. Grab both sides of the glass panel and slowly pull it out of the door upper moulding. Lay the glass flat.
Handle the glass panel with care. When dropped on a corner the glass panel may shatter in multiple fragments
and you could get hurt.
DO NOT
remove the lower metal trim, which is fixed on the underside of the glass panel.
To replace the external door glass panel:
1. Grab the sides of the glass panel and carefully insert the glass into the door top moulding.
2. Replace the glass lower trim or the glass assembly using the locking screws.
3. Replace the door onto the range as per
“To Remove and Replace Oven Door”
in “Cleaning the Appliance” section.


