background image

5

IMPORTANT SAFETY INSTRUCTIONS

 (continued)

IMPORTANT INSTRUCTIONS FOR CLEANING
YOUR RANGE

• Clean the appliance regularly to keep all parts free of

grease that could catch fire. 

Exhaust fan ventilation hoods

and grease filters should be kept clean. Do not allow grease
to accumulate. Greasy deposits in the fan could catch fire.
Refer to the hood manufacturer's instructions for cleaning.

• Cleaners/aerosols

—Always follow the manufacturer's rec-

ommended directions for use. Be aware that excess residue
from cleaners and aerosols may ignite causing damage and/
or injury.

SELF-CLEANING OVENS

• Clean in the self-cleaning cycle only the parts of the

oven listed in this owner's guide. 

Before self-cleaning

the oven, remove the broiler pan and any utensils stored in
the oven.

• Do not clean the oven door gasket. 

The door gasket is

essential for a good seal. Care should be taken not to rub,
damage or move the gasket.

SAVE THESE INSTRUCTIONS

• Do not use oven cleaners. 

No oven cleaner or oven liner

protective coating of any kind should be used in or around
any part of the oven.

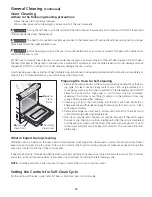
• Remove oven racks. 

Oven racks color will change if left in

the oven during a self-cleaning cycle.


The health of some birds is extremely

sensitive to the fumes given off during the self-clean
cycle of any range. Move birds to another well venti-
lated room.

IMPORTANT SAFETY NOTICE

The California Safe Drinking Water and Toxic Enforcement
Act requires the Governor of California to publish a list of
substances known to the state to cause cancer, birth defects
or other reproductive harm, and requires businesses to warn
customers of potential exposure to such substances.

Liquefied Petroleum (Propane) Gas Conversion

The cooktop can be used with Natural Gas or Propane Gas. It is shipped from the factory for use with natural gas.

If you wish to convert your appliance for use with LP/Propane gas, use the supplied fixed orifices located in a bag containing the
literature marked, "FOR LP/PROPANE GAS CONVERSION". Follow the instructions package with the orifices.

The conversion must be performed by a qualified service technician in accordance with the manufacturer's instructions and all
codes and requirements of the authority having jurisdiction. Failure to follow instructions could result in serious injury or property
damage. The qualified agency performing this work assumes responsibility for the conversion.

  Severe shock or damage to the appliance may occur if the appliance is not installed by a qualified installer.

Summary of Contents for GLCS378DSA

Page 1: ...version 5 Selecting Surface Cooking Utensils 6 Specialty Pans Trivets 6 Canning Tips Information 7 Setting Surface Controls 7 8 Flame Size 8 Proper Burner Adjustments 8 Before Setting Oven Controls 9 Setting Oven Controls 9 Setting Warmer Drawer Controls If Equipped 10 Speed BakeTM Cooking System If Equipped 11 Oven Baking 12 Broiling 13 General Cleaning 14 21 Changing Oven Light 21 Avoid Service ...

Page 2: ...___________________________________________ Serial Number __________________________________________________ Date of Purchase ________________________________________________ This Owner s Guide contains general operating instructions for your range and feature information for several models Your range may not have all the described features The graphics shown are representational The graphics on y...

Page 3: ...f interest to children in the cabinets above the appliance Do not leave children alone Children should not be left alone or unattended in the area where an appli ance is in use They should never be allowed to sit or stand on any part of the appliance DO NOT TOUCH SURFACE BURNERS GRATES AREAS NEAR THESE BURNERS OVEN HEATING ELEMENTS OR INTERIOR SURFACES OF THE OVEN OR WARMER DRAWER if equipped Both...

Page 4: ...ever Leave Surface Burners Unattended Boilovers cause smoking and greasy spillovers that may ignite or a pan that has boiled dry may melt Protective liners Do not use aluminum foil to line oven bottom or any other part of the appliance Only use aluminum foil as recommended for baking if used as a cover placed on the food Any other used of protective liners or aluminum foil may result in a risk of ...

Page 5: ... self cleaning cycle The health of some birds is extremely sensitive to the fumes given off during the self clean cycle of any range Move birds to another well venti lated room IMPORTANT SAFETY NOTICE The California Safe Drinking Water and Toxic Enforcement Act requires the Governor of California to publish a list of substances known to the state to cause cancer birth defects or other reproductive...

Page 6: ...s by rotating a ruler across the bot tom There should be no gaps between the pan and ruler Note Always use a utensil for its intend ed purpose Follow manufacturer s in structions Some utensils were not made to be used in the oven or on the cooktop Specialty pans such as lobster pots griddles and pressure cookers may be used but must conform to the above recommended cookware requirements Selecting ...

Page 7: ... Surface Burner Caps and Surface Burner Grates are installed correctly and at the correct locations 1 Place all 4 Burner Heads in the correct locations Make sure that the correct Burner Head is placed with the corresponding Orifice Holder and that the Electrode is located properly in the slot of each Burner Head See Figure 1 Proper Burner Head placement insures that each Burner will have the corre...

Page 8: ...rner see instructions under General Cleaning The surface control knob shown below may not look identical to the Surface Control Knobs on your range They are only representational Setting Surface Controls Continued Operating the Gas Surface Controls 1 Place cooking utensil on burner 2 Push in and turn the Surface Control knob to LITE Note All electronic ignitors will click at the same time However ...

Page 9: ...t of the rack upward and slide the rack back into place Arranging Oven Racks Tobakeonasinglerack place the rack in position 2 or 3 To bake on 2 racks place the racks in positions 2 and 3 Oven Vent Location The oven vent is located at right side of the front panel and visible when the oven door is open When the oven is on hot air is released through the vents This ventingisnecessaryforproperaircirc...

Page 10: ...ersettingstableisshowninFigure2 Ifaparticularfood is not listed start with the MED setting If more crispness is desired remove the lid or aluminum foil from the food Most foods can be kept at serving temperatures on the MED setting When a combination of foods are to be kept warm for instance meat with 2 vegetables and rolls use the HI setting To avoid heat loss do not open the Warmer Drawer while ...

Page 11: ... with items such as cakes cookies biscuits breads etc 3 When using two racks at the same time place them in positions 1 and 3 for the best results 4 When baking cakes with Speed Bake set temperature 25 F 13 C degrees lower than the recommended setting for best results To Set Speed BakeTM Cooking System 1 Program the oven as you normally would for baking Speed Bake may be used with Bake Time Bake a...

Page 12: ... the selected temperature be fore placing food in oven Choose pan sizes that will permit 5 1 cm to 10 2 cm 2 to 4 of air space on all sides when placed in the oven Use a medium weight aluminum baking sheet Allow oven to preheat to the selected temperature be fore placing food in the oven Use proper rack position for baking needs Set oven temperature 25 F 12 C lower than recom mended Set oven tempe...

Page 13: ... second Frozen meats also require additional time Broiling Tips The broiler pan and its grid allow dripping grease to drain and be kept away from the high heat of the broiler DO NOT use the pan without its grid DO NOT cover the grid with foil The exposed grease could ignite Should an oven fire occur close the oven door and turn off the oven If the fire continues throw baking soda on the fire or us...

Page 14: ...h stains may occur during heating that cannot be removed The holes in the burner of your range must be kept clean at all times for proper ignition and a complete even flame Clean the burners routinely and especially after bad spillovers which could clog these holes To remove clean and replace the entire burner cap assembly follow the instructions under General Cleaning DO NOT put burner parts in t...

Page 15: ...rfaceburnerheads TheGratesaredesignedtobeDishwashersafe for cleaning The ports or slots around the burner heads must be routinelycleaned Ifresiduestillremainsintheseports useasmall gauge wire or needle to clean the slots or holes For proper flow of gas and ignition of the burner DO NOT ALLOW SPILLS FOOD CLEANING AGENTS OR ANY OTHER MATERIAL TO ENTER THE GAS ORIFICE HOLDER OPENING ALWAYS keep the s...

Page 16: ... not cook foods directly on the cooktop surface without a pan Do not drop heavy or hard objects on the glass cooktop they may cause it to crack Before cleaning the cooktop be sure the controls are turned to OFF and the cooktop is COOL DO NOT use a cooktop cleaner on a hot cooktop The fumes can be hazardous to your health and can chemically damage the ceramic glass surface General Cleaning Continue...

Page 17: ...urface Use a small amount of cleaner creme with clean damp paper towel Cleaning Materials for Ceramic Glass Cooktop Some cleaning materials may contain an ingredient which can damage the cooktop Use recommended materials only see below Cleaner cream should be used regularly Prior to using your cooktop for the first time apply a cleaner cream to the ceramic surface A sample of CERAMA BRYTE cleaner ...

Page 18: ...using cleaner cream Cause Condensation when cooking often collects and drips from cookware The minerals found in water supply and foods may cause a gray or brown film to develop on cooktop This film is so thin it cannot be felt and appears to be under cooktop To Prevent Daily and proper use of cleaner cream To Remove Wet surface with water and sprinkle on cleaner cream Scrub with clean damp paper ...

Page 19: ... allow food spills with a high sugar or acid content such as tomatoes sauerkraut fruit juices or pie filling to remain on the surface as they may cause a dull spot even after cleaning 2 Clean any soil from the oven frame and the door liner see illustration These areas heat sufficiently during self cleaning cycle to burn soil on Clean with soap and water 3 Remove the broiler pan and insert all uten...

Page 20: ... allows you to clean the inside face of the exterior door panel as well as the hidden face of the door inner glass There are two different kinds of glass panel one with a lower metal trim fixed on the underside of the glass panel and the other one with a lower metal support rail To remove the external door glass panel 1 Pull the door off the range as per instructions under To Remove and Replace Ov...

Page 21: ...the drawer in gently and it will spring open To close push the drawer until you hear a click which indicates that the spring is compressed and the drawer is closed To remove the drawer 1 Pull empty drawer out to the roller guide stop 2 Tilt the drawer up and pull it out over the rollers To replace the drawer 1 Insert the rear end of the drawer into the opening 2 Fit the drawer end rollers onto the...

Page 22: ... in too tight Contact a cabinet maker to correct the problem Contact builder or installer to make appliance accessible Carpeting interferes with range Provide sufficient space so range can be lifted over carpet Make sure cord plug is tightly into outlet Service wiring is not complete Contact your dealer installaling agent or authorized servicer Power outage Check house lights to be sure Call your ...

Page 23: ...lame is unavoidable Coarse particles such as salt or sand between cooktop and utensils can cause scratches Be sure cooktop surface and bottoms of utensils are clean before usage Small scratches do not affect cooking and will become less visible with time Cleaning materials not recommended for ceramic glass cooktop have been used See Cooktop Cleaning Ceramic Glass Cooktop Models section under Gener...

Page 24: ...ke are present stop the self clean cycle and follow the steps under Stopping or Interrupting the Self Cleaning Cycle in the Electronic Oven Control guide Control s not set properly Follow instructions under Setting Oven Controls guide Make sure oven is opened to Broil Stop Position Meat too close to the element Reposition the rack to provide proper clearance between the meat and the element Prehea...

Page 25: ...Notes ...

Page 26: ...26 Notes ...

Page 27: ...27 Notes ...

Page 28: ...on or limitation of incidental or consequential damages so this limitation or exclusion may not apply to you 2 Service calls which do not involve malfunction or defects in workmanship or material or for appliances not in ordinary household use The consumer shall pay for such service calls 3 Damages caused by services performed by servicers other than Electrolux Home Products North America or its a...

Reviews: