background image

Summary of Contents for GLEB27M9FBB

Page 1: ...Cycle 34 36 Microwave Oven Care Cleaning 37 Wall Oven Care Cleaning 38 40 Adjusting your Oven Temperature 41 Before You Call Solutions to Commo Problems 42 43 Vis the Frigidaire Web Site at http www frigidaire com Warranty Back Cover READ AND SAVE THESE fNS TRUOTIONS 318205117 0703 Rev A ...

Page 2: ... look exactly like those shown These instructions are not meant to cover every possible condition and situation that may occur Common sense and caution must be practiced when installing operating and maintaining any appliance Please record your model and serial numbers below for future reference Model Number Serial Number Purchase Date Product Registration Register Your Product The PRODUCT REGISTR...

Page 3: ...ature package for this appliance Ask your dealer to recommend a qualified technician and an authorized repair service Know how to disconnect the electrical power to the appliance at the circuit breaker or fuse box in case of an emergency All wall ovens can tip Injury to persons could result install mounting bracket packed with wall oven See Installation Instructions To reduce the risk of tipping t...

Page 4: ... IMPORTANT INSTRUCTIONS FOR USING YOUR MICROWAVE To reduce the risk of fire burns electric shock injury to persons or exposure to excessive microwave energy when using your appliance follow basic precautions including the following sections Read all instructions before using the appliance Read and follow the specific PRECAUTIONS TO AVOID POSSIBLE EXPOSURE TO EXCESSIVE MICROWAVE ENERGY on page 3 So...

Page 5: ...osed fat and grease could ignite Do not touch a hot oven light bulb with a damp cloth Doing so could cause the bulb to break Disconnect the appliance or shut off the power to the appliance before removing and replacing the bulb Protective liners Do not use aluminum foil to line the oven bottom Only use aluminum foil as recommended in this manual Improper installation of these liners may result in ...

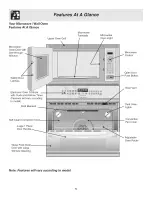
Page 6: ...w Microwave Safety Door Latches Open Door Button Electronic Oven Controls with Clock and Kitchen Timer Features will vary according to model Broil Element Oven Vent Dual Oven Lights Self Clean Convection Large 1 Piece Convection Fan Cover Glass Front Oven Door with Large Window Opening ustable Oven Racks Note Features will vary according to model 6 ...

Page 7: ... results For inside oven standing time you can program a 0 power stage of cooking cycle See Multiple Stage Cooking Check for doneness Look for signs indicating that cooking temperatures have been reached Doneness signs include Food steams throughout not just at edge Center bottom of dish is very hot to the touch Poultry thigh joints move easily Meat and poultry show no pinkness Fish is opaque and ...

Page 8: ...eet your needs A microwave safe thermometer will assist you in determining correct doneness and assure you that foods have been cooked to safe temperatures Electrolux is not responsible for any damage to the microwave oven when accessories are used ABOUT CHILDREN AND THE MICROWAVE Children below the age of 7 should use the microwave oven with a supervising person very near to them Between the ages...

Page 9: ...rs during cooking the program will be erased The time of day will also be erased Simply touch Clear Off pad and reset the clock for the correct time o1day NOTE Your microwave oven can be programmed with the door open except 1or START SENSOR COOKING ONE TOUCH COOKING DEFROST and Plus 1 Min CLEAR OFF Touch the Clear off pad to 1 Erase if you make a mistake during programming 2 Cancel timer 3 Stop th...

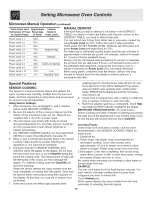
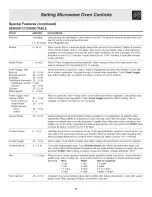
Page 10: ...KING selection can be programmed with More or Less Time Adjustment See page 16 5 More or less food than the quantity listed in the Sensor Cooking Table should be cooked following the guidelines in any microwave cookbook 6 During the first part of SENSOR COOKING food selection name will appear on the display Do not open the microwave oven door or touch Clear Off during this part of the cooking cycl...

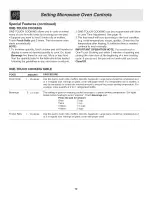
Page 11: ...e safe rack and cover with wax paper Place ground meat in a casserole and cover with wax paper or plastic wrap When microwave oven stops turn patties over or stir meat in casserole to break up large pieces Re cover and touch START After cooking let stand covered for 2 to 3 minutes Frozen Entrees 6 17 oz Use this pad for frozen convenience foods it will give satisfactory results for most brands You...

Page 12: ... You must touch a One Touch Cooking pad within 3 minutes of opening and closing the oven door at the beginning of a new cooking cycle If you de not the pad will not work until you touch Clear Off ONE TOUCH COOKING TABLE FOOD AMOUNT PROCEDURE Fresh Rolls I 10 pieces Use this pad to warm rolls muffins biscuits bagels etc Large items should be considered as 2 or 3 of regular size Arrange on plate cov...

Page 13: ...ter weight by touching the number pads Ex touch Steaks Chops then 3 and 0 for a weight of three pounds or touch Steaks Chops then 2 and 2 for a weight of 2 2 lb IMPORTANT OPERATION NOTE You must touch a Defrost pad within 3 minutes of opening and closing the oven door at the beginning of a new cooking cycle If you do not the pad will not work until you touch Clear Off DEFROST TABLE FOOD AMOUNT PRO...

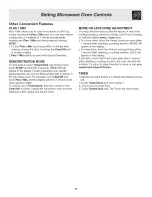
Page 14: ...ve oven safely until the Auto Start time Acorn or butternut squash are often a good choice Do not use foods that can easily spoil 4 If you wish to know the time of day simply touch the Timer Clock pad As long as your finger is touching the Timer Clock pad the time of day will be displayed 4 LanguagelWeight Selection The microwave oven comes set for English and U S Customary Unit pounds To change t...

Page 15: ...kly to END To cancel touch TimedClock then the number 0 and Clear Off If easier unplug the microwave oven from the electrical outlet replug and set the clock MORE OR LESS DONE ADJUSTMENT You may discover that you like the results of one of the cooking functions Sensor Cooking One Touch Cooking or Defrost slightly more or less done D For more done touch the Power Level pad once within 1 second afte...

Page 16: ...NGE OVEN RACKS WHEN THE OVEN IS COOL PRIOR TO OPERATING THE OVEN Always use oven mitts when using the oven To remove an oven rack pull the rack forward until it stops Lift up front of rack and slide out To replace an oven rack fit the rack onto the guides on the oven walls Tilt the front of the rack upward and slide the rack back into place Air Circulation in the Oven For best air circulation and ...

Page 17: ...imer ON OFF Pad Usedto Pad Use to Use tosetthe set or cancel the minute selectthe Keep time of day timer The minute timer does not start or stop cooking Warm feature Maxx Clean Pad Use to select the Maxx Oven Light Used Clean feature to turn the even light on and off Clear Off Used to cancel any function previously entered except the time of day and minute timer Push Clear Off pad to stop cooking ...

Page 18: ... 2 2 Press _ _ 0_ pads to set the time of day to 1 30 Figure 3 CLO will stay in the display Press Q CLO will disappear and the clock will start Figure 4 Changing between 12 or 24 hour time of day display 1 Press and hold for 7 seconds Figure 3 After 7 seconds _ for 7 seconds 12Hr Figure 5 or 24Hr Figure 6 will appear in the display and the control will beep once 2 Press _ea_ to switch between the ...

Page 19: ...e 4 display will return to day or press to reject the change time of Setting Timer for 7 seconds Figure 1 Figure 2 Figure 3 Figure 4 The TIMER ON OFF _ _ pad controls the Timer feature The Timer serves as an extra timer in the kitchen that will beep when the set time has run out It does not start or stop cooking The Timer feature can be used during any of the other oven control functions Refer to ...

Page 20: ...pletely unlocked figure 2 for 3 seconds for 3 seconds Figure 1 Figure 2 2 The wall oven is again fully operational Setting Silent Control Operation The STARTTIME _ and CLEAN _ea_ pads control the Silent Control operation feature The Silent Control operation V v feature allows the oven control to be operated without sounds or beeps whenever necessary If desired the control can be programmed for sil...

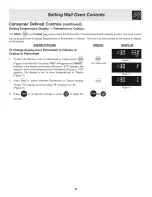
Page 21: ...renheit to Celsius or Celsius to Fahrenheit 1 To tell if the display is set for Fahrenheit or Celsius press Figure 1 and hold for 7 seconds 550 will appear and BROIL will flash in the display and a beep will sound If F appears the display is set to show temperatures in Fahrenheit Figure 2 If C appears the display is set to show temperatures in Celsius Figure 3 2 Press _tea_ to switch between Fahre...

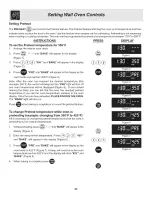
Page 22: ...ff and oven temperature will be displayed Figure 4 If you missed hearing the beep you can tell that the oven has reached preheat temperature if you see the oven temperature showing in the oven display Once the oven has preheated PLACE FOOD IN THE OVEN The BAKE light will stay on Press _ when baking is complete or to cancel the preheat feature To change Preheat temperature while oven is preheating ...

Page 23: ...beep will sound once the oven temperature reaches 350 F and the display will show 350 and BAKE Figure 3 Pressing will cancel the Bake feature at any time Figure 1 Figure 3 To change the Bake Temperature example changing from 350 F to 425 F 1 After the oven has already been set to bake at 350 F and the oven temperature needs to be changed to 425 F press _Bak_ Figure4 will appear and BAKE will flash...

Page 24: ...o fre quently Allow oven to preheat to the selected temperature before placing food in oven Choose pan sizes that will permit 5 1 cm to 10 2 cm 2 to 4 of air space on all sides when placed in the oveR Use a medium weight aluminum baking sheet Allow oven to preheat to the selected temperature before placing food in the oven Use proper rack position for baking needs Set oven temperature 25 F 12 C lo...

Page 25: ... if cooking on multiple racks place the oven racks in positions 2 and 3 iNSTRUCTiONS To set the oven for Convection Bake and temperature to 350 F 1 Arrange interior oven racks and place food in oven 2 Press _o_ CONV BAKE will flash and will appear in the display Figure 1 3 4 Press CONV BAKE and 350 will appear in the display Figure 2 Press O The temperature will be decreased by 25 F 13 C CONV BAKE...

Page 26: ...d Bake or a Delayed Timed Bake setting the Convection Convert feature will display a CF for check food when the bake time is 75 complete See Figure 7 At this time the oven control will sound 3 long beeps at regular intervals until baking has finished When the bake time has completely finished the control will display End and will sound 3 long beeps every 30 seconds until the iNSTRUCTiONS Using Con...

Page 27: ... on in the display Figure 6 Once the Timed Bake feature has started the current time of day will appear in the display Note After the Timed Bake feature has activated press _tBi_ to display the bake time remaining in the Timed Bake mode Once Timed Bake has started baking a beep will sound when the oven temperature reaches the set temperature DISPLAY Figure 1 helm Figure 2 Figure 3 Figure 4 Figure ...

Page 28: ...ll appear and BAKE and 350 will remain in the display Figure 4 Enter the desired baking time using the number pads by pressing _ _ _ _0_ TIMED will flash BAKE 30 00 and 350 will in the appear display Figure 5 Note Baking time can be set for any amount of time from 1 minute to 11 hours and 59 minutes TIMED BAKE and 350 will remain in the display Press Figure 6 Press _ _ DELAY will flash in the disp...

Page 29: ... oven racks and place food in oven 2 Press _ HLd will appear in the display Figure 1 Note If no pad is touched within 25 seconds the request to turn ON Keep Warm feature will be cancelled 3 Press Q The oven icon will appear in the display Figure 2 turn the Keep Warm OFF at any time press _ or 4 To Note The Keep Warm feature will automatically turn OFF after 3 hours Figure 1 or Figure 2 To set Keep...

Page 30: ...er the broiler element Make sure the oven door is in the broil stop position See Figure 4 3 Press _Bro_ BROIL will flash and 550 will appear Figure 1 4 If a lower broil temperature is desired minimum broil temperature setting is 400 F press the desired temperature before continuing to step 5 5 Press The oven will begin to broil BROIL and 550 will 6 appear in the display Figure 2 Broil on one side ...

Page 31: ...ts also require additional time Broiling Tips Grid The broiler pan and its grid allow dripping grease to drain and be kept away from the high some models heat of the broiler DO NOT use the pan without its grid DO NOT cover the grid with foil The exposed grease could ignite Should an oven fire occur close the oven door and turn off the oven If the fire continues throw baking soda on the fire or use...

Page 32: ... ONLY the following key pads will function after setting the Sabbath feature to _ O ALL OTHER KEYPADS will not function once the Sabbath feature is properly activated INSTRUCTIONS PRESS DISPLAY To Program the Oven to Begin Baking Immediately activate the Sabbath feature example baking at 350 F 1 Be sure that the clock is set with the correct time of day 2 Place the food in the oven 3 Press _ appea...

Page 33: ... at least 3 seconds _ and_ This also turns off the oven SAb will disappear from the display Figure 1 Figure 1 Should you experience a power failure or interruption the oven will shut off When power is returned the oven will not turn back on automatically The oven will remember that it is set for the Sabbath and the food may be safely removed from the oven while still in the Sabbath feature however...

Page 34: ...ated porcelain oven racks which can remain in the oven during the self clean cycle Do not clean this vegetable oil lubrication off the racks It is important that the sides of the oven racks always have a light coating of vegetable oil To maintain optimal rack performance re apply a thin layer of vegetable oil to the sides of the rack after every self clean cycle or when the rack becomes difficult ...

Page 35: ...h and 3 00 HR will show in the _ display Figure 1 The control will automatically clean for a 3 hour period default self cleaning cycle time Note If a 2 or 4 hour clean time is desired press for 2 hour or press for a 4 or hour clean time Set the cleaning time based on the amount of soil light medium or heavy See above 3 Press The DOOR LOCKED icon will flash CLEAN DISPLAY Figure 1 Figure 2 icon and ...

Page 36: ...ven oven door lock will begin to close automatically Once the door has been locked the DOOR LOCKED indicator light will quit flashing and remain on 5 Press _ Enter the desired start time using the number pads _ Figure 3 6 Press The CLB icon will turn off DELAY DOOR or Figure 1 Figure 2 Figure 3 Figure 4 Figure 5 7 LOCKED and CLEAN icons will remain on Figure 4 The control will start the self clean...

Page 37: ...nterior surfaces therefore there is no baking and setting of spills or spattering To clean the interior surfaces wipe with a soft cloth and warm water DO NOT USE ABRASIVE OR HARSH CLEANERS OR SCOURING PADS For heavier soil use baking soda or a mild soap rinse thoroughly with hot water The waveguide cover is located on the ceiling in the microwave oven cavity It is made from mica so it requires spe...

Page 38: ...a cloth Do not use cleaners with high concentrations of chlorides or chlorines Do not use harsh scrubbing cleaners Only use kitchen cleaners that are especially made for cleaning stainless steel Always be sure to rinse the cleaners from the surface as bluish stains may occur during heating that cannot be removed Oven Backs Gentle scouring with a soapy scouring pad will remove most spots Rinse with...

Page 39: ...n door Special Door Care instructions Most oven doors contain glass that can break Read the following recommendations 1 Do not close the oven door until all the oven racks are fully in place 2 Do not hit the glass with pots pans or any other object 3 Scratching hitting jarring or stressing the glass may weaken its structure causing an increased risk of breakage at a later time Changing the Oven Li...

Page 40: ...When re installing the hidden bake cover be sure to put it all the way to the back o1the oven and lay it down on the 2 shoulder screws Then push the front edge of the cover in its place below the front bracket To have easier access to the hidden bake cover first remove the oven door by following the instructions above iMPORTANT Always replace the hidden bake cover before the next use 4O ...

Page 41: ...s for S seconds O will appear in the display Figure 1 2 To increase the temperature use the number pads to enter the change Example 30 F Figure 2 desired The temperature may be increased by as much as 35 F 19 C 3 Press to accept the temperature change and the display will return to the time of day Figure 3 Press change if necessary I to reject the To adjust the oven temperature lower 1 Press for 6...

Page 42: ...rogram the oven if a fault reoccurs Ff 1 record the fault number Press CLEAR OFF and call Electrolux or another qualified servicer dr is displayed The door was left open and controls set for self cleaning cycle Close the door and push CLEAR OFF pad Installation Place oven rack in center of oven Place a level on the oven rack Contact installing agent if rack and cabinet cutout flooring are not leve...

Page 43: ...d Grease has built up on oven surfaces Regular cleaning is necessary when broiling frequently Old grease or food spatters cause excessive smoking Poor baking results Many factors affect baking results See Oven Baking for hints causes and corrections See Adjusting Oven Temperature Self cleaning cycle does not work Make sure the oven door is closed Controls not set properly Follow instructions Self ...

Page 44: ...her than authorized service companies or external causes such as abuse misuse inadequate power supply accidents fires or acts of God DISCLAIMER OF IMPLIED WARRANTIES LIMITATION OF REMEDIES CUSTOMER S SOLE AND EXCLUSIVE REMEDY UNDER THIS LIMITED WARRANTY SHALL BE PRODUCT REPAIR OR REPLACEMENTAS PROVIDED HEREIN CLAIMS BASED ON IMPLIED WARRANTIES INCLUDING WARRANTIES OF MERCHANTABILITY OR FITNESS FOR...

Reviews: