2
PRE-INSTALLATION REQUIREMENTS
Tools Required for Installation:
1.
3/8 in. socket with ratchet.
2.
Channel-lock adjustable pliers.
3.
Carpenter’s level.
ELECTRICAL REQUIREMENTS
CIRCUIT
- Individual, properly polarized and grounded 15 amp.
branch circuit fused with 15 amp. time delay fuse or circuit breaker.
POWER SUPPLY
- 2 wire, with ground, 120 volt, single phase, 60
Hz, Alternating Current.
OUTLET RECEPTACLE
- Properly grounded 3-prong receptacle to
be located so the power supply cord is accessible when the washer is
in an installed position.
GROUNDING REQUIREMENTS
Improper connection of the equipment grounding
conductor can result in a risk of electrical shock. Check with a licensed
electrician if you are in doubt as to whether the appliance is properly
grounded.
1.
The washer
MUST
be grounded. In the event of a malfunction
or breakdown, grounding will reduce the risk of electrical shock
by a path of least resistance for electrical current.
2.
Since your washer is equipped with a power supply cord having
DRAIN REQUIREMENTS
1.
Drain capable of eliminating 17 gallons (64.3 L) per minute.
2.
A standpipe diameter of 1-1/4 in. (3.18 cm) minimum.
3.
The standpipe height above the floor should be:
Minimum height:
33 in. (61 cm)
Maximum height:
96 in. (244 cm)
NOTE:
For installations requiring a longer drain hose, have a
qualified technician install a longer drain hose according
to your model number. For drain systems in the floor,
install a syphon break kit, P/N 5377678100. Both parts
are available from an authorized parts distributor.
an equipment-grounding conductor and a grounding plug, the
plug
MUST
be plugged into an appropriate, copper wired
receptacle that is properly installed and grounded in accordance
with all local codes and ordinances or in the absence of local
codes, with the National Electrical Codes,
ANSI/NFPA 70 (latest edition). If in
doubt, call a licensed electrician.
DO NOT
cut off or alter the
grounding prong on the power
supply cord. In situations where a
two-slot receptacle is present, it is
the owner’s responsi-
bility to have a licensed electrician
replace it with a
properly grounded
three prong grounding type receptacle.
3.
For added personal safety, connect a separate ground wire (No.
18 minimum) from a top panel hinge screw on the rear of the
washer to a grounded cold water pipe.
DO NOT
ground to a gas
supply pipe or hot water pipe.
4.
Grounded cold water pipe
MUST
have metal continuity to
electrical ground and
MUST
register no more than 25 ohms
resistance. It
MUST
not be interrupted by plastic, rubber, or
other electrical insulating connectors such as hoses, fittings,
washers, gaskets (including water meter or pump). Any electrically
insulated connector should be jumped with a length of No. 4
copper wire securely clamped to bare metal at both ends with a
UL approved ground clamp.
5.
If a grounded water pipe is not available, a ground rod
MUST
be used and register no more than 25 ohms resistance when in
the ground. Drive the rod into the ground outside the dwelling
and connect a grounding wire (12 AWG or heavier) between the
grounding screw and the grounding rod. It may take more than
one ground rod to not exceed 25 ohms resistance to ground.
WATER SUPPLY REQUIREMENTS
Hot and cold water faucets
MUST
be installed within 42 inches (107
cm) of your washer’s water inlet. The faucets
MUST
be 3/4 inch (1.9
cm) garden hose type so inlet hoses can be connected. Water pressure
MUST
be between 10 and 120 pounds per square inch (maximum
unbalance pressure, hot vs. cold, 10 psi.) Your water department can
advise you of your water pressure. The hot water temperature should
be about 140 degrees F (60 degrees C).
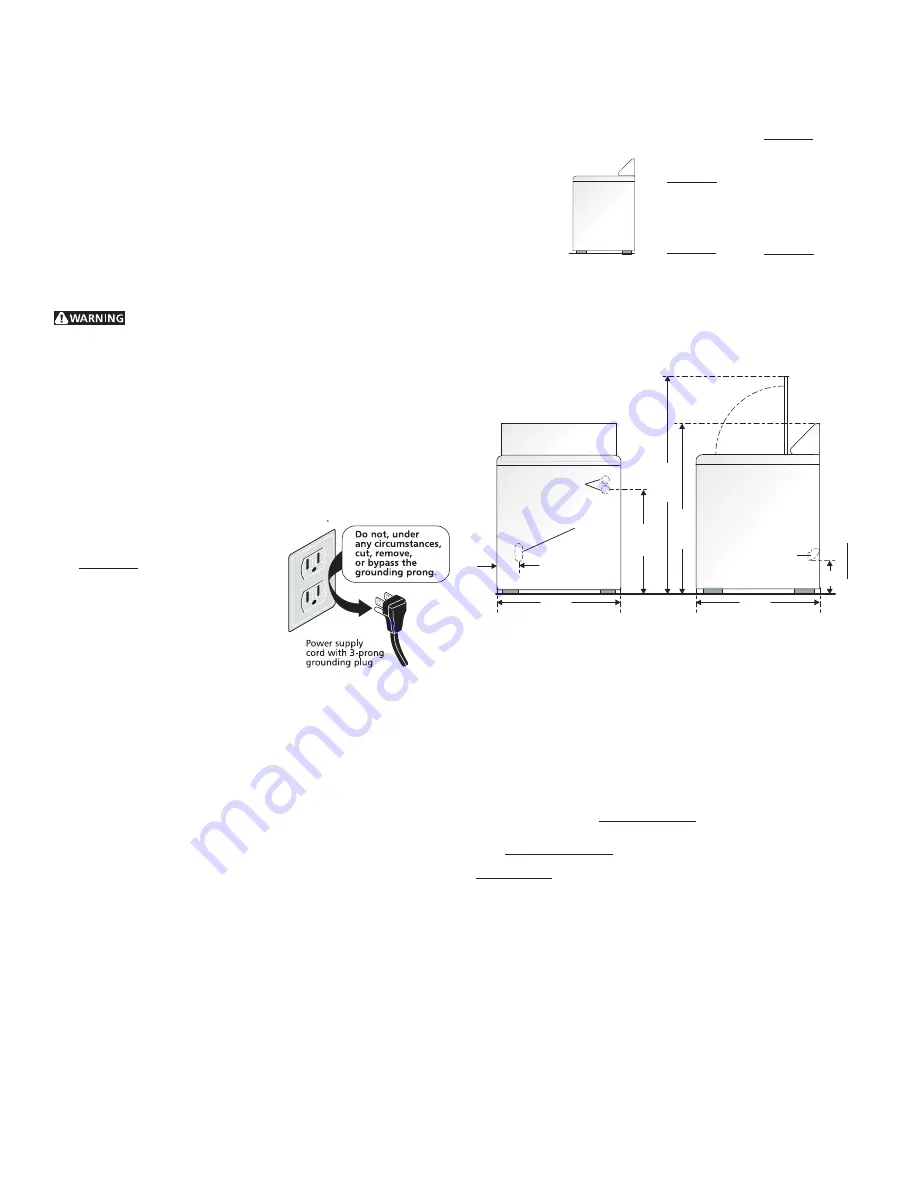
ROUGH-IN DIMENSIONS
LID OPEN 90°
FRONT VIEW
SIDE VIEW
DRAIN
O U T L E T
DRAIN
O U T L E T
( R E A R )
WAT E R
I N L E T S
( R E A R )
27"
27"
3-3/4"
(129.54
cm)
(9.53 cm)
(68.58 cm)
(68.58 cm)
(74.77 cm)
29-7/16" (111.76
cm)
44"
51"
←
11-7/16"
↓
↓
↑
↑
96" Max.
(244 cm)
33" Min.
(61 cm)
LOCATION OF YOUR WASHER
DO NOT INSTALL YOUR WASHER:
1.
In an area exposed to dripping water or outside weather
conditions. The ambient temperature should never be below
60 degrees F (15.6 degrees C) for proper washer operation.
2.
In an area where it will come in contact with curtains or drapes.
3.
In an area (garage or garage-type building) where gasoline of
other flammables are kept or stored (including automobiles).
4.
On carpet. Floor
MUST BE SOLID
with a maximum slope of 1 in.
(2.54 cm). To ensure vibration or movement does not occur,
REINFORCEMENT
of the floor may be necessary.
IMPORTANT MINIMUM INSTALLATION CLEARANCES
When installed in alcove:
Sides = 0" (0 cm),
Rear = 0" (0 cm), Top = 20" (50.8 cm).
When installed in closet:
Sides = 0" (0 cm),
Rear = 0" (0 cm), Top = 20" (50.8 cm), Front = 1"
(2.54 cm).
Closet door ventilation openings required: 2 louvers each 60 square
inches (387 cm
2
) — 3 inches (7.6 cm) from bottom and top of door.
(29.05 cm)
UNPACKING
1.
Using the four shipping carton corner posts (two on each side),
carefully lay the washer on its left side and remove foam shipping
base.
2.
Using a ratchet with 3/8" socket, remove the mechanism shipping
bolt and plastic spacer block from the center of the base.


