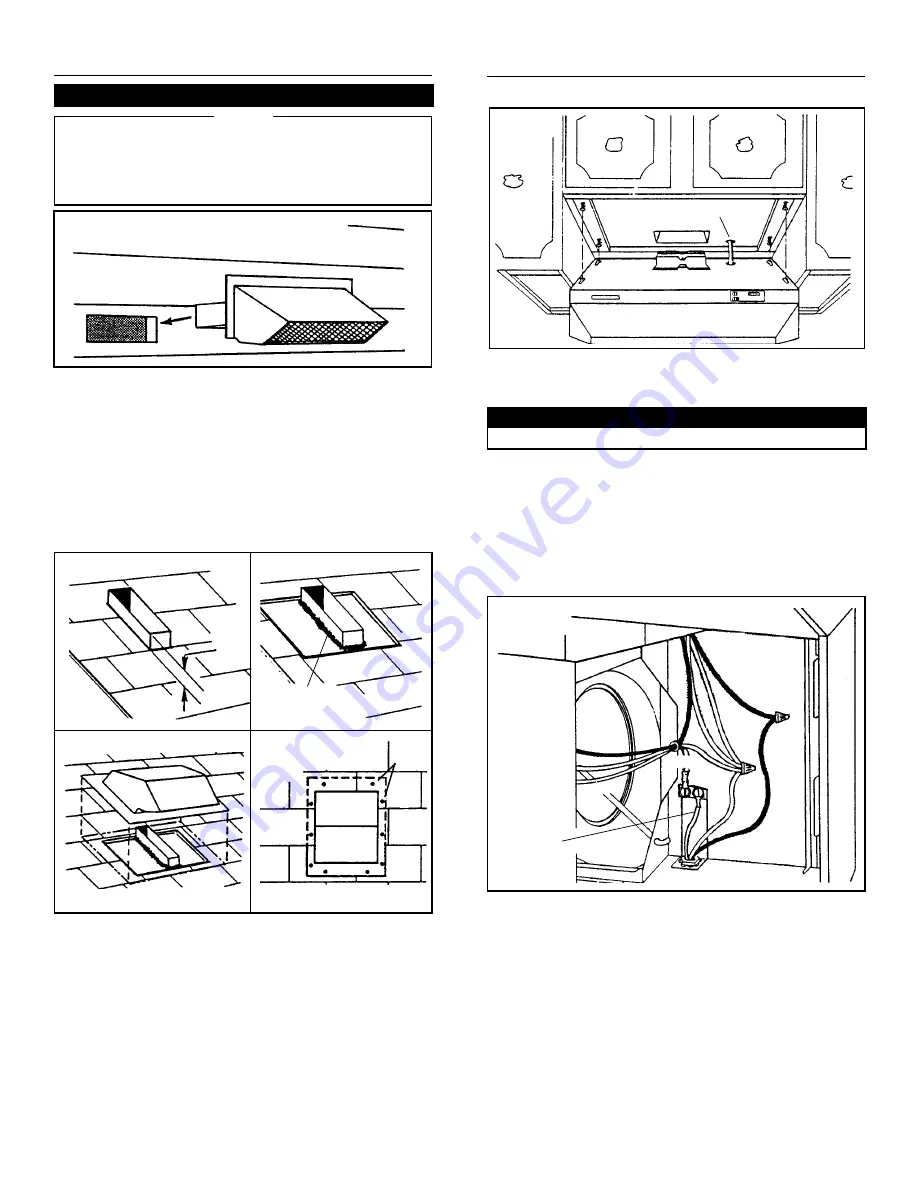
FIG. 6
INSTALL THE DUCTWORK
For Ducted Installations Only:
NOTE
THESE INSTRUCTIONS WILL FOLLOW THE PLANS
MADE ON PAGE 2. START ON THE OUTSIDE AND
WORK BACK TOWARD HOOD. FOLLOW
APPROPRIATE DIRECTIONS FOR TYPE OF DUCT
SYSTEM YOU ARE INSTALLING.
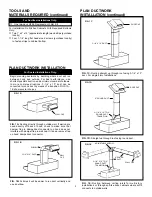
WALL CAPS (FIG. 6)
Use a saber saw to cut a hole slightly larger than duct so
duct will line up easily with hood. Install casing strips on
outside walls finished in siding. Assemble the ductwork and
tape all joints. Run ductwork back to hood. Fasten wall cap
to last section of duct and nail or screw cap to wall. Seal all
around flange on wall cap with caulking compound. Make
sure that enough duct runs into the room so that the duct
will overlap the damper/duct connector by 3/4” when the
hood is installed.
5
FIG. 7A
FIG. 7B
3/4"
PLASTIC ROOF
CEMENT
FIG. 7C
FIG. 7D
NAIL
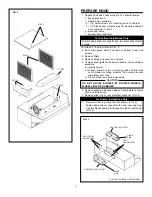
ROOF CAPS (FIGS. 7A - 7D)
Cut hole in roof slightly larger than duct so duct will line up
easily with hood. Trim shingles around hole so that they will
fit snugly around hood of cap when cap is installed. Assemble
the ductwork and tape all joints. Run the ductwork down to
hood. Trim duct parallel to roof pitch, leaving 3/4” of duct
projecting above roof (FIG. 7A). Seal all around duct with
roof cement. (FIG 7B) Install roof cap, inserting back edge
of cap under shingles. (FIG 7C) Seal around roof cap with
roof cement and seal all nail heads and shingles which were
cut or lifted. (FIG. 7D)
Make sure that enough duct runs into the room so that the
duct will overlap the damper/duct connector by 3/4” when
the hood is put into place.
ELECTRICAL LINE
FIG. 8
INSTALL HOOD
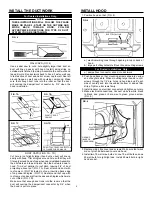
1. Position hood so that: (FIG. 8)
a.) electrical wiring runs through opening in top or back of
hood.
b.) large part of keyhole slots fit over hood mounting screws
For Ducted Installations Only:
c.) damper/duct connector slides into ductwork.
2. Push hood back so that mounting screws slide into narrow
end of keyhole slots. When mounting larger hoods, run (2)
screws through the 1/4” dia. holes (in hood top and 8” each
side of center) and into the cabinet bottom or added filler
strips. Tighten all screws firmly.
3. Install locknut on electrical connector and tighten securely.
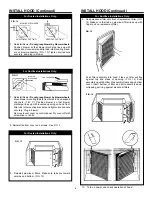
4. Make electrical connections. Connect white to white, black
to black, and green or bare wire to green ground screw.
(FIG. 9)
5. Replace wiring box cover and screws. Make sure that wires
are not pinched between cover and hood.
6. Install two 75 watt max. bulbs, or one 75 watt bulb and one
25 watt bulb for night-light use. Install 25 watt bulb in right-
hand socket.
FIG. 9
GROUND
(BARE OR
GREEN WIRE)
BLACK
BLACK
BLACK
WHITE
WHITE
GREEN
GREEN
WHITE
BLACK
WHITE
DO NOT CAULK AROUND BOTTOM
OF FLANGE FOR DRAINAGE


