background image

4

Important Safety Instructions

 Never use your appliance for warming or

heating the room.

IMPORTANT INSTRUCTIONS FOR USING
YOUR WARM & SERVE DRAWER

• Protective Liners

—Do not use aluminum foil to line

warmer drawer. Any other use of protective liners or
aluminum foil may result in poor performance or damage to
the appliance. Only use aluminum foil as recommended for
baking if used as a cover placed on the food.

• Glazed Cooking Utensils

—Only certain types of glass,

glass/ceramic, ceramic, earthenware, or other glazed
utensils are suitable for use without breaking due to the
sudden change in temperature. Check the manufacturer's
recommendations.

• Use Care When Opening Warmer Drawer

—Stand to the

side of the unit when opening the door of a hot drawer. Let
hot air or steam escape before you remove or replace food
in the warmer drawer.

• Placement of Warmer Drawer Racks

—Always place rack

in desired location while drawer is cool. If rack must be

moved while hot, use extreme caution. Use potholders and
grasp the rack with both hands to reposition. Do not let
potholders contact the hot element or interior of the warmer
drawer. Remove all utensils from the rack before removing
rack.

IMPORTANT INSTRUCTIONS FOR
CLEANING YOUR WARM & SERVE DRAWER

• Clean the drawer regularly to keep all parts free of

grease that could catch fire. 

Do not allow grease to

accumulate. Greasy deposits could catch fire.

• Kitchen cleaners/aerosols

—Always follow the

manufacturer's recommended directions for use. Be aware
that excess residue from cleaners and aerosols may ignite
causing damage and/or injury.

IMPORTANT SAFETY NOTICE

The California Safe Drinking Water and Toxic Enforcement Act
requires the Governor of California to publish a list of
substances known to the state to cause cancer, birth defects or
other reproductive harm, and requires businesses to warn
customers of potential exposure to such substances.

Before Setting Control

SAVE THESE INSTRUCTIONS

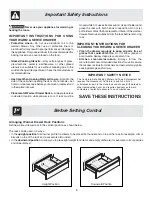
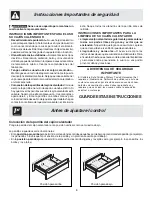
Downward Position

Upright Position

Arranging Warmer Drawer Rack Positions

Set the warmer drawer rack in the vertical position as shown below.

The rack can be used in 2 ways:
• In the 

upright position

 to allow low profile food items to be placed both under and on top of the rack (for example, rolls or

biscuits on top of the rack and a casserole dish under).

• In the 

downward position

 to allow you to place light weight food items and empty dishware (for example, rolls or pastries

and dinner plates).

Summary of Contents for PLEW30S3DCB

Page 1: ...318201004 0406 Rev A Warm Serve Drawer Warranty 8 Before You Call 7 Care Cleaning 6 Setting Control 5 Before Setting Control 4 ImportantSafetyInstructions 3 4 Welcome 2 Solutions to Common Problems ...

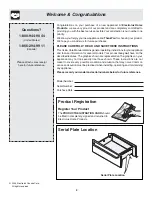
Page 2: ...r several models Your product may not have all the described features The graphics shown are representative The graphics on your appliance may not look exactly like those shown These instructions are not meant to cover every possible condition and situation that may occur Common sense and caution must be practiced when installing operating and maintaining any appliance Please record your model and...

Page 3: ...de out of the opening Refer to the installation instructions for proper locking plate installation All Warm and ServeDrawer can tip Injury to persons could result Install anti tip device packed withwarmer drawer See installation instructions Do not use the warmer drawer for storage Stepping leaning or sitting on the door or drawer can result in serious injuries and may also cause damage to the war...

Page 4: ...llutensilsfromtherackbeforeremoving rack IMPORTANT INSTRUCTIONS FOR CLEANING YOUR WARM SERVE DRAWER Clean the drawer regularly to keep all parts free of grease that could catch fire Do not allow grease to accumulate Greasy deposits could catch fire Kitchen cleaners aerosols Always follow the manufacturer srecommendeddirectionsforuse Beaware that excess residue from cleaners and aerosols may ignite...

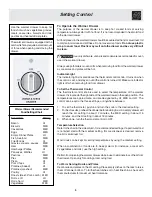
Page 5: ...ut 12 minutes the MED setting in about 15 minutes and the HI setting in about 18 minutes 3 When done turn the thermostat control to OFF TemperatureSelection Refertothechartinthesidecolumnforrecommendedsettings Ifaparticularfood is not listed start with the medium setting If more crispness is desired remove the lid or aluminum foil Most foods can be kept at serving temperatures by using the medium ...

Page 6: ...ld abrasivecleanerfollowing manufacturer s instructions Rinse with clean water and dry Surfaces Vinyl Plastic Control Knobs Control Panel StainlessSteel Drawer BodyPartsandDrawer Cavity Porcelain Enamel Drawer Liner Body Parts and DrawerCavity WarmerDrawerRack To Remove and Replace Warmer Drawer ToRemoveWarmerDrawer 1 Turn power off before removing the warmer drawer 2 Open the drawer to the fully ...

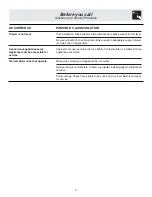
Page 7: ...sure bottom is level Be sure cutout bottom is strong and stable enough to adequately support drawer and wall oven if applicable Cabinets not square or are built in too tightly Contact builder or installer to make appliance accessible Make sure cord plug is plugged tightly into outlet Service wiring is not complete Contact your dealer installing agent or authorized servicer Power outage Check house...

Page 8: ...removed or altered and cannot be readily determined Keep your bill of sale delivery slip or some other appropriate payment record The date on the bill establishes the warranty period should service be required If service is performed it is in your best interest to obtain and keep all receipts This written warranty gives you specific legal rights You may also have other rights that vary from state ...

Page 9: ...Rev A Cajón Calentador Garantia 8 Antes de llamar 7 Limpieza general 6 Reglaje del control 5 Antes de ajustar el control 4 Instrucciones importantes sobre la seguridad 3 4 Bienvenido 2 Soluciones de Problemas Comunes ...

Page 10: ...e su producto no tenga todas las características descritas Las ilustraciones mostradas son representativas Es possible que las ilustraciones de su aparato no sean exactamente las mismas Estas instrucciones no estan echas para cubrir cada condición y cada situación posibles que puede ocurrir El sentido común y el cuidado deben de ser practicados al instalar operar o para mantener cualquier aparato ...

Page 11: ...entro o sobre el aparato No deben almacenarse materiales quemables en el cajón calentador Estoincluyeartículosdepapel plásticoydetela tales como libros de cocina utensilios de plástico y toallas asícomolíquidosquemables Noalmaceneexplosivos tales comolatasdeaerosol cercaoencima delcajóncalentador Losmaterialesquemablespuedenexplotarycausarincendios odañosalapropiedad Nodejealosniñossolos Nuncahayq...

Page 12: ...la parrilla antes de retirarla INSTRUCCIONES IMPORTANTES PARA LA LIMPIEZA DE SU CAJÓN CALENTADOR Limpieelcajóncalentadorregularmenteparamantener todas sus partes libres de grasa y evitar que se enciendan Nopermitaquelagrasaseacumule Lagrasa quese depositaenelventiladorpuedeencenderse Limpiadores y aerosoles Observe siempre las instruccionesdeusoquerecomiendanlosfabricantes Tome encuentaelhechoquee...

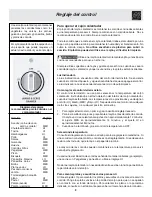
Page 13: ... ajuste LO en aproximadamente 12 minutos al ajuste MED en aproximadamente 15 minutos y el ajuste HI en aproximadamente18minutos 3 Cuando se ha terminado gire el control de temperatura a OFF Seleccióndetemperatura Consulte el diagrama en la columna al lado para los reglajes recomendados Si unacomidanoconstaenlalista comienceconelreglajemedio Sisedeseauna textura más tostada quite la tapa o el papel...

Page 14: ...añolimpio Quitetodoellimpiadorporquelaporcelanapodríadañarselapróxima vez que se caliente NO deben usarse rociadores para hornos Sepuedequitarlaparrillaparalalimpieza Useunlimpiadorabrasivosuaveparalavarla siguiendo las instrucciones del fabricante Enjuague con agua limpia y seque Superficies Vinilo Plástico Perilla de control panel de control Aceroinoxidable Puerta Porcelanaesmaltada Revestimient...

Page 15: ... Asegúrese de que la base de la abertura es bastante fuerte y estable para soportar el cajón calentador y un horno entegrado si hay uno Los armarios no están bien a escuadra o quedaron muy apretados Llamar a un ebanista para corregir el problema Asegúresedequeelcordóneléctrico enchufeestéenchufadocorrectamenteen sutomacorriente La instalación eléctrica no está completa Llame a su representante o a...

Page 16: ...e Conserve la factura de compra el recibo de entrega o cualquier otro registro de pago apropiado La fecha de la factura determina el período de garantía si se requiere servicio técnico Si se realiza el servicio técnico le conviene obtener y conservar todos los recibos Esta garantía escrita le otorga ciertos derechos legales Usted puede tener otros derechos que varían de acuerdo a la legislación es...

Page 17: ... réchaud Garantie 8 Avant de faire appel au service après vente 7 Entretien et nettoyage 6 Réglage de la commande 5 Avant le réglage de la commande 4 Mesures de sécurité importantes 3 4 Bienvenue 2 Solutions aux problèmes communs ...

Page 18: ...re appareil n aille pas toutes les caractéristiques décrites Les illustrations ne sont que représentatives Les illustrations sur votre appareilpourraientdifférerdeceuxdumanuel Lesinstructionsdonnéesdansce guide ne couvrent pas toutes les conditions et situations possibles Usez de bon sens et de prudence lors de l installation de l emploi et de l entretien de tout appareilménager Enregistrez les nu...

Page 19: ...ans ou sur l appareil ne rangez pas dans le tiroir réchaud des matériaux inflammables ceci comprend les papiers plastiques tissus livres de cuisine objets en plastique et torchons ainsi que les liquides inflammables Ne rangez pas sur ou près du tiroir des produits comme les produits en aérosol qui risquent d exploser et d entraîner un incendie ou des dégâts matériels Ne laissez pas les enfants seu...

Page 20: ... l appareil pour ouvrir la porte d un tiroir chaud Laissezlavapeuroul airchauds échapperavantdeplacerou d enleverlanourriture Emplacement des grilles du tiroir réchaud Placez toujourslesgrillesàl endroitvoululorsqueletiroirestfroid Si la grille doit être déplacée alors que le tiroir est chaud soyez extrêmement prudent Servez vous de gants isolants et saisissez la grille des deux mains pour la reme...

Page 21: ... température du réglage BAS LO en 12 minutes environ le réglage MOYEN MED prendra environ 15 minutes alors que le réglageHAUT HI atteindrasatempératureen18minutes 3 Lorsque vous aurez terminé tournez le bouton de commande thermostat à OFF ARRÊT Sélectiondetempérature Référez vousautableaudanslacolonneci contrepourlesréglagesrecommandés Siunalimentn estpasénuméré commencezparleréglagemoyen Sivouspr...

Page 22: ... fabricant Rincez la à l eau propre et asséchez la Surfaces Vinyle Plastique Boutondecommande panneau decommande Acierinoxydable Porte Émail Revêtement de la porte pièces du châssis et l intérieur de la cavitédutiroir réchaud Grille du tiroir réchaud Pour retirer et replacer le tiroir réchaud Pour enlever le tiroir réchaud 1 Interrompez le courant avant d enlever le tiroir réchaud 2 Ouvrez complèt...

Page 23: ...z vous que le plancher du découpage est solide et capable de supporter adéquatement le tiroir réchaud en plus du four encastré si applicable Lesarmoiresnesontpasd équerreouledécoupageesttroppetit Communiquez avec le constructeur ou l installateur afin de rendre l appareil accessible Assurez vous que le cordon d alimentation est correctement raccordé Lebranchementn estpasachevé Communiquezavecvotre...

Page 24: ... naturelle 4 Les produits dont les numéros de série d origine ont été enlevés ou effacés et qui ne peuvent être lus Garder votre facture le bordereau de livraison ou toute autre preuve de versement effectué La date de la facture indique le début de la période de garantie dans l éventualité où une réparation serait requise Il est dans votre intérêt de demander et de conserver tous les reçus Cette g...

Reviews: