42
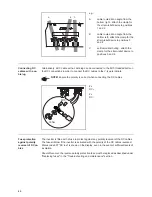
Use the M10 hexagonal nut and the washer to connect the cable with the correct po-
larity at the central M10 threaded bolt of the relevant DC connection
Close the M20 screw joints
Connect the overvoltage protection to the grounding terminal
If available, connect the remote contacts of the overvoltage protection device with two
cables to the NO/alarm contact terminals in the data communication area
Fitting and con-
necting overvolt-
age protection on
the AC side
IMPORTANT!
-
Provide a separate grounding terminal for each overvoltage protection device
-
Make sure that the cables have adequate insulation resistance.
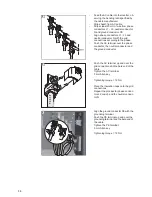
Fit overvoltage protection to the DIN rail on the AC side according to the manufactur-
er's instructions
Fit a grounding terminal to the DIN rail on the AC side
Remove 3-4 blank screw joints on the AC side, depending on the overvoltage protec-
tion
Insert 3-4 M20 screw joints from the inverter's accessories kit into the openings and
secure them with the hexagonal nuts of the blank screw joint
Prepare the cable:
-
Strip the cable on the overvoltage protection side
-
Fit the M10 cable lug on the AC connection side
Max. cable cross-section must comply with the instructions of the overvoltage
protection manufacturer.
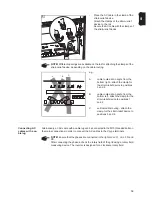
Open the M20 screw joints
Feed the cable through
Connect the cable to the overvoltage protection device according to the manufactur-
er's instructions
Connect the cable to the upper part of the relevant AC connection in the correct phase
sequence
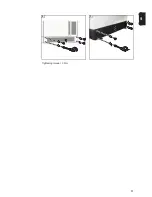
Tightening torque = 18 Nm
Close the M20 screw joints
Connect the overvoltage protection to the grounding terminal
If available, connect the remote contacts of the overvoltage protection device with two
cables to the NO/alarm contact terminals in the data communication area
Fitting and con-
necting overvolt-
age protection for
the AC- supply
IMPORTANT!
-
Provide a separate grounding terminal for each overvoltage protection device
-
Make sure that the cables have adequate insulation resistance.
Fit overvoltage protection to the DIN rail on the AC side according to the manufactur-
er's instructions
Fit a grounding terminal to the DIN rail
Strip the cable on both sides
Max. cable cross-section must comply with the instructions of the overvoltage protec-
tion manufacturer.
Connect cables L1 and N on the overvoltage protection device according to the man-
ufacturer's instructions
9
10
11
12
1
2
3
4
5
6
7
8
9
10
11
12
1
2
3
4
Summary of Contents for Agilo 100.0-3
Page 2: ...0...
Page 4: ...2...
Page 8: ...6...
Page 13: ...General information...
Page 14: ......
Page 30: ...28...
Page 31: ...Installation and commissioning...
Page 32: ......
Page 51: ...49 EN 1 2 Inserting the fuse grounds the solar modules on the negative pole 1 1 1 2 2...
Page 53: ...51 EN 2 3 Tightening torque 3 Nm 1 3 2 4 5 4 3 2 4 5 1 5...
Page 57: ...Operation...
Page 58: ......
Page 84: ...82...
Page 85: ...Troubleshooting and maintenance...
Page 86: ......
Page 107: ...Appendix...
Page 108: ......


