background image

46030 / 10 ft. Nordman Fir Pro Shape Tree  

Page 3 


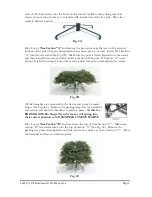
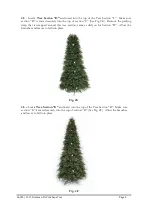
2.6 – 

Locate

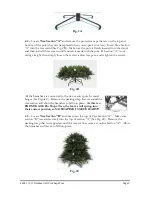
 Tree Section “C”

 and insert into the top of the Tree Section “B”.  Make 

sure section “C” is seated securely into the top of section “B” (See Fig. 2D).  Remove the 

packing strap that is wrapped around this tree section, same as you for Section “B”.  Allow 

the branches and leaves to fall into place. 


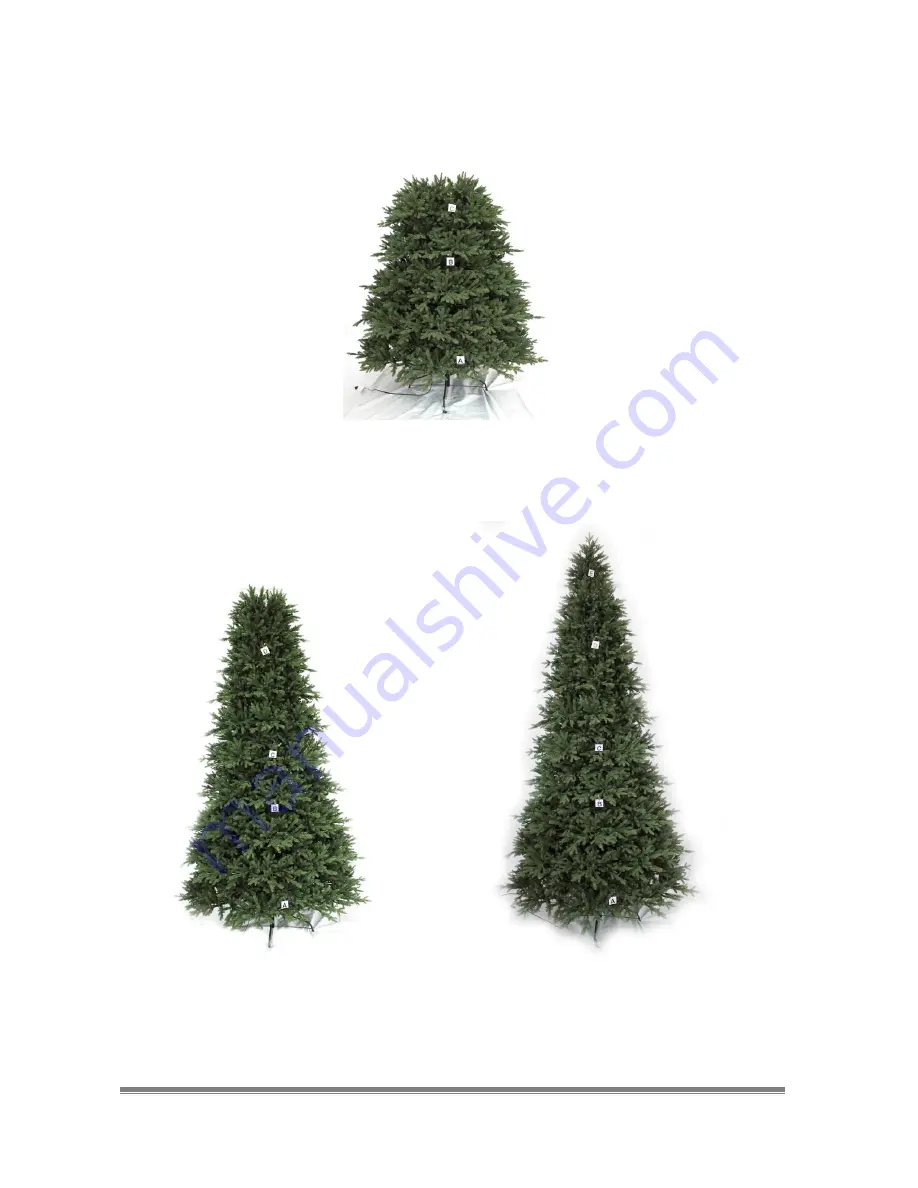
Fig. 2D 


2.6 – 

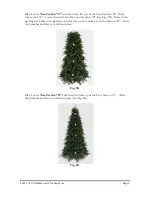
Locate

 Tree Section “D”

 and insert into the top of the Tree Section “C”.  Make 

sure section “D” is seated securely into the top of section “C” (See Fig. 2E).  Remove the 

packing strap that is wrapped around this tree section, same as you for Section “C”.  Allow 

the branches and leaves to fall into place. 


2.7 – 

Locate

 Tree Section “E”

 and insert into the top of the Tree Section “D”.  Make 

sure section “E” is seated securely into the top of section “D” (See Fig. 2F).  Allow the 

branches and leaves to fall into place. 


Fig. 2E 

Fig. 2F 

Summary of Contents for 46027 CLE

Page 1: ...IONS 1 EA PACKET OF EXTRA BULBS AND FUSES 1 EA TREE CARTON WITH EXPANDABLE FEATURE 1 PAIR ARTIFICIAL CHRISTMAS TREE SHAPING GLOVES TREE ASSEMBLY INSRUCTIONS 1 Unpack Carefully remove the contents from the carton and keep the carton for future storage Some sections of the tree may be heavy and assistance may be required Be sure to untangle any wires that may be caught with other items Please DO NOT...

Page 2: ...Section A and remove the protective caps that are on the top and bottom of the pole they can be replaced when you re pack your tree Insert Tree Section A into the tree stand See Fig 2B Make sure the pole is firmly inserted into the stand and then turn all three screws until contact is made with the pole If Section A is not sitting straight then simply loosen the screws adjust tree pole and retight...

Page 3: ...at is wrapped around this tree section same as you for Section A Allow the branches and leaves to fall into place Fig 2C 2 4 Locate Tree Section C and insert into the top of the Tree Section B Make sure section C is seated securely into the top of section B See Fig 2D Remove the packing strap that is wrapped around this tree section same as did you for Section B Allow the branches and leaves to fa...

Page 4: ... and insert into the top of the Tree Section C Make sure section D is seated securely into the top of section C See Fig 2E Remove the packing strap that is wrapped around this tree section same as did you for Section B Allow the branches and leaves to fall into place Fig 2E ...

Page 5: ...ur tree is lighted with miniature lights that are strung on the tree at the factory Those lights are plugged into the extension cords on the tree Your 7 5 ft tree will have One 1 extension cord plug Total Light Set plugs equal Ten 10 Sections A B C and D have the number of plugs outlined in the below diagram Fig 3C Follow the diagram for complete lighting instructions 3 3 Guide the extension cord ...

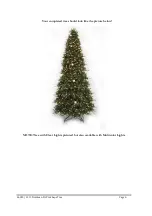
Page 6: ...46027 7 5 ft Nordman Fir Pro Shape Tree Page 6 Your completed tree should look like the picture below NOTE Tree with Clear Lights pictured but also available with Multicolor Lights ...

Page 7: ... box Carefully place the tree in its box and tape it shut Your Frontgate Pro Shape Tree comes in a Expandable Storage Carton The flaps on the cartons are scored This allows you to increase the size of the carton for easier storage of your Pro Shape Tree DO NOT STORE TREE IN A DAMP AREA OR IN AN AREA WHERE THE TEMPERATURE EXCEEDS 100ºF CARE USE INSTRUCTIONS Before using inspect products carefully D...

Page 8: ... house when retiring for the night or if left unattended This is an electrical product not a toy To avoid risk of fire burns personal injury and electric shock it should not be played with or placed where small children can reach it Do not use this product for other than its intended use Do not hang ornaments or other objects from cord wire or light string Do not close doors or windows on the prod...

Page 9: ... from the carton and keep the carton for future storage Some sections of the tree may be heavy and assistance may be required Remove any outer foam wrapping from the tree and its branches See Fig 1A 2 Basic Assembly Steps CAUTION Two people may be needed to balance and assemble tree s upper sections Please use a ladder if needed and follow all ladder safety instructions 2 1 Open the carton and tak...

Page 10: ...adjust tree pole and retighten the screws Fig 2B All the branches are connected to the tree s center pole by metal hinges See Figure 2 Remove the packing strap that is around the tree section and allow the branches to fall into place As this is a FRONTGATE Pro Shape Tree the leaves will spring into their correct position so NO SHAPING IS NECESSARY 2 3 Locate Tree Section B and insert into the top ...

Page 11: ... seated securely into the top of section B See Fig 2D Remove the packing strap that is wrapped around this tree section same as you for Section B Allow the branches and leaves to fall into place Fig 2D 2 6 Locate Tree Section D and insert into the top of the Tree Section C Allow the branches and leaves to fall into place See Fig 2E Fig 2E ...

Page 12: ... cords on the tree Your 9 ft tree will have One 1 extension cord plug Total Light Set plugs equal twelve 12 Section D Tree Top has 1 one light plug coming out of the bottom of it This plug has a tag stating that the plug is to go into the extension cord as outlined in the below diagram This plug can be inserted directly into the extension cord outlet Sections A B and C have the number of plugs out...

Page 13: ...46029 9 ft Nordman Fir Pro Shape Tree Page 5 Fig 3C PLUGS FOR SECTION D ARE BLACK CODED PLUGS FOR SECTION C ARE GREEN CODED PLUGS FOR SECTION B ARE BLUE CODED PLUGS FOR SECTION A ARE RED CODED ...

Page 14: ...ift off each section Each section should be packed away in the carton that it came in Each tree section should be turned upside down and then carefully press branches toward center pole for easier placement into the storage box Carefully place the tree in its box and tape it shut Your Frontgate Pro Shape Tree comes in a Expandable Storage Carton The flaps on the cartons are scored This allows you ...

Page 15: ...This is an electrical product not a toy To avoid risk of fire burns personal injury and electric shock it should not be played with or placed where small children can reach it Do not use this product for other than its intended use Do not hang ornaments or other objects from cord wire or light string Do not close doors or windows on the product or extension cords as this may damage the wire insula...

Page 16: ... Dear Frontgate Customer Please contact one of our Product Specialists for assembly assistance or questions at 1 800 537 8484 or e mail us at ps frontgate com Specialists are available weekdays from 8 00 a m to 8 00 p m EST and Saturdays from 9 30 a m to 6 00 p m EST ...

Page 17: ... 1 Unpack Carefully remove the contents from the carton and keep the carton for future storage Some sections of the tree may be heavy and assistance may be required Remove any outer foam wrapping from the tree and its branches See Fig 1A 2 Basic Assembly Steps CAUTION Two people may be needed to balance and assemble tree s upper sections Please use a ladder if needed and follow all ladder safety i...

Page 18: ...ntil contact is made with the pole If Section A is not sitting straight then simply loosen the screws adjust tree pole and retighten the screws Fig 2B All the branches are connected to the tree s center pole by metal hinges See Figure 2 Remove the packing strap that is around the tree section and allow the branches to fall into place As this is a FRONTGATE Pro Shape Tree the leaves will spring int...

Page 19: ...all into place Fig 2D 2 6 Locate Tree Section D and insert into the top of the Tree Section C Make sure section D is seated securely into the top of section C See Fig 2E Remove the packing strap that is wrapped around this tree section same as you for Section C Allow the branches and leaves to fall into place 2 7 Locate Tree Section E and insert into the top of the Tree Section D Make sure section...

Page 20: ...ords on the tree Your 10 ft tree will have One 1 extension cord plug Total Light Set plugs equal fourteen 14 Section E Tree Top has 1 one light plug coming out of the bottom of it This plug has a tag stating that the plug is to go into the extension cord as outlined in the below diagram This plug can be inserted directly into the extension cord outlet Sections A B C and D have the number of plugs ...

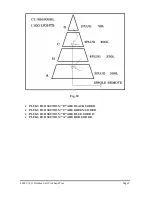
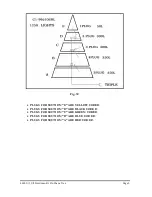
Page 21: ...rdman Fir Pro Shape Tree Page 5 Fig 3C PLUGS FOR SECTION E ARE YELLOW CODED PLUGS FOR SECTION D ARE BLACK CODED PLUGS FOR SECTION C ARE GREEN CODED PLUGS FOR SECTION B ARE BLUE CODED PLUGS FOR SECTION A ARE RED CODED ...

Page 22: ...lift off each section Each section should be packed away in the carton that it came in Each tree section should be turned upside down and then carefully press branches toward center pole for easier placement into the storage box Carefully place the tree in its box and tape it shut Your Frontgate Pro Shape Tree comes in a Expandable Storage Carton The flaps on the cartons are scored This allows you...

Page 23: ...This is an electrical product not a toy To avoid risk of fire burns personal injury and electric shock it should not be played with or placed where small children can reach it Do not use this product for other than its intended use Do not hang ornaments or other objects from cord wire or light string Do not close doors or windows on the product or extension cords as this may damage the wire insula...

Page 24: ...n Dear Frontgate Customer Please contact one of our Product Specialists for assembly assistance or questions at 1 800 537 8484 or e mail us at ps frontgate com Specialists are available weekdays from 8 00 a m to 8 00 p m EST and Saturdays from 9 30 a m to 6 00 p m EST ...

Page 25: ... WITH EXPANDABLE FEATURE 1 PAIR ARTIFICIAL CHRISTMAS TREE SHAPING GLOVES TREE ASSEMBLY INSRUCTIONS 1 Unpack There are two cartons for your 12 ft Tree There is a notation on the side of each box listing the contents Open the cartons and take out all the contents All contents that are listed in the Bill of Material section on this page should be enclosed Carefully remove the contents from the carton...

Page 26: ... 2 2 Locate Tree Section A and remove the protective caps that are on the top and bottom of the pole they can be replaced when you re pack your tree Insert Tree Section A into the tree stand See Fig 2B Make sure the pole is firmly inserted into the stand and then turn all three screws until contact is made with the pole If Section A is not sitting straight then simply loosen the screws adjust tree...

Page 27: ...t is wrapped around this tree section same as you for Section A Allow the branches and leaves to fall into place Fig 2C 2 4 Locate Tree Section C and insert into the top of the Tree Section B Make sure section C is seated securely into the top of section B See Fig 2D Remove the packing strap that is wrapped around this tree section same as did you for Section B Allow the branches and leaves to fal...

Page 28: ...ection C See Fig 2E Remove the packing strap that is wrapped around this tree section same as did you for Section B Allow the branches and leaves to fall into place Fig 2E 2 6 Locate Tree Section E and insert into the top of the Tree Section D Make sure section E is seated securely into the top of section D See Fig 2F Allow the branches and leaves to fall into place Fig 2F ...

Page 29: ... is lighted with miniature lights that are strung on the Tree at the factory Those lights are plugged into the extension cords on the Tree Your 12 ft tree will have Two 2 extension cord plugs Total Light Set plugs equal Nineteen 19 Sections A B C D and E have the number of plugs outlined in the below diagram Fig 3C Follow the diagram for complete lighting instructions 3 3 Guide the extension cord ...

Page 30: ...46022 12 ft Nordman Fir Pro Shape Tree Page 6 Your completed tree should look like the picture below NOTE Tree with Clear Lights pictured but also available with Multicolor Lights ...

Page 31: ...box Carefully place the tree in its box and tape it shut Your Frontgate Pro Shape Tree comes in a Expandable Storage Carton The flaps on the cartons are scored This allows you to increase the size of the carton for easier storage of your Pro Shape Tree DO NOT STORE TREE IN A DAMP AREA OR IN AN AREA WHERE THE TEMPERATURE EXCEEDS 100ºF CARE USE INSTRUCTIONS Before using inspect products carefully Di...

Page 32: ... house when retiring for the night or if left unattended This is an electrical product not a toy To avoid risk of fire burns personal injury and electric shock it should not be played with or placed where small children can reach it Do not use this product for other than its intended use Do not hang ornaments or other objects from cord wire or light string Do not close doors or windows on the prod...

Page 33: ...k Carefully remove the contents from the cartons and keep the cartons for future storage Some sections of the tree may be heavy and assistance may be required Remove any outer foam wrapping from the tree and its branches See Fig 1A 2 Basic Assembly Steps CAUTION Two people may be needed to balance and assemble tree s upper sections Please use a ladder if needed and follow all ladder safety instruc...

Page 34: ...ntil contact is made with the pole If Section A is not sitting straight then simply loosen the screws adjust tree pole and retighten the screws Fig 2B All the branches are connected to the tree s center pole by metal hinges See Figure 2 Remove the packing strap that is around the tree section and allow the branches to fall into place As this is a FRONTGATE Pro Shape Tree the leaves will spring int...

Page 35: ...all into place Fig 2D 2 6 Locate Tree Section D and insert into the top of the Tree Section C Make sure section D is seated securely into the top of section C See Fig 2E Remove the packing strap that is wrapped around this tree section same as you for Section C Allow the branches and leaves to fall into place 2 7 Locate Tree Section E and insert into the top of the Tree Section D Make sure section...

Page 36: ...ds on the tree Your 15 ft tree will have Two 2 extension cord plugs Total Light Set plugs equal twenty five 25 Section E Tree Top has 1 one light plug coming out of the bottom of it This plug has a tag stating that the plug is to go into the extension cord as outlined in the below diagram This plug can be inserted directly into the extension cord outlet Sections A B C and D have the number of plug...

Page 37: ...e 5 Fig 3C Plugs for Section E are marked with Yellow code Plugs for Section D are marked with Black Code Plugs for Section C are marked with Green code Plugs for Section B are marked with Blue Code Plugs for Section A are marked with Red Code ...

Page 38: ...lift off each section Each section should be packed away in the carton that it came in Each tree section should be turned upside down and then carefully press branches toward center pole for easier placement into the storage box Carefully place the tree in its box and tape it shut Your Frontgate Pro Shape Tree comes in a Expandable Storage Carton The flaps on the cartons are scored This allows you...

Page 39: ...This is an electrical product not a toy To avoid risk of fire burns personal injury and electric shock it should not be played with or placed where small children can reach it Do not use this product for other than its intended use Do not hang ornaments or other objects from cord wire or light string Do not close doors or windows on the product or extension cords as this may damage the wire insula...

Page 40: ...n Dear Frontgate Customer Please contact one of our Product Specialists for assembly assistance or questions at 1 800 537 8484 or e mail us at ps frontgate com Specialists are available weekdays from 8 00 a m to 8 00 p m EST and Saturdays from 9 30 a m to 6 00 p m EST ...

Reviews: