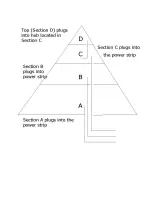
background image

BULBS AND FUSES: 
Fuses: 
 

The fuses are designed to prevent a short circuit or overheating that could lead to damage to the lights.  
The most common cause for a blown fuse is a power surge.  


Each cord string of Christmas tree lights has a fuse housed in the plug.  When a fuse blows, the lights 
will simply stop working. Whenever an entire strand (or in some cases the entire tree) ceases to light, 
check the fuses before you try tightening or replacing the light bulbs. 
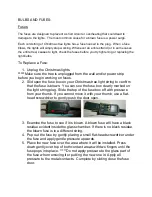
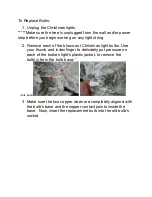
 

To Replace a Fuse: 
 

1.  Unplug the Christmas lights.  

*****

Make sure the light string is unplugged from the wall and any other light strings 

before you start working on it. 

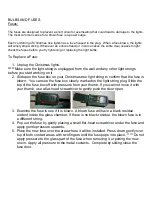
2.  Slid open the fuse box on your Christmas tree light string to confirm that the fuse is 

blown.  You can see the fuse box clearly marked on the light string plug. Slide the 
top of the fuse box off with pressure from your thumb. If you cannot move it with 
your thumb, use a flat-head screwdriver to gently push the door open. 


3.  Examine the fuse to see if it is blown. A blown fuse will have a black residue 

evident inside the glass chamber. If there is no black residue, the blown fuse is in 
a different string. 

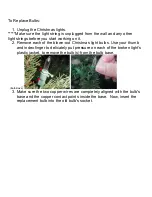
4.  Pop out the fuse by gently placing a small flat-head screwdriver under the fuse and 

apply gentle pressure upwards. 

5.  Place the new fuse over the area where it will be installed. Press down gently over 

top of both contact areas with two fingers until the fuse pops into place. *****Do not 
apply pressure to the glass part of the fuse when removing it or putting the new 
one in. Apply all pressure to the metal contacts.  Complete by sliding close the 
fuse door. 


Summary of Contents for Holiday 142067 CLE

Page 1: ...W TO ASSEMBLE AND SHAPE YOUR TREE 1 BEFORE STARTING TO ASSEMBLE YOUR TREE CHOOSE A LOCATION NEAR AN 110V ELECTRICAL WALL OUTLET FOR THE PRELIT TREE 2 REMOVE THE 3 TREE SECTIONS FROM THE CARTON 3 THE SECTIONS OF THE TREE ARE MARKED A B C SECTION A IS THE BOTTOM SECTION B IS THE MIDDLE AND SECTION C IS THE TOP 4 PLACE THE TREE STAND ON A LEVEL SURFACE 5 INSTALL THE BOTTOM END OF THE LOWER SECTION A ...

Page 2: ...HE BRANCHES STARTING AT THE BOTTOM WITH THE TIPS FARTHEST FROM THE POLE AND CURVING OUT FROM THE POLE ONE TO THE RIGHT ONE TO THE LEFT AND ONE AT THE CENTER TO ACHIEVE A REALISTIC LOOK EACH BRANCH SHOULD BE SHAPED 10 SHIFT ANY BRANCHES AS NECESSARY TO FILL ANY GAPS AND SLIGHTLY UPSWEEP ALL BRANCHES FOR A UNIFORM LOOK 11 LOCATE AND PLUG THE TWO EXTENSION CORDS FROM SECTIONS A B INTO THE SELECTED OU...

Page 3: ...7 5 SNOWDRIFT TREE ...

Page 4: ......

Page 5: ...at the fuse is blown You can see the fuse box clearly marked on the light string plug Slide the top of the fuse box off with pressure from your thumb If you cannot move it with your thumb use a flat head screwdriver to gently push the door open 3 Examine the fuse to see if it is blown A blown fuse will have a black residue evident inside the glass chamber If there is no black residue the blown fus...

Page 6: ...f the blown out Christmas light bulbs Use your thumb and index finger to delicately put pressure on each of the broken light s plastic jacket to remove the bulb s from the bulb base Bulb Base 3 Make sure the two copper wires are completely aligned with the bulb s base and the copper contact points inside the base Now insert the replacement bulb into the old bulb s socket ...

Page 7: ...R PICTURED BELOW THE SINGLE OUTLET RECIEVER IS TO BE PLUGGED INTO A GROUNDED ELECTRICAL OUTLET If you do not know or are unsure as to whether the intended outlet is grounded or not please contact an electrician immediately to test and upgrade the outlet if needed PLUG THE POWER STRIP INTO THE RECEIVER S OUTLET ...

Page 8: ... OFF BUTTON TO TURN OFF THE LIGHTS TO REPLACE REMOTE CONTROL BATTERY BATTERY SPECS 12 VOLT A23 SLIDE OPEN THE BATTERY COMPARTMENT DOOR LOCATED ON THE BACK OF THE REMOTE TRANSMITTER REMOVE THE 12 VOLT TYPE A23 BATTERY AND REPLACE WITH A NEW BATTERY SLIDE CLOSE THE BATTERY COMPARTMENT DOOR ...

Page 9: ... OBJECTS FROM THE ELECTRICAL CORDS OR WIRES o THIS PRODUCT EMPLOYS ELECTRICAL OVERLOAD PROTECTION FUSES INSIDE EACH PLUG SPARE FUSES ARE PROVIDED IN THE CARTON OUR PRODUCT DESIGN HAS NOT EXPERIENCED FUSE PROBLEMS HOWEVER IF A FUSE BLOWS THE PRODUCT SHOULD BE UNPLUGGED BEFORE REPLACING THE FUSE o WHEN A LIGHT SET FLICKERS OR GOES ON AND OFF THE MOST COMMON PROBLEM IS A LOOSE FITTING BULB CHECK TO M...

Page 10: ... SHAPE YOUR TREE 1 BEFORE STARTING TO ASSEMBLE YOUR TREE CHOOSE A LOCATION NEAR AN 110V ELECTRICAL WALL OUTLET FOR THE PRELIT TREE 2 REMOVE THE 4 TREE SECTIONS FROM THE TWO CARTONS 3 THE SECTIONS OF THE TREE ARE MARKED A THROUGH D SECTION A IS THE BOTTOM SECTION B IS THE LOWER MIDDLE AND SECTION C IS THE UPPER MIDDLE AND SECTION D IS THE TOP 4 PLACE THE TREE STAND ON A LEVEL SURFACE AND INSTALL TH...

Page 11: ...7 ALLOW THE HINGED BRANCHES TO FALL INTO PLACE OR GENTLY PULL UP AND OUT EACH BRANCH 8 SHAPE THE BRANCHES STARTING AT THE BOTTOM WITH THE TIPS FARTHEST FROM THE POLE AND CURVING OUT FROM THE POLE ONE TO THE RIGHT ONE TO THE LEFT AND ONE AT THE CENTER TO ACHIEVE A REALISTIC LOOK EACH BRANCH SHOULD BE SHAPED 9 SHIFT ANY BRANCHES AS NECESSARY TO FILL ANY GAPS AND SLIGHTLY UPSWEEP ALL BRANCHES FOR A U...

Page 12: ...9 SNOWDRIFT TREE ...

Page 13: ......

Page 14: ...firm that the fuse is blown You can see the fuse box clearly marked on the light string plug Slide the top of the fuse box off with pressure from your thumb If you cannot move it with your thumb use a flat head screwdriver to gently push the door open 3 Examine the fuse to see if it is blown A blown fuse will have a black residue evident inside the glass chamber If there is no black residue the bl...

Page 15: ... of the blown out Christmas light bulbs Use your thumb and index finger to delicately put pressure on each of the broken light s plastic jacket to remove the bulb s from the bulb base Bulb Base 3 Make sure the two copper wires are completely aligned with the bulb s base and the copper contact points inside the base Now insert the replacement bulb into the old bulb s socket ...

Page 16: ...R PICTURED BELOW THE SINGLE OUTLET RECIEVER IS TO BE PLUGGED INTO A GROUNDED ELECTRICAL OUTLET If you do not know or are unsure as to whether the intended outlet is grounded or not please contact an electrician immediately to test and upgrade the outlet if needed PLUG THE POWER STRIP INTO THE RECEIVER S OUTLET ...

Page 17: ... THE OFF BUTTON TO TURN OFF THE LIGHTS TO REPLACE REMOTE CONTROL BATTERY BATTERY SPECS 12 VOLT A23 SLIDE OPEN THE BATTERY COMPARTMENT DOOR ON THE BACK OF THE REMOTE TRANSMITTER REMOVE THE 12 VOLT TYPE A23 BATTERY AND REPLACE WITH A NEW BATTERY SLIDE CLOSE THE BATTERY COMPARTMENT DOOR ...

Page 18: ... OBJECTS FROM THE ELECTRICAL CORDS OR WIRES o THIS PRODUCT EMPLOYS ELECTRICAL OVERLOAD PROTECTION FUSES INSIDE EACH PLUG SPARE FUSES ARE PROVIDED IN THE CARTON OUR PRODUCT DESIGN HAS NOT EXPERIENCED FUSE PROBLEMS HOWEVER IF A FUSE BLOWS THE PRODUCT SHOULD BE UNPLUGGED BEFORE REPLACING ANY FUSE o WHEN A LIGHT SET FLICKERS OR GOES ON AND OFF THE MOST COMMON PROBLEM IS A LOOSE FITTING BULB CHECK TO M...

Reviews: