background image

PARTS LIST

A. BOTTOM
B. LOWER MIDDLE
C. UPPER MIDDLE
D. TOP

HARDWARE

A. TREE STAND

QUANTITY 1 PC

B. 1/4” SCREWS FOR TREE STAND

QUANTITY 7 PCS

C. POWER STRIP

QUANTITY 1 PC

D. REMOTE CONTROL W/ RECEIVER

QUANTITY 1 SET

SKU 45829 - 9’ AUSTRIAN PINE

2469 TIPS METAL STAND

UL 1700 LIGHTS

MAX DIAMETER 69”

NUMBER OF PERSONS

RECOMMENDED FOR
ASSEMBLY: 2

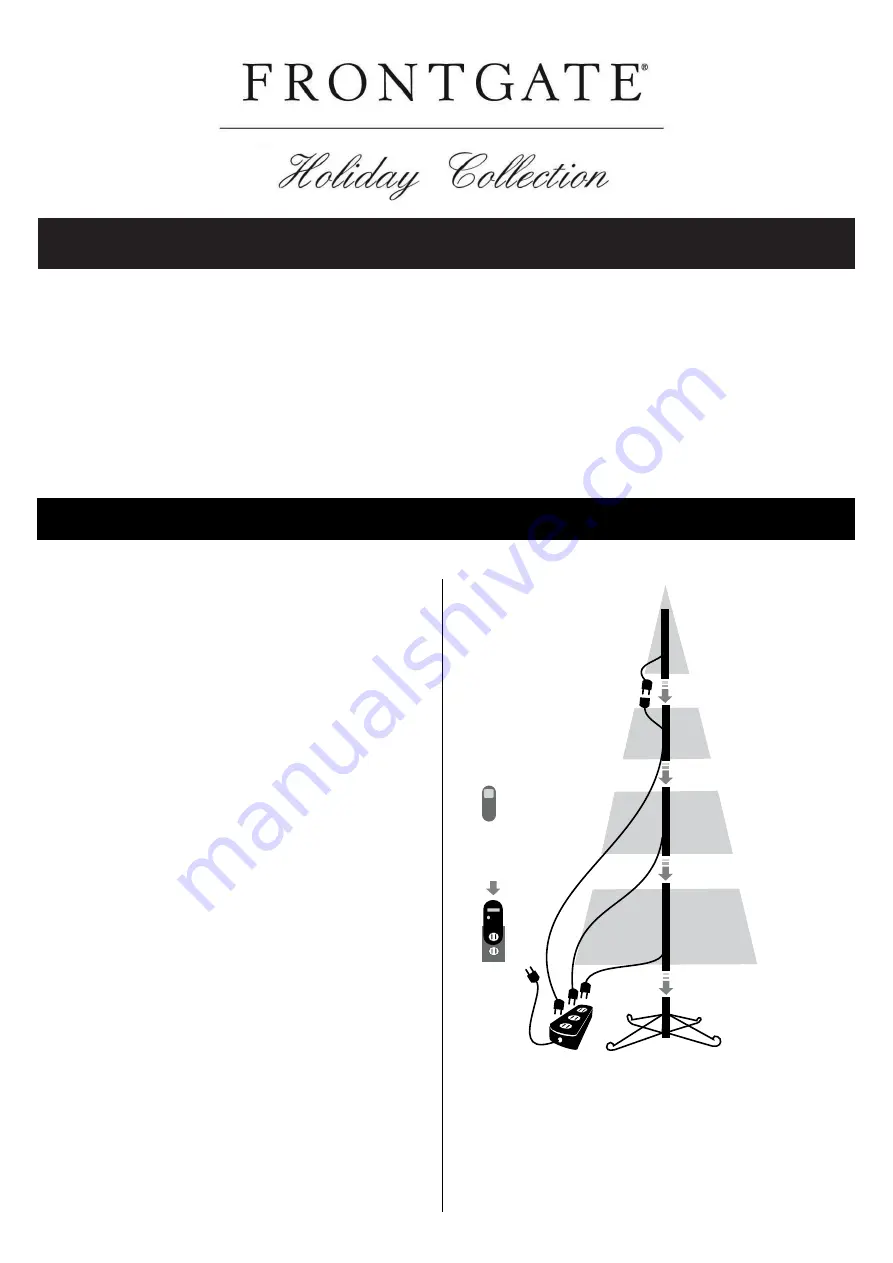
Drawing not to Scale 

Wall Outlet

L

OWER MIDDLE SECTION 

B

(BLUE PLUG)

U

PPER MIDDLE SECTION 

C

(GREEN PLUG)

B

OTTOM SECTION 

A

(RED PLUG)

R

EMOTE CONTROL

and

P

LUG-IN REMOTE 

CONTROL RECEIVER

  T

OP SECTION 

D

(BLACK PLUG)

Step 1

Pull apart the legs of the stand so that they are “X” shaped.

Fasten the bottom screws to lock the stand into position.

Step 2

Insert the section (A) of the tree into the stand and tighten 

screws on base to secure tree pole. 

Step 3

Plug light set of (A) into power strip, plug power strip into 

the remote control receiver.  Then, plug remote control 

receiver into wall outlet.

Step 4

To shape your tree start with the bottom most layer of 

branches, with each branch start with the tips closest to the 

pole and lift each tip up and out in alternating directions.

Repeat for each branch.  It is recommended to shape section 

(A) before adding section (B).

Step 5

Insert the section (B) of the tree into the section (A) of the 

tree.  Plug light set of section (B) into the power strip

Step 6

Repeat step 4 for shaping.

Step 7

Insert the section (C) of the tree into section (B) of the tree.

Plug lights from section (C) into power strip.

Step 8

Repeat step 4 for shaping. 

ASSEMBLY INSTRUCTIONS

Step 9

Insert section (D) of the tree into the section (C) of the tree.

Plug lights from (D) into section (C).

Step 10

To shape the top (D) section of the tree it will be necessary to 

gently bend the branches downward to the desired angle before 

shaping tips.

COLOR CODE ON PLUG

RED
BLUE
GREEN
BLACK

E. EXTRA BULBS AND FUSES

QUANTITY EACH 18 PCS

L

EGS  SET  IN  

X

  SHAPE

9ft  AUSTRIAN PINE TREE - ITEM  #45829

Summary of Contents for Holiday 45827

Page 1: ...7 5ft AUSTRIAN PINE TREE ITEM 45827 ...

Page 2: ...to the stand and tighten screws on base to secure tree pole Step 3 Plug power strip into the remote control receiver Then plug remote control receiver into wall outlet Step 4 To shape your tree start with the bottom most layer of branches with each branch start with the tips closest to the pole and lift each tip up and out in alternating directions Repeat for each branch It is recommended to shape...

Page 3: ...tion Note that a blown fuse indicates an electrical overload or electrical short circuit If the fuse is blown unplug power strip from outlet Also unplug any additional strings or products may be attached to the power strip Replace the fuse following manufacturer instructions with proper fuse rating If the replacement fuse blows a short circuit may be present and the product should be discarded c C...

Page 4: ... if left unattended 7 This is an electrical product not a toy To avoid risk of fire burns personal injury and electric shock it should not be played with or placed where small children can reach it 8 Do not use this product for other than its intended use 9 Do not hang ornaments or other objects from cord wire or light string 10 Do not close doors or windows on the product or extensions cords as th...

Page 5: ...at the leads will touch the contacts inside the light socket TO REPLACE A FUSE CAUTION FIRST UNPLUG YOUR PRODUCT FROM ANY POWER SOURCE 1 Grasp plug and remove from the receptacle or other outlet device Do not unplug by pulling on cord 2 Open fuse cover Slide open fuse access cover on top of attachment plug towards plug s metal prongs or blades 3 Remove fuse carefully 4 Risk of fire Replace fuse ONL...

Page 6: ...9ft AUSTRIAN PINE TREE ITEM 45829 ...

Page 7: ...ontrol receiver Then plug remote control receiver into wall outlet Step 4 To shape your tree start with the bottom most layer of branches with each branch start with the tips closest to the pole and lift each tip up and out in alternating directions Repeat for each branch It is recommended to shape section A before adding section B Step 5 Insert the section B of the tree into the section A of the ...

Page 8: ...tion Note that a blown fuse indicates an electrical overload or electrical short circuit If the fuse is blown unplug power strip from outlet Also unplug any additional strings or products may be attached to the power strip Replace the fuse following manufacturer instructions with proper fuse rating If the replacement fuse blows a short circuit may be present and the product should be discarded c C...

Page 9: ... if left unattended 7 This is an electrical product not a toy To avoid risk of fire burns personal injury and electric shock it should not be played with or placed where small children can reach it 8 Do not use this product for other than its intended use 9 Do not hang ornaments or other objects from cord wire or light string 10 Do not close doors or windows on the product or extensions cords as th...

Page 10: ...at the leads will touch the contacts inside the light socket TO REPLACE A FUSE CAUTION FIRST UNPLUG YOUR PRODUCT FROM ANY POWER SOURCE 1 Grasp plug and remove from the receptacle or other outlet device Do not unplug by pulling on cord 2 Open fuse cover Slide open fuse access cover on top of attachment plug towards plug s metal prongs or blades 3 Remove fuse carefully 4 Risk of fire Replace fuse ONL...

Reviews: