I
UK
D
E
F
NL
P
S
DK
FIN
B
GR
CZ
EE
LV
LT
H
M
PL
SK
SLO
7
Operator's guide
6. SUPPORT TABLE (OPTIONAL)
1.
2.
Fix the bracket to the cabinet using the screws provided.
Grasp the lower edge of the shelves with
both hands and turn upwards until horizontal. Push the edge close to the tank downwards until each shelf
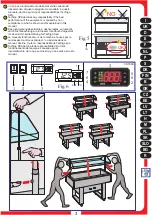
is locked into position (see figure 4).
7. CONNECTION TO THE MAINS
1
(A)
. Ensure that mains voltage and frequency are the same as those stated on the rating plate
attached
to the appliance. . Ensure that the supply socket:
2
a)
b)
is properly earthed;
fulfils the requirements of the
rated current as set out on the rating plate;
complies with the IEC regulations:- thermal-magnetic
c)
switch with In = rated value as stated on the rating plate; - differential with Id sensitivity = 30 mA.
3
4
. Ensure that there is no danger of explosion (AD) in the room. . Make sure the environment is suitable
for the power supply cable provided. The cable of the appliance is H05 VVF, designed for internal use.
5
N.B.:
. Insert the plug in the socket (do not use three-way adapters and reduction adapters).
if the
equipment has been transported or stored overturned, let is rest in its correct position for at least 3 hours
before hooking it up to the mains (see fig. 5).
8. CONTROLS
The appliance is supplied with adjusting controls situated in a panel at the rear. .
1 Cover lifting
switch:
to open and close the cover: - Position II to lift- Position O to stop- Position I to lower.
2. Refrigeration unit switch:
3. Thermometer:
to switch on the refrigeration unit.
to display the
temperature in the appliance.
to adjust the temperature in the appliance.
Press button
Thermostat:
a)
4
“
SET or P
”
once to display the temperature set-point, which can be changed by pressing button
5
“
UP
”
6
“
DOWN
”
8.
or button
.
Manual
7. Light switch:
to switch on the light inside the appliance.
defrosting
(see figure 6).
9. CHECKING CORRECT OPERATION
Check that: 1.
2.
the appliance is plugged in.
The refrigeration unit is switched on and that the green light
is ON. . The thermometer shows the desired temperature for the goods to be stored.
The appliance is
3
4.
not exposed to direct sunlight or high-powered lamps. . The room temperature does not exceed that in
5
which the appliance is designed to work normally, i.e. +25°C, R.H.60% (climatic class 3).
Make sure
6.
that there are no direct air currents from doors, windows, ventilators or air conditioner pipes, inside the
appliance itself.
10. INTERNAL AND EVAPORATOR CLEANING
1.
2.
Switch off the appliance.
Check the evaporator fins for frost or ice. Should the layer of frost be too
thick, and ice drips are noted that could impair passage of air, complete defrosting should be undertaken.
Remove goods and store them in another suitable refrigerator running at the same temperature.
3.
4
N.B.:
Remove the plug in the bottom section of the machine. . Allow the evaporator to defrost.
do not
use sharp or pointed metal objects to remove the ice from the evaporator. . Clean the walls and
5
accessories with a sponge dipped in water and sodium bicarbonate. Take care not to touch the
evaporator fins, which feature sharp edges. . Dry all parts with care.
6


