FrSky Electronic Co., Ltd. www.frsky-rc.com Contact us: frsky@frsky-rc.com
Add:F-4,Building C, Zhongxiu Technology Park, No.3 Yuanxi Road, Wuxi, 214125, Jiangsu, China Technical Support: sales4tech@gmail.com
FrSky Electronic Co., Ltd. www.frsky-rc.com Contact us: frsky@frsky-rc.com
Add:F-4,Building C, Zhongxiu Technology Park, No.3 Yuanxi Road, Wuxi, 214125, Jiangsu, China Technical Support: sales4tech@gmail.com
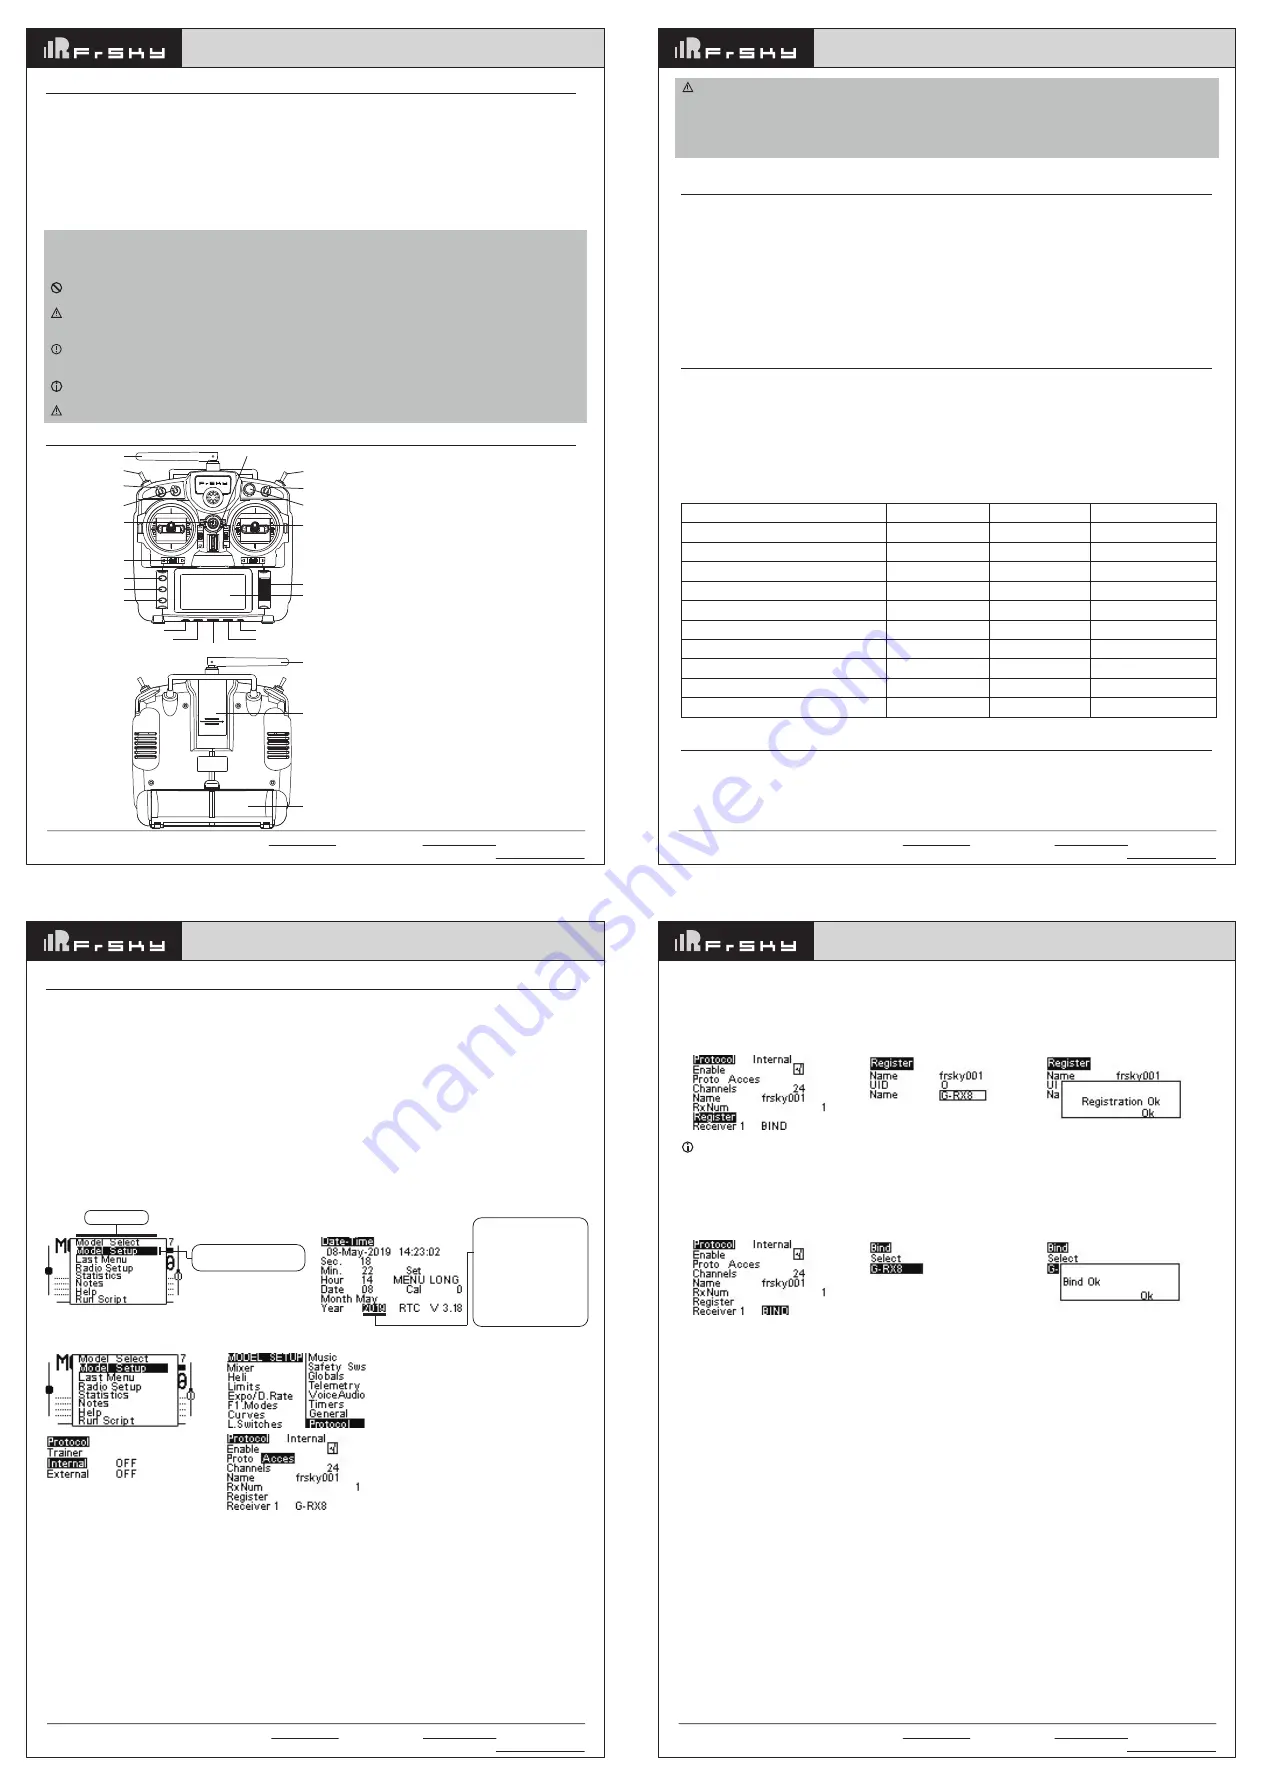
Navigate the Menu
To navigate the menus, Taranis X9 Lite has the following elements:
● Scroll Button
● MENU Button
● PAGE Button
● EXIT Button
Taranis X9 Lite supports ErskyTX / OpenTX system
About ErskyTX:
FrSky 2.4GHz ACCESS Taranis X9 Lite Manual
FrSky 2.4GHz ACCESS Taranis X9 Lite Manual
FrSky Electronic Co., Ltd. www.frsky-rc.com Contact us: frsky@frsky-rc.com
Add:F-4,Building C, Zhongxiu Technology Park, No.3 Yuanxi Road, Wuxi, 214125, Jiangsu, China Technical Support: sales4tech@gmail.com
FrSky 2.4GHz ACCESS Taranis X9 Lite Manual
FrSky Electronic Co., Ltd. www.frsky-rc.com Contact us: frsky@frsky-rc.com
Add:F-4,Building C, Zhongxiu Technology Park, No.3 Yuanxi Road, Wuxi, 214125, Jiangsu, China Technical Support: sales4tech@gmail.com
FrSky 2.4GHz ACCESS Taranis X9 Lite Manual
Introduction
As
a portable radio, the
FrSky
Taranis X9 Lite is a
remarkable
fusion of traditional radio design with the innovations
of the latest
ACCESS
protocol.
The X9 Lite inherits its
classic
form
factor
from the
FrSky
Taranis X9D series remote
control,
along with
completely
preserving the
comfort
of the
classic
grip design, it also adds a
scroll
button adding
convenience
when navigating the menu further improving the user
experience.
For beginners, the wired training
function is retained, allowing beginners to improve their skills with the security of an instructors input upon command.
Like
the Taranis X-Lite
Pro,
the new Taranis X9 Lite also uses the latest
ACCESS
communication
protocol,
along with
ErskyTX
/ OpenTX open
source
operating
system,
it boasts 24
channels
with a faster baud rate and lower
latency
with a
high-speed module digital
interface.
Additional
ACCESS
features
like
wireless firmware updates and wireless
configurations
will be
gradually
unlocked,
providing a more reliable, more
secure
link
between the remote and
model.
Making the X9 Lite a fully functioning remote control with tons of extra features.
Due to unforeseen
changes
in produ
ct
ion, the information
c
ontained in this manual is s
ubjec
t to
change
without not
ice. P
a
y s
pe
c
ial
attention to safety where indicated by the following marks:
Meanings of Special Markings
DANGER
- procedures which may lead to dangerous conditions and cause death/serious injury if not carried out properly.
WARNING
- Procedures which may lead to a dangerous condition or cause serious injury and even death to the user if not carried
out properly or procedures where the probability of superficial injury or physical damage is high.
CAUTION
- Procedures where the possibility of serious injury to the user is small, but there is a danger of injury or physical
damage,
if not carried out properly.
NOTE
– Steps, Tips or information
WARNING
- Always keep electrical components away from children.
Layout
Antenna
Power
Hook
Stick
SB
SD
SE
SC
S1
Exit
Digital Trim
MENU
PAGE
SA
LCD Display
Scroll Button
Micro USB Port
Micro SD Card Port
Smart Port
Earphone Port
D
SC P
ort (Training port)
Switch
SA: 3 positions; Short lever
SB: 3 positions; Long lever
SC: 3 positions; Short lever
SD: 2 positions; Short lever
SE: 2 positions, Moment, Short lever
S1: Knob Switch
1. Micro SD card is not provided with
shipment.
2. USB port is for upgrading, reading/
writing Micro SD card and internal
memory of radio contents
.
3. Smart Port is for firmware upgrade
for all FrSky S.Port devices.
Antenna
Module Bay
Battery Cover
Specifications
● Dimension: 184*170*101mm (L*W*H)
● Weight: 505g (without battery)
● Operating system: ErskyTX / OpenTX
● Number of channels: 24 channels
● Internal RF Module: ISRM-N
● Operating voltage range: 6.0~8.4V
● Operating current: 190mA@7.4V
● Operating Temperature: -10
℃
~60
℃
(
14℉~140℉
)
● Backlight LCD resolution: 128*64
● Model memories: 60 models (expandable by Micro SD card)
● Smart Port, Micro SD card slot, Micro USB Port and DSC Port
Features
● Ergonomic and compact design
● Installed with ACCESS protocol
● Supports spectrum analyzer function
● High-speed module digital interface
● G7 Noble potentiometer gimbal
● Supports wired training function
● Haptic vibration alerts and voice speech outputs
● Easily accessible battery compartment (*Batteries not included, adaptive with replaceable 18650 button top Li-ion
batteries)
Comparison List
Taranis X9D Plus
Taranis Q X7
Taranis X9 Lite
Operating System
OpenTX OpenTX
ErskyTX/OpenTX
Communication Protocol
ACCST ACCST ACCESS/ACCST D16
High-speed module digital interface
×
×
√
Wired Training System
√
√
√
Haptic Vibration Alerts
√
√
√
Voice Speech Outputs
√
√
√
Outdoor Legible Backlit LCD √
√
√
Easily Accessible Battery Compartment
√
√
√
Potentiometer Gimbal
√
√
√
Battery Charging System
√
×
×
Warnings for Battery
Do not remove the battery from the X9 Lite transmitter while the voltage warning is blinking as this could cause
internal settings and memories to be destroyed.
Do not use the transmitter if a “Backup Error” warning occurs.
Scroll Button
To navigate menus or widgets, roll the button to left or right as navigation.
MENU Button
To go to the main menu, press the button, and hold for one second.
PAGE Button
To go to switch the page, press the button.
EXIT Button
To exit current page or operation widgets.
Where am I in the menu tree
To go to the other item, Scroll
Button roll to the left or right.
To change the data in other
items, firstly roll Scroll Button
to the left or right until the
cursor stays at the needed
item.
Secondly, press Scroll button
and roll the button to the left
or right.
Finally, you need to press the
MENU button and hold for one
second, and the time will be set.
System item
number and is bound to the X9 Lite, the bind procedure will not need to be repeated unless the receiver number is changed. In this case,
either set the receiver number to the previous one or repeat the bind procedure.
Model Setup for Taranis X9 Lite Internal RF Module
Enter the MODEL SETUP menu.
Step 1: Set the Mode for Taranis X9 Lite Internal RF.
Press Scroll button or MENU button and hold one second, go to the main menu, select [Model Setup], go to [Protocol], select the [Internal]
[Enable], and select [Proto] [Acces].
Step 2: Set the Channel Range
The Internal RF module of X9 Lite supports up to 24 channels. The channel range is configurable, and needs to be confirmed before
use.
Step 3: Set the Receiver Number
When you create a new model, the system will assign you a receiver number automatically, but this can be easily changed. The range
of the receiver number is 00-63, with the default number being 01 (use 00 is not recommended). Once the receiver is set to desired
Step 4: Registration
Select [Register], press F/S button, and power it on, The display will show the RX xx and press the Menu button or the Scroll button to
complete process. then power down the receiver.
Note:
If two or three receivers are used at the same time, the UID should be set to different values.
Step 5: Automatic binding (Smart Match )
Move the cursor to Receiver 1 [BIND], and select it, power your receiver,The display will show the RX xx and press the Menu button or
the Scroll button to complete process. the system will confirm “Bind ok”. (You do not need to press the “F/S” button in ACCESS Protocol
to bind. Refer to the receivers manual for details.)
TM
Step 6: Set Failsafe mode
There are 4 failsafe modes: No pulse, Hold, Custom and receiver.
No Pulse: on loss of signal the receiver produces no pulses on any channel.
Hold: the receiver continues to output the last positions before signal was lost.
Custom: pre-set to required positions on lost signal.
Receiver: set the failsafe on the receiver (see receiver instructions) in ACCESS Protocol.
Step 7: Range
Range refers to
Taranis
X9 Lite range check mode. A pre-flight range check should be done before each flying
session. Move the cursor to [Range Check] and press the Scroll Button. In range check mode, the effective
distance will be decreased to 1/30. Press the EXIT to exit.
About OpenTX:
Scroll Button
To navigate menus or widgets, roll the button to left or right as navigation.
MENU Button
To go to the [Model] menu,press the button.
To go to the [RADIO SETUP] menu, press the button, and hold for one second.
PAGE Button
To go to switch the page,press the button.
To go to the [Telemetry] menu, press the button, and hold for one second.
EXIT Button
To exit current page or operation widgets.


