Frye Electronics FONIX COLT Audiometer
19
Chapter 3: Operation of the Colt Audiometer
Note: It is suggested that the first step before making an audiometric test is to first touch "Start" and
then to enter the new patient's identifier. This action sets up the proper labeling of the internal test data
file and associates the data collected with that patient. Please see section 3.1.11 "Changing the Patient
ID" and 3.1.12 "Starting a New Patient/Clearing Data."
Tactile Option Note:
A Colt Audiometer equipped with the tactile option gives the operator traditional controls
with "feel." Visual contact with the test subject then need not be broken when making changes
in test signal presentation, amplitude or frequency. Three silent detent rotational controls and
two pushbuttons are placed in intuitive positions on the panel of the Colt main electronics
module. Use of these mechanical controls is optional. Either these mechanical controls or the
virtual tablet controls provided as described below can be used.
3.0 Control with the Android tablet
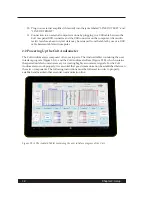
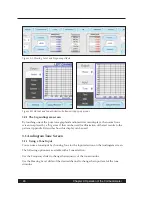
This chapter describes how to operate the Colt Audiometer using the Android tablet. Specific
details of operation are not covered in this chapter. Instead of actual knobs, sliders and but-
tons, the tablet controlling the Colt Audiometer has touch-based controls, but we will refer
to them as “sliders” (Figure 3A) and “selection buttons” (Figure 3B) for the purpose of these
instructions. When first “powered up,” the Colt starts operation in the tone screen
If the Colt is equipped with the tactile option, then knobs are placed on the front panel that
can control the frequency and amplitude of the corresponding channel. Physical push buttons
are also added for stimulus activation.
The sliders control the Hearing Level for each channel and the Frequency setting. To manipu-
late them, move your finger up and down on the slider, as if you were moving an actual slider
handle.
Once you start pushing the slider display, you can actually shift your finger to one side of the
control while continuing to move your finger up and down. This is a way of controlling the
slider without obscuring the selected value with your finger. When you lift your finger, the
chosen value will remain in place. Alternately, you can change the slider setting one increment
at a time by tapping above or below its selected value.
To change the value of the selection buttons (such as the Input and the Output selections),
touch the appropriate button. This will change the selection to the next value, and you can re-
peat this action to go through all available selections. Alternately, you can push and hold down
the selection button, which causes a menu list to pop up. Then make a choice from the list.
One of the first tasks is to enter the user and patient numbers. Touch the corresponding
number field at the top of the screen. A virtual keyboard will appear, allowing you to enter or
modify the displayed number. Touch OK when finished. Use this procedure for both numbers.
They are used as indicators if and when a data file is stored with a SAVE button press.


