Real-Ear Measurements
115
9. Press START/STOP to start the measurement. While the measurement is running, you may
want to adjust the angle of the speaker (or the position of the client) to make sure the sound
source is hitting the null position of the aid. You are looking for the response with the least
amount of amplification.
10. Press START/STOP to stop the measurement once it has stabilized. The “unaided” response is
now the reverse measurement of the directional aid.
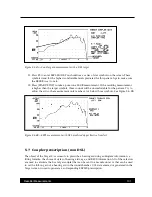
Figure 5.11.1—Reverse measurement positioning for directional test
5.11.2 Forward Measurement
1. Move the patient and/or speaker so that the speaker is positioned at a 0
°
azimuth.
2. Look above F3 and make sure that AIDED 1 is highlighted. If it is not, press F3 to selected it.
3. Press START/STOP to start the measurement. The source type and level should be the same
as used for the reverse measurement.
4. Press START/STOP again once the measurement has stabilized. The “aided 1” measurement
is now the forward measurement of the directional aid.
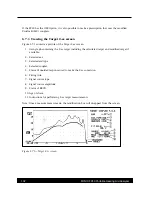
5. Look at the insertion gain graph on the left side of the screen. This shows the directional ben-
efit of the hearing aid – the reverse measurement subtracted from the forward measurement.

