background image

2.2 Equipment 

Assembly 


Assembly of the unit is a four-step process: 


1.


Remove the two bolts from the handle-mounting bracket and raise the handle to the upright 
position.  Reinstall the bolts in the bracket and tighten to 8 ft/lbs. 

 
2.


Ensure the O-rings and the bottom 2 inches of the suction tube are lubricated with 

Accrolube 

with Teflon

 or an equivalent light oil or grease. 

 
3.


Turn the pump and suction tube upside down and carefully pour no more than one cup of 
cooking oil down the tube.  Rotate the pump handle slowly three or four times to prime the 
pump. 


4.


Insert the suction tube through the pipe bracket on the handle and into the pickup tube on top of 
the reservoir.  Push down on the pump assembly and ensure the suction tube is fully seated. 

 
2.3 Equipment 

Operation


 WARNING 

DO NOT use this unit to dispose of water or Boil-out solution.  Introduction of water 
or solvents into the unit will permanently damage the pump. 

 
1.


Turn the fryer off prior to draining into SDU.  If so equipped, ensure the fryer drainpipe is firmly 
threaded into the frypot drain valve. 

 
2.


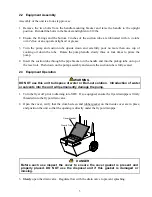
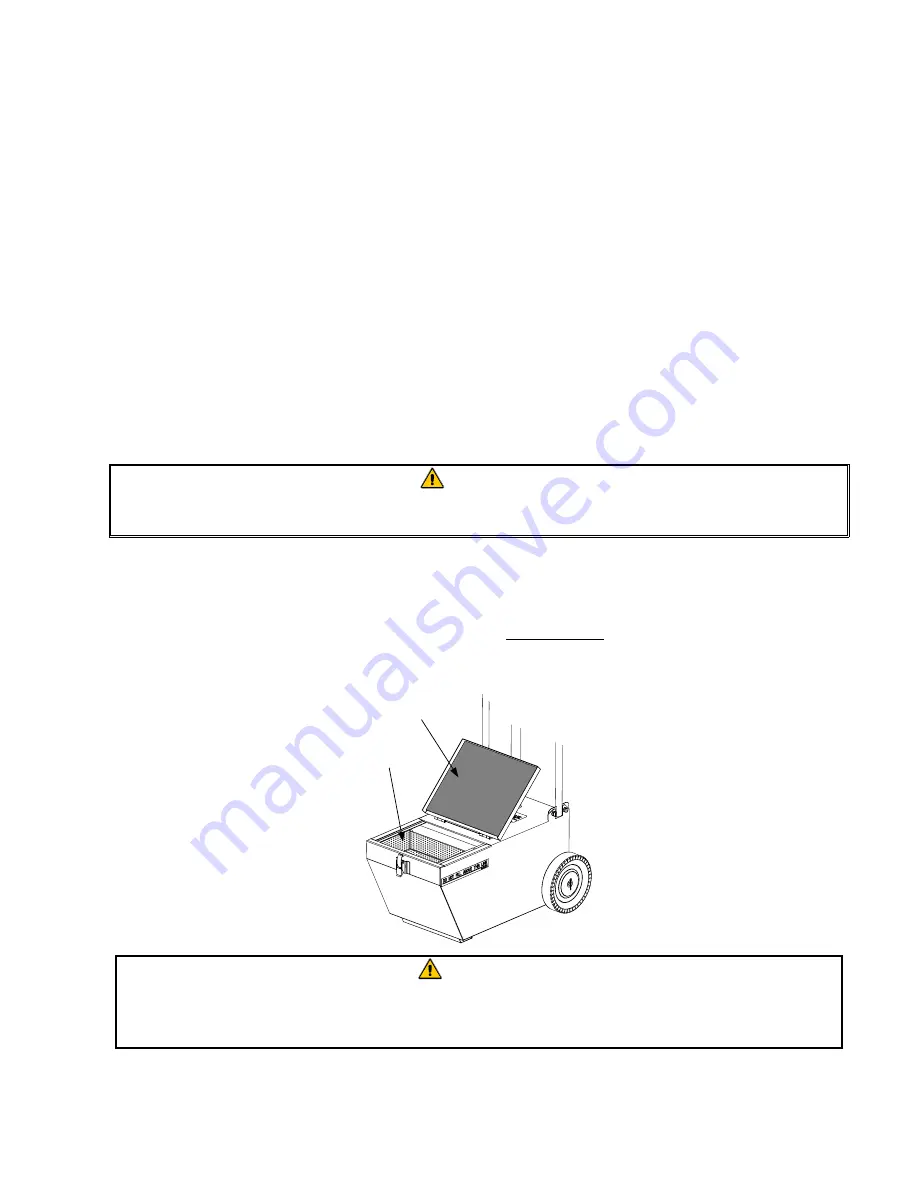
Open the cover, verify that the crumb screen and rubber gasket on the inside cover are in place, 
and position the unit so that the opening is directly under the frypot drainpipe. 


Cover Gasket

Crumb Tray


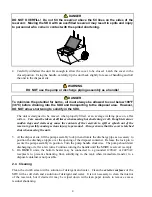
 DANGER 

Before each use inspect the cover to ensure the cover gasket is present and 
properly placed. DO NOT use the disposal unit if this gasket is damaged or 
missing. 

 
3.


Slowly

 open the drain valve.  Regulate flow with the drain valve to prevent splashing. 


Summary of Contents for BKSDU

Page 1: ...ce Association recommends using CFESA Certified Technicians 24 Hour Service Hotline 1 800 551 8633 MARCH 11 www frymaster com E mail service frymaster com 8195703 Shortening Disposal Unit SDU 50 90 100 and BKSDU Installation Operation Service and Parts Manual ...

Page 2: ...ICE Drawings and photos used in this manual are intended to illustrate operational cleaning and technical procedures and may not conform to on site management operational procedures WARNING Improper installation adjustment alteration service or maintenance can cause property damage injury or death Read the installation operating and maintenance instructions thoroughly before installing operating o...

Page 3: ...d Service Personnel 1 1 3 Definitions 1 1 4 Shipping Damage Claim Procedure 2 1 5 What To Do If Your Equipment Arrives Damaged 2 2 ASSEMBLY AND OPERATION 2 2 1 Equipment Description 2 2 2 Equipment Assembly 3 2 3 Equipment Operation 3 2 4 Cleaning 5 3 SERVICE PROCEDURES 5 3 1 General 5 3 2 Replacing Worn or Damaged O Rings 5 3 3 Replacing Worn Pump Vanes and or Pump Shaft Seal 5 4 PARTS LIST 7 ...

Page 4: ...ribe the nature of the problem and have ready any other information that you think may be helpful in solving your problem Parts orders may be placed directly with your local FAS or distributor When ordering parts the following information is required Model Number Serial Number Item Part Number Quantity Needed RETAIN AND STORE THESE INSTRUCTIONS IN A SAFE PLACE FOR FUTURE USE 1 2 Installation Opera...

Page 5: ...e of delivery Ensure that the shipping container is retained for inspection FRYMASTER DOES NOT ASSUME RESPONSIBILITY FOR DAMAGE OR LOSS INCURRED IN TRANSIT 2 ASSEMBLY AND OPERATION 2 1 Equipment Description The Shortening Disposal Unit SDU is designed for the safe transportation of used shortening or cooking oil from the kitchen to a disposal container There are three sizes SDU 50 50 lbs 23 kg SDU...

Page 6: ...f the reservoir Push down on the pump assembly and ensure the suction tube is fully seated 2 3 Equipment Operation WARNING DO NOT use this unit to dispose of water or Boil out solution Introduction of water or solvents into the unit will permanently damage the pump 1 Turn the fryer off prior to draining into SDU If so equipped ensure the fryer drainpipe is firmly threaded into the frypot drain val...

Page 7: ...udden stops and starts may cause the contents of the reservoir to spill or splash out of the reservoir possibly causing serious injury to personnel Always ensure that the cover is latched shut when moving the unit 5 At the disposal site lift the pump assembly lock pin and rotate the discharge pipe as necessary to position the discharge nipple over the opening of the disposal container Release the ...

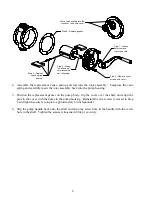
Page 8: ...down on the pump assembly to make sure the suction tube is fully seated 3 3 Replacing Worn Pump Vanes and or Pump Shaft Seal Depending upon the amount of use the vanes in the pump assembly will eventually wear reducing the efficiency of the pump The pump shaft seal can also become worn and start to leak A kit for replacing the vanes and the seal is available The pump shaft seal can also be purchas...

Page 9: ...assembly Compress the vane spring and carefully insert the rotor assembly back into the pump housing 5 Position the replacement gasket on the pump body slip the cover over the shaft and align the pins in the cover with the holes in the pump housing Reinstall the five screws removed in Step 2 and tighten securely torque to approximately 60 inch pounds 6 Slip the pump handle back onto the shaft and ...

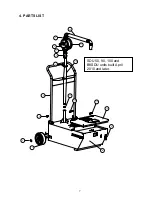
Page 10: ...7 4 PARTS LIST 1 2 6 5 4 3 8 10 9 7 13 12 11 14 15 16 17 18 SDU 50 90 100 and BKSDU units built April 2010 and later ...

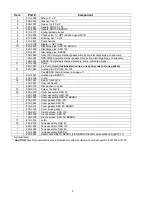
Page 11: ...ne rod one gasket 12 823 7849 Suction pipe SDU 50 90 100 See BKSDU Pump Enclosure on page 11 823 4581 Suction pipe BKSDU 13 816 0132 O ring 14 809 1001 Screw 1 4x20x1 2 809 0047 Cap nut 1 4x20 809 0193 Flat washer nylon 15 809 0119 Screw 10x32x1 2 16 823 2422 Cover assembly SDU 90 823 7804 Cover assembly SDU 100 823 1683 Cover assembly SDU 50 BKSDU 816 0877 Cover gasket SDU 100 816 0264 Cover gask...

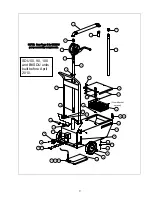
Page 12: ...33 9 28 1 2 3 4 6 7 8 10 12 13 11 14 15 16 20 21 25 26 27 29 16 11 30 18 34 38 37 36 35 19 NOTE See Page 6 for BKSDU pump assembly components 24 Crumb Basket optional SDU 50 90 100 and BKSDU units built before April 2010 ...

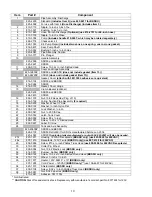
Page 13: ... ring Suction Pipe Assembly 2 required 18 809 0200 Washer Wheel SAE 19 809 0193 Washer inch Nylon Flat 20 809 0191 Lock Washer inch 21 809 0047 Nut 20 S S Cap 22 810 0742 Latch Tank Cover 23 809 0359 Screw 8 x inch 24 809 1001 Screw 20 x Slotted Head 25 802 0227 Label Fill Line 26 Tank and Axle Assembly 823 4580SP SDU50 and BKSDU 826 2103 SDU50 Retrofit Kit for SDU s manufactured before Jan 2004 8...

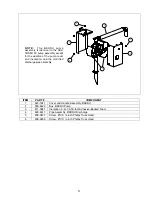
Page 14: ...lation and the modified discharge pipe assembly 1 2 3 4 5 6 6 ITEM PART COMPONENT 1 823 1847 Cover and Handle Assembly BKSDU 2 900 4429 Box BKSDU Pump 3 811 0861 Insulation 3 inch X 50 foot Adhesive Backed Foam 4 823 4617 Pipe Assembly BKSDU Discharge 5 809 0477 Screw 10 X inch Philips Truss Head 6 809 0266 Screw 10 X inch Philips Truss Head ...

Page 15: ......

Page 16: ...er L L C 8700 Line Avenue Shreveport Louisiana 71106 TEL 1 318 865 1711 FAX Parts 1 318 688 2200 FAX Tech Support 1 318 219 7135 PRINTED IN THE UNITED STATES SERVICE HOTLINE 1 800 551 8633 819 5703 March 2011 ...

Reviews: