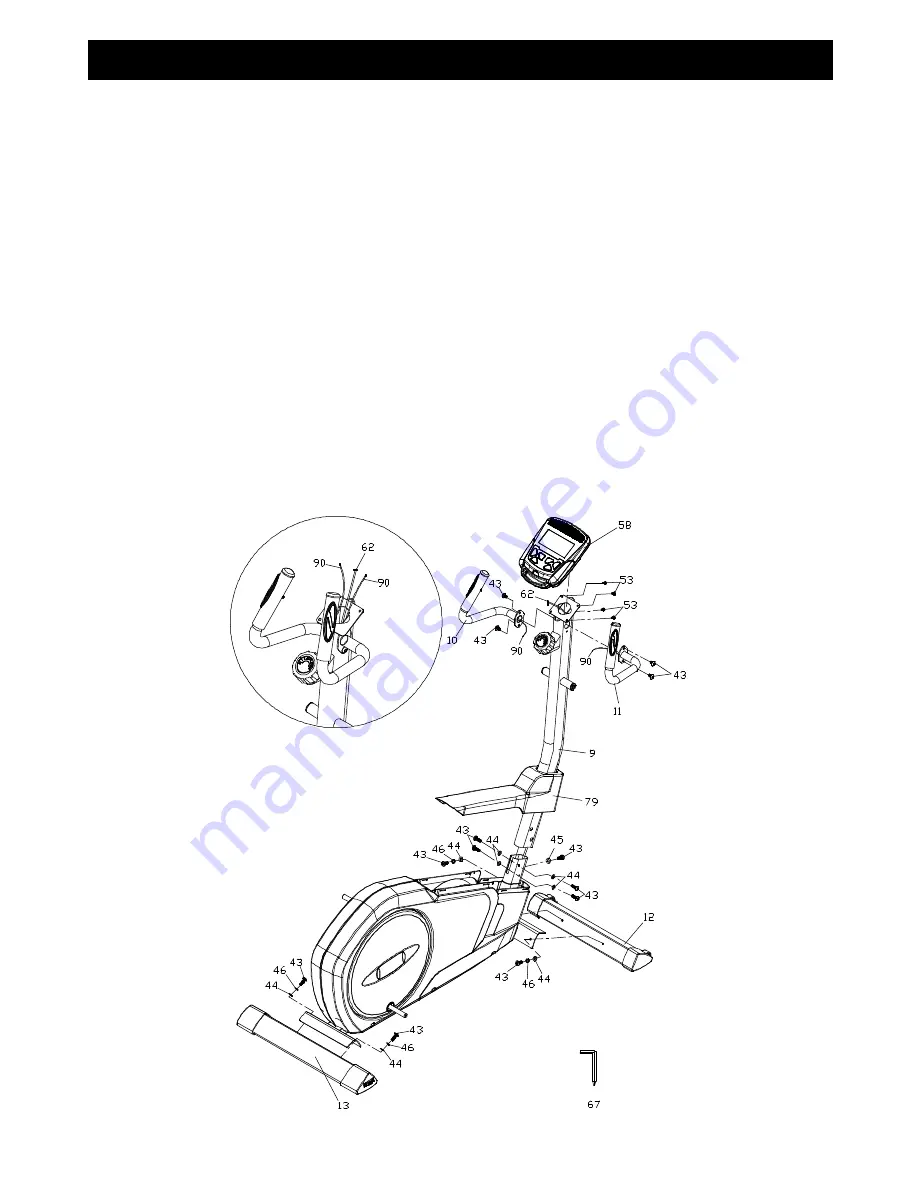
background image


STEP 1: 

1. 

Locate the Console Mast (9) and slide on Console Mast Cover (79). Make sure the 
cover is facing the correct direction, as shown below, before sliding onto mast. Install 
the wiring harness (90) into the bottom of the mast and out the top. Be careful when 
installing the console mast to the mainframe so as not to pinch or cut the wiring 
harness; damage to the console may occur. 

2. 

Install the console mast on the mainframe using the M5 Allen Wrench (67) to tighten 
5pcs of 5/16” Button Head Socket Bolts (43), 4pcs of 5/16” Flat Washers (44) and 1pc 
of 5/16" Curved Washer (45). 

Snap the Console Mast Cover (79) in place on the 

body of the elliptical.   

3. 

Route the hand pulse wires

 (90)

 from the stationary handle bars (10, 11) through 

Console Mast (9) as shown below. Use M5 Allen Wrench (67) to tighten 4pcs of 5/16” 
Button Head Socket Bolts (43) to secure both handles on the Console Mast (9). 

4. 

Connect the cables 

(62, 90)

 to the Console (58) and install console onto the Mast (9) 

with 4pcs of M5 × 12L Phillips head screws (53) by using the Phillips Head Screw 
Driver (67). 

5. 

Secure Front Stabilizer (12) and Rear Stabilizer (13) with 4pcs of 5/16” Button Head 
Socket Bolts (43), 4pcs of 5/16" Split Washers (46) and 4pcs of 5/16” Flat Washers (44) 
by using M5 Allen Wrench (67). 


Assembly Instructions 

Summary of Contents for SE155-30

Page 1: ...PLEASE CAREFULLY READ THIS ENTIRE MANUAL BEFORE OPERATING YOUR RECUMENT OWNER S MANUAL SE155 30 RECUMENT...

Page 2: ...ny openings Do not use outdoors Do not attempt to use your elliptical for any purpose other than for the purpose it is intended The pulse sensors are not medical devices Various factors including the...

Page 3: ...Phillips Head Screw 4pcs STEP 1 STEP 2 STEP 3 43 5 16 3 4 Button Head Socket Bolt 1pc 44 5 16 Flat Washer 1pc 46 5 16 Split Washer 4pcs 55 5 16 Nyloc Nut 2pcs 43 5 16 3 4 Button Head Socket Bolt 1pc 4...

Page 4: ...EP 4 67 Combination M5 Allen Wrench Phillips Head Screw Driver 1pc 68 19m m Wrench 1pc 91 5 16 1 Button Head Socket Bolt 2pcs 44 5 16 Flat Washer 2pcs 30 1 2 Nyloc Nut 2pcs 29 1 2 70mm Carriage Bolt 2...

Page 5: ...ashers 44 and 1pc of 5 16 Curved Washer 45 Snap the Console Mast Cover 79 in place on the body of the elliptical 3 Route the hand pulse wires 90 from the stationary handle bars 10 11 through Console M...

Page 6: ...o tighten 2pcs of 5 16 Button Head Socket Bolts 56 and 2pcs of 5 16 Nyloc Nuts 55 to the swing arm assembly 2 Locate the Swing Arm Axle 22 and slide it through the console mast bushings then through t...

Page 7: ...Use M5 Allen Wrench 67 to tighten 2pcs of 5 16 Button Head Socket Bolts 56 and 2pcs of 5 16 Nyloc Nuts 55 to the swing arm assembly 2 Slide the swing arm onto the axle 22 Secure the swing arm to the a...

Page 8: ...llen Wrench 67 to tighten the 5 16 Button Head Socket Bolt 91 5 16 Split Washer 46 and 5 16 Flat Washer 44 2 Locate the 1 2 2 3 4 Carriage Bolt 29 and slide through the bracket at the front of the Ped...

Page 9: ...t all value to zero and return to idle mode When the user replace batteries all the values will reset to ZERO automatically SET 1 Press to set the hour minute year month and date after choosing each o...

Page 10: ...ED Displays current training speed Maximum speed is 99 9 km h or mile h DISTANCE Accumulates total distance from 0 00 up to 99 99 km or mile The user may preset a target distance goal by pressing MODE...

Page 11: ...en 6 If you have preset any target the value will begin to count down from the target setting when the training starts Once the target is achieved the monitor will beep and the function will count up...

Page 12: ...an mode BODY FAT Calculated from your personal data and is shown as a value from 5 50 BMI Calculated from your personal data and is shown as a value from 1 0 99 99 9 6 Press any key to return to the m...

Reviews: