background image

xii

 CAUTION

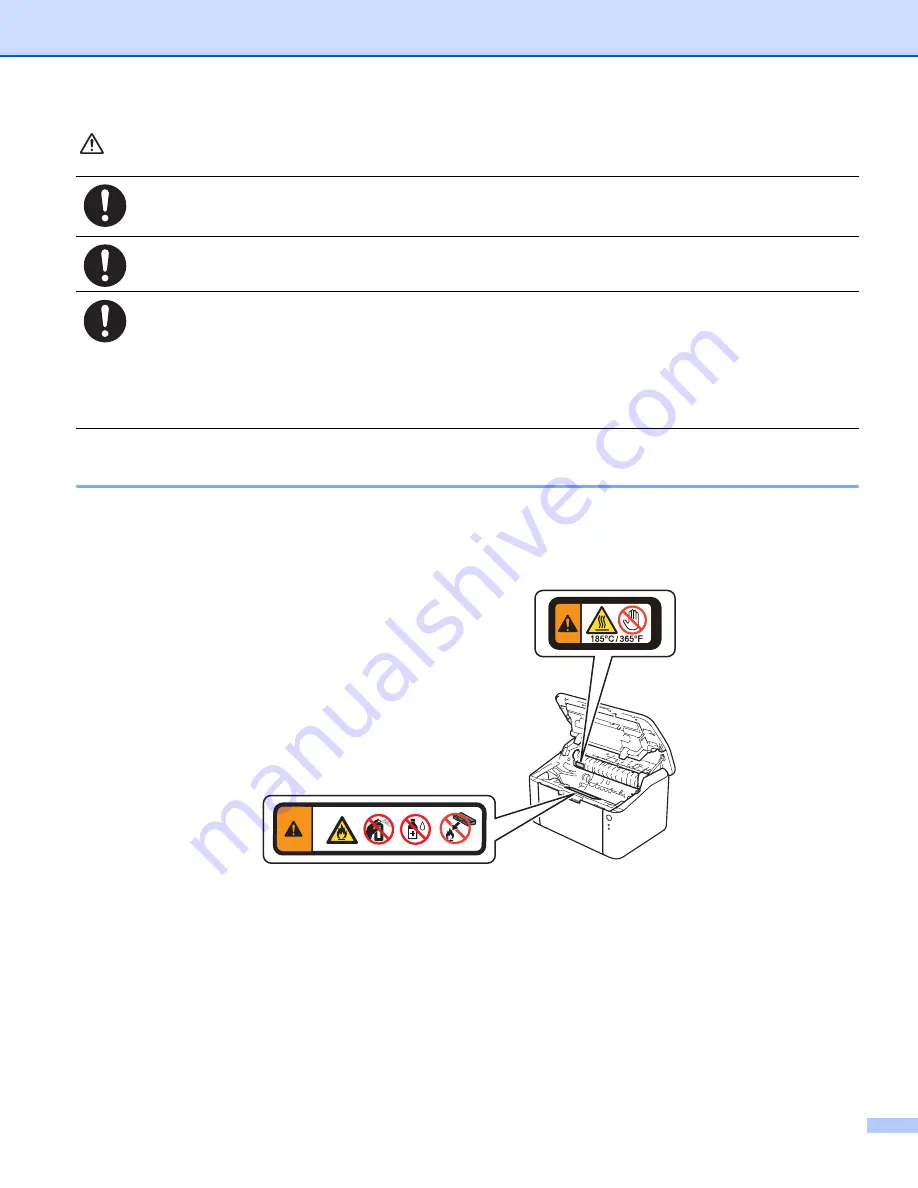
Warning and Caution Labels

Always follow all warning instructions marked on or supplied with this product.
To avoid the risk of burn injuries and electric shock, never touch the area with the "High Temperature" or 
"High Voltage" marks on.


Keep drum cartridges (or drum if not a cartridge type) and toner cartridges out of the reach of children. If a 
child accidentally swallows toner, spit it out, rinse mouth with water, drink water and consult a physician 
immediately.


When replacing drum cartridges (or drum if not a cartridge type) and toner cartridges, be careful not to spill 
the toner. In case of any toner spills, avoid contact with clothes, skin, eyes and mouth as well as inhalation.


If toner spills onto your skin or clothing, wash it off with soap and water.

If you get toner particles in the eyes, wash it out with plenty of water for at least 15 minutes until irritation is 
gone. Consult a physician if necessary.

If you inhale toner particles, move to a fresh air location and rinse your mouth with water.

If you swallow toner, spit it out, rinse your mouth with water, drink plenty of water and consult a physician 
immediately.

Summary of Contents for DocuPrint P115 b

Page 1: ...User s Guide DocuPrint P115 b ...

Page 2: ...e and provides all the necessary operating information about the printer function Please read this guide to achieve the best performance from this printer This guide assumes you are familiar with computers and the basics of network operation and configuration After reading this guide keep it safe and handy for future reference ...

Page 3: ...ructions before performing the required procedures Fuji Xerox is not responsible for any breakdown of machines due to infection of computer virus or computer hacking IMPORTANT 1 This manual is copyrighted with all rights reserved Under the copyright laws this manual may not be copied or modified in whole or part without the written consent of the publisher 2 Parts of this manual are subject to cha...

Page 4: ...chine See this Guide for trademarks and legal limitations Quick Setup Guide Follow the instructions for setting up your machine and installing the drivers and software for the operating system and connection type you are using User s Guide Learn the print operations how to replace consumables and performing routine maintenance See troubleshooting tips ...

Page 5: ...scribes the basic information about how to connect the printer to your computer and how to install the print driver 3 General Information Describes the main components of the printer the power saver mode and how to turn on the printer A Troubleshooting and other information Describes the troubleshooting tips for printer problems such as paper jams B Specifications Describes the printer specificati...

Page 6: ...rtant information that must be read and followed NOTE Additional information that merits emphasis See also References within this guide 3 Orientation of documents or paper is described in this guide as follows Short Edge Feed SEF Loading the document or paper with the short edge into the machine as shown in the illustration below SEF Orientation Paper feed direction ...

Page 7: ...m that if not followed strictly can lead death or severe or fatal injuries and the possibility to do it is comparatively high Used for items that if not followed strictly can lead to severe or fatal injuries Used for items that if not followed strictly can cause injuries to user or damages to machine A symbol for items to pay attention to when handling machine Follow instructions carefully to use ...

Page 8: ...ative to check if an outlet is grounded Connect this product to a branch circuit or an outlet that has larger capacity than the rated ampere and voltage of this product See the data plate on the rear panel of this product for its rated ampere and voltage Never touch the power cord with wet hands It may cause electric shock Do not put an object on the power cord Always keep the plug connection free...

Page 9: ... plugged firmly into an electrical outlet the plug is not excessively heated rusted or bent the plug and electrical outlet are free of dust and the power cord is not cracked or worn down Once you notice any unusual condition switch off and unplug this product first and contact your local Fuji Xerox representative Do not locate this product where people might step on or trip over the power cord Fri...

Page 10: ...uct if an abnormal condition is noted Do not incline the product at more than 10 degree angle Otherwise it may fall over and cause injuries To bundle wires and cables always use the cable ties and spiral tubes that Fuji Xerox supplies Otherwise it may cause some defects 100 mm 100 mm 100 mm 662 mm 662 mm 540 mm 464 mm 200 mm 200 mm 100 mm 100 mm Left Left Right Right Front Front Back Back 10 10 10...

Page 11: ...e The product emits smoke or its surface is unusually hot The product emits unusual noise or odor The power cord is cracked or worn down A circuit breaker fuse or any other safety device becomes activated Any liquid is spilled into the product The product is soaked in water Any part of the product is damaged Do not insert any object into slots or openings of this product Do not put any of the foll...

Page 12: ... inside the product particularly a paper wrapped around a heat roller Otherwise it may cause injuries or burns and even worse may generate smoke if you keep operating the product with a paper jammed Switch off the product promptly and contact your local Fuji Xerox representative for more information Ventilate well during extended operation or mass copying It may affect the office air environment d...

Page 13: ...ediately When replacing drum cartridges or drum if not a cartridge type and toner cartridges be careful not to spill the toner In case of any toner spills avoid contact with clothes skin eyes and mouth as well as inhalation If toner spills onto your skin or clothing wash it off with soap and water If you get toner particles in the eyes wash it out with plenty of water for at least 15 minutes until...

Page 14: ...ment Proper disposal is required for toner cartridges and drum photoreceptor modules no longer needed Do not open toner cartridges and drum photoreceptor modules Return them to your local Fuji Xerox representative ...

Page 15: ...ructions may cause harmful interference to radio communications However there is no guarantee that interference will not occur in a particular installation If this product does cause harmful interference to radio or television reception which can be determined by turning this product off and on the user is encouraged to try to correct the interference by one or more of the following measures Reori...

Page 16: ...that may be illegal to copy or print in your country Currency Banknotes and checks Bank and government bonds and securities Passports and identification cards Copyright material or trademarks without the consent of the owner Postage stamps and other negotiable instruments This list is not inclusive and no liability is assumed for either its completeness or accuracy In case of doubt contact your le...

Page 17: ...nced tab 13 Print Profiles tab 19 Device Settings tab 21 Support 22 Uninstalling the printer driver 23 Status Monitor 24 Macintosh 26 Features in the printer driver Macintosh 26 Choosing page setup options 26 Removing the printer driver 33 Status Monitor 34 3 General Information 35 Control panel 35 LEDs Light Emitting Diodes 35 Service call indications 39 Power On Off key 40 Print a Printer Settin...

Page 18: ...53 If you are having difficulty with your machine 57 Cleaning and Checking the machine 59 Machine Information 60 Default settings 60 B Specifications 61 General 61 Print media 63 Important information for choosing your paper 64 Printer 65 C Contacting Fuji Xerox 66 Technical Support 66 Online Services 67 D Index 68 ...

Page 19: ... 3 Face down output tray support flap support flap 4 Paper tray 5 USB port NOTE For details about how the LEDs show the machine s status see LEDs Light Emitting Diodes on page 35 For the Power On Off key functions see Power On Off key on page 40 Printing Methods 1 1 3 5 2 4 ...

Page 20: ...nted surface of the paper immediately after printing Before you buy a lot of paper test a small quantity to make sure that the paper is suitable WARNING Do not use conductive paper such as origami paper carbonic paper or conductively coated paper When paper jam occurs it may cause short circuit and eventually a fire accident Paper capacity of the paper tray 1 1 Folio size is 215 9 mm x 330 2 mm Sm...

Page 21: ...thin it may wrinkle If paper is curled straighten it and put it back in the paper tray If the paper continues to curl replace the paper If the paper is not feeding correctly it may be curled Remove the paper and straighten it If the paper continues to curl replace the paper When you use the manual 2 sided function it is possible that there may be paper jams or poor print quality If there is a pape...

Page 22: ...t Choose 2 sided Manual 2 sided Type in 2 sided Settings There are four options for each orientation See 2 sided Booklet on page 10 Binding Offset in 2 sided Settings You can specify the offset for binding See 2 sided Booklet on page 10 For any other settings see Driver and Software in Chapter 2 b Send the print data to the machine The machine will print all the even numbered pages on one side of ...

Page 23: ... more information and to download the printer driver for Linux please visit your model page at http www fujixeroxprinters com 2 Depending on Linux distributions the driver may not be available or it may be released after the initial release of your model Printing a document 2 When the machine receives data from your computer it begins printing by picking up paper from the paper tray The paper tray...

Page 24: ...ation software Printer driver settings 2 You can change the following printer settings when you print from your computer Paper Size Orientation Copies Media Type Print Quality Print Settings Multiple Page 2 sided Booklet Print Preview Scaling Reverse Print Use Watermark Header Footer Print Toner Save Mode Administrator Density Adjustment Improve Print Output Skip Blank Page Print Text in Black Pri...

Page 25: ...ettings and then click Control Panel In the Hardware group click View devices and printers b For Windows XP Windows Server 2003 Windows Vista and Windows Server 2008 Right click the DocuPrint P115 b icon and then select Properties option If printer driver options appear select your printer driver For Windows 7 Windows Server 2008 R2 Windows 8 and Windows Server 2012 Right click the DocuPrint P115 ...

Page 26: ...Print Quality and Print Settings 1 b Choose Multiple Page and 2 sided Booklet 2 c Confirm your current settings in the window 3 d Click OK to apply your chosen settings To return to the default settings click Default then OK NOTE If you want to preview your document before printing check the Print Preview check box 4 Paper Size 2 From the drop down list choose the Paper Size you are using 4 1 2 3 ...

Page 27: ...peated for the number of copies you selected If the Collate check box is not selected then each page will be printed for all the copies selected before the next page of the document is printed Media Type 2 You can use the following types of media in your machine For the best print quality select the type of media that you wish to use Plain Paper Recycled Paper Print Quality 2 You can choose the pr...

Page 28: ...ting multiple pages onto one sheet with the Multiple Page feature you can choose to have a solid border dash border or no border around each page on the sheet Print cut out line When 1 in NxN Pages option is selected the Print cut out line option can be selected This option allows you to print a faint cut out line around the printable area 2 sided Booklet 2 When you want to print a booklet or do 2...

Page 29: ... using 2 sided printing it will arrange the document according to the correct page number and allows you to fold at the centre of the print output without having to change the order of the page number When you choose Booklet Manual the 2 sided Settings button becomes available to choose You can set the following settings in the 2 sided Settings dialog box Portrait Long Edge Left Long Edge Right Sh...

Page 30: ...o change the order of the page number You can specify the number of sheets in each smaller booklet set from 1 to 15 This option can help when folding the printed booklet that has a large number of pages Binding Offset When you check Binding Offset you can also specify the offset for binding in inches or millimetres Print Preview 2 You can preview a document before it is printed If you check the Pr...

Page 31: ...e clear the check mark 2 Preview Area The Preview Area displays a preview of the print results for the pages chosen in the Page List Area NOTE If 2 sided Manual or Booklet Manual was chosen in the Printer driver settings you cannot use the Print Preview function Advanced tab 2 Change the tab settings by clicking one of the following selections Scaling 1 Reverse Print 2 Use Watermark 3 Header Foote...

Page 32: ...Reverse Print to reverse the data from up to down Use Watermark 2 You can put a logo or text into your document as a watermark You can choose one of the preset Watermarks or you can use a bitmap file that you have created Check Use Watermark and then click the Settings button Watermark Settings 2 ...

Page 33: ... name and location of your bitmap image in the File box or click Browse to search for the file You can also set the scaling size of the image Position Use this setting if you want to control the position of the watermark on the page Bring to Front This option will overlay the selected characters or image onto your printed document In Outline Text Check In Outline Text if you only want to print an ...

Page 34: ...er Save Mode 2 You can conserve toner use with this feature When you set Toner Save Mode to on print appears lighter The default setting is off NOTE We do not recommend Toner Save Mode for printing photo or Greyscale images Toner Save Mode is not available when Fine is selected for Print Quality Administrator 2 Administrators have the authority to limit access to functions such as scaling and wate...

Page 35: ...llowing in Printer Function Density Adjustment Improve Print Output Skip Blank Page Print Text in Black Density Adjustment 2 Increase or decrease the print density NOTE Density Adjustment is not available when Fine is selected for Print Quality Improve Print Output 2 This feature allows you to improve a print quality problem Reduce Paper Curl If you choose this setting the paper curl may be reduce...

Page 36: ...Skip Blank Page 2 If Skip Blank Page is checked the printer driver automatically detects blank pages and excludes them from printing NOTE This option does not work when you choose the following options Use Watermark Header Footer Print N in 1 and 1 in NxN Pages in Multiple Page 2 sided Manual Booklet Manual in 2 sided Booklet Print Preview Print Text in Black 2 This function enables all text to be...

Page 37: ...le list box b If you want to display the Print Profiles tab at the front of the window from the next time you print check Always show Print Profiles tab first c Click OK to apply your chosen profile Add Profile 2 The Add Profile dialog box appears by clicking Add Profile You can add 20 new profiles with your preferred settings a Enter the desired title in Name b Choose an icon you want to use from...

Page 38: ...le 2 The Delete Profile dialog box appears by clicking Delete Profile You can delete any of the profiles you have added a Choose your profile from the print profile list box b Click Delete c Click Yes d The selected profile will be deleted ...

Page 39: ...machine and display its serial number If it fails to receive the information the screen will display Auto Detect 2 The Auto Detect function shows the available settings in the printer driver NOTE The Auto Detect 2 function is not available under the following machine conditions The machine is turned off The machine is in an error state The machine is connected to the print server using a USB cable...

Page 40: ...ebsite offers information about your Fuji Xerox product including Driver updates Links to Fuji Xerox Website http www fujixeroxprinters com Print Settings 2 This button will print the pages that show how the internal settings of the machine have been configured Check Setting 3 You can check the current driver settings 1 3 4 2 ...

Page 41: ...nction After uninstalling we recommend that you restart your computer to remove files that were in use during the uninstall For Windows XP Windows Vista and Windows 7 a Click the Start button point to All Programs Fuji Xerox and then to your machine name b Click Uninstall c Follow the instructions on the screen For Windows 8 a Click Fuji Xerox Utilities b Click the drop down list and select your m...

Page 42: ...d in Start All Programs Fuji Xerox DocuPrint P115 b on your PC Windows 7 To show the Status Monitor icon on your taskbar click the button The Status Monitor icon will appear in the small window Then drag the icon to the taskbar Windows 8 Click Fuji Xerox Utilities and then click the drop down list and select your model name if not already selected Click Tools in the left navigation bar and then cl...

Page 43: ...ange colour depending on the machine status A green icon indicates the normal stand by condition A yellow icon indicates a warning A red icon indicates a printing error has occurred There are two locations where you can display the Status Monitor on your PC in the tasktray or on the desktop ...

Page 44: ...ng system version The printer driver for Macintosh is available from the download page for your model on the Fuji Xerox website http www fujixeroxprinters com Choosing page setup options 2 You can set the Paper Size Orientation and Scale a From an application such as TextEdit click File then Page Setup Make sure FX DocuPrint P115 b is chosen in the Format For pop up menu You can change the setting...

Page 45: ...extEdit click File then Print to start printing For Mac OS X v10 6 8 For more page setup options click the disclosure triangle beside the Printer pop up menu NOTE You can save the current settings as a preset by choosing Save As from the Presets pop up menu ...

Page 46: ...re 28 2 For OS X v10 7 x and v10 8 x For more page setup options click the Show Details button NOTE You can save the current settings as a preset by choosing Save Current Settings as Preset from the Presets pop up menu ...

Page 47: ...ble options see the following descriptions of each option Cover Page 2 You can choose the following cover page settings Print Cover Page If you want to add a cover page to your document use this function Cover Page Type Choose a template for the cover page Billing Info If you want to add the billing information to the cover page enter text in the Billing Info box ...

Page 48: ...on one sheet of paper Layout Direction When you specify the pages per sheet you can also specify the direction of the layout Border If you want to add a border use this function Reverse page orientation Check Reverse page orientation to reverse the data from up to down Flip horizontally Check Flip horizontally to print as a reflection flipped left to right ...

Page 49: ...2 You can change settings by choosing a setting in the Print Settings list Media Type You can change the media type to one of the following Plain Paper Recycled Paper Print Quality You can change the print quality as follows Draft Normal Fine ...

Page 50: ...ty Graphics Quality You can change the print quality as follows Graphics This is a graphics mode contrast priority Choose this setting for printing text and figures such as business and presentation documents You can represent sharp contrasts between shaded areas Text This is the best mode for printing text documents Improve Print Output This feature allows you to improve a print quality problem R...

Page 51: ...e printer driver automatically detects blank pages and excludes them from printing 2 sided Printing 2 Manual 2 sided Printing Select Paper Handling Choose Even Only and Print Reload the printed paper into the tray blank side face down Choose Odd Only and Print Removing the printer driver 2 a Log in as an Administrator b From the Apple menu choose System Preferences Click Print Scan 1 then choose t...

Page 52: ...rint Fax for Mac OS X v10 6 8 users Updating the machine s status 2 If you want the latest machine status while the Status Monitor window is open click the Refresh icon You can set the interval at which the software will update the machine status information Go to the menu bar Status Monitor and choose Preferences Hiding or showing the window 2 After starting the Status Monitor you can hide or sho...

Page 53: ...can use the following functions 1 Job Cancel All Jobs Cancel Error recovery Form feed For details see Power On Off key on page 40 2 Error LED The Error LED indicates that the machine is in error state Also the Error LED indicates the kind of error in combination with other LEDs 3 Ready LED The Ready LED will blink depending on the machine status The LED indications shown in the table below are use...

Page 54: ...e information see Deep Sleep mode on page 42 Ready The machine is ready to print Printing The machine is printing Please Wait The machine is warming up The Ready LED will blink in 1 second intervals Cooling Down The inside of the machine is extremely hot The machine will pause its current print job and go into Cooling Down mode Wait until the machine is in Ready mode The Ready LED will blink in 1 ...

Page 55: ...he toner cartridge from the drum unit and re install the toner cartridge back into the drum unit again Re install the drum unit and toner cartridge assembly back in the machine If the problem continues replace the toner cartridge The Error LED will blink once in 1 5 seconds intervals See the instructions that we have supplied with the new toner cartridge Toner Ended Replace the toner cartridge wit...

Page 56: ...per in the paper tray that is selected in the printer driver and then press The Error LED will blink twice and turn off for 1 second No Paper Put paper in the paper tray you are using The Error LED will blink twice and turn off for 1 second Cover is Open Close the top cover of the machine The Error LED will blink 4 times and turn off for 1 second Out of Memory Press and hold for about 2 seconds un...

Page 57: ...1 If this error occurs turn off the machine wait a few seconds and then turn it on again Leave the machine for approx 15 minutes with the power on If the error occurs again call Fuji Xerox customer service or your local Fuji Xerox dealer For example the LED indication below shows a fusing unit failure Make a note of the indication referring to LED error indication on page 39 and report the error s...

Page 58: ...r The Error LED and Ready LED will light up alternately Then release Cancel all the received jobs To delete all jobs cancel the current job first following the procedure above While all the LEDs light up alternately press again All the LEDs will keep on lighting up alternately as the job s is being canceled Error recovery If there is an error the machine will recover automatically from some errors...

Page 59: ...at the top cover is closed and the power cord is plugged in b Turn on the machine and wait until the machine is in Ready mode c Press three times The machine will print the current printer settings page Using the printer driver 3 If you are using the Windows printer driver you can print the current printer settings page by clicking the Print Settings button in the Support dialog box ...

Page 60: ...machine is in Sleep Mode Power Save mode it acts as though it were turned off The machine will wake up and start printing when it receives a print job The machine automatically goes into Sleep mode after it is idle for 1 minute When the machine receives a print file or document the timer will be reset While the machine is in Sleep mode the Ready LED glows dimly Deep Sleep mode 3 If the machine is ...

Page 61: ...ode after a certain period of time To start printing hold key on the control panel until all the LEDs light up Then send the print data You can enable the Power Off mode feature manually by following these steps a Make sure that the top cover is closed and the power cord is plugged in b Turn on the machine and wait until the machine is in the Ready mode c Hold down key for about 2 seconds All the ...

Page 62: ...r in the cartridge may catch fire and cause burn injuries or explosion If you have a used toner cartridge no longer needed contact your local Fuji Xerox representative for its disposal CAUTION Keep drum cartridges or drum if not a cartridge type and toner cartridges out of the reach of children If a child accidentally swallows toner spit it out rinse mouth with water drink water and consult a phys...

Page 63: ...urces If damage is caused to the drum unit or other parts of this machine as a result of the use of toner or toner cartridges other than Fuji Xerox Original products due to the incompatibility or lack of suitability of those products with this machine any repairs required as a result may not be covered by the warranty For best performance use a Fuji Xerox Original drum unit and Fuji Xerox Original...

Page 64: ...icate Replace Toner press seven times to enter Continue mode all the LEDs blink twice and then the Ready LED turns on The machine will continue printing until the LEDs indicate Toner Ended To return to the default setting Stop mode press seven times all the LEDs blink once NOTE Make sure that the top cover is closed before you change the mode When the LEDs indicate an error mode you cannot change ...

Page 65: ...aper tray The interface cable is securely connected to the machine and the computer If you did not solve your problem with the above checks identify your problem and then go to the page suggested below If you are having difficulty with your machine on page 57 Improving the print quality on page 49 If the machine is connected to a PC depending on the error a Popup application may appear on the PC F...

Page 66: ...top cover of the machine Drum End Soon The drum unit is near the end of its life Order a new drum unit now so a replacement drum unit will be available when the Status Monitor indicates Replace Drum See Drum End Soon Replace Drum on LEDs Light Emitting Diodes Replace Drum It is time to replace the drum unit Replace the drum unit See the instructions that are supplied with the new drum unit The dru...

Page 67: ...g problems with print results check the following 1 The machine s environment Choose a location where the temperature remains between 10 C and 32 5 C and the humidity is between 20 to 80 without condensation 2 Acceptable paper is loaded in the paper tray See Acceptable paper on page 2 3 The paper is loaded correctly in the machine Turning the paper over may help paper loading become smoother Adjus...

Page 68: ...d on the box of the toner cartridge for replacing the toner cartridge 5 Clean the inside of the machine Cleaning the corona wire Slide the green tab from left to right and right to left several times NOTE Be sure to return the tab to the home position a 1 If you do not printed pages may have a vertical stripe Clean the drum unit if black or white dots appear on printed pages Push down the lock lev...

Page 69: ...and other information 51 A Turn the drum unit gear by hand while looking at the surface of the drum roller 1 Wipe the surface of the drum gently with a dry cotton swab until the dust or glue on the surface comes off 1 ...

Page 70: ... Check the printer driver settings Try changing the Print Settings in Basic tab If the paper is curled or the toner is not fixed well on the paper you can adjust these settings in Improve Print Output Click Other Print Options in the Advanced tab ...

Page 71: ...smoke if you keep operating the product with a paper jammed Switch off the product promptly and contact your local Fuji Xerox representative for more information If a paper jam occurs inside the machine or the paper tray the Error LED will blink twice a Leave the machine turned on for 15 minutes for the product to cool down before you touch the internal parts of the product b Use both hands to slo...

Page 72: ... d Slowly take out the drum unit and toner cartridge assembly The jammed paper may be pulled out with the drum unit and toner cartridge assembly or this may release the paper so you can pull it out from inside of the machine WARNING HOT SURFACE ...

Page 73: ...ammed paper if there is any inside the drum unit f Put the toner cartridge back into the drum unit until you hear it lock into place If you put the cartridge in correctly the lock lever on the drum unit will lift automatically g Put the drum unit and toner cartridge assembly back into the machine h Close the top cover of the machine ...

Page 74: ...er guides to fit the paper size Make sure that the guides are firmly in the slots NOTE If you turn off the machine during paper jam the machine will print incomplete data from your computer Before you turn on the machine delete the print spool job on your computer j Make sure that the Error LED is off and that the Ready LED is green ...

Page 75: ...ntrol Panel In the Hardware and Sound group click View devices and printers Right click Fuji Xerox DocuPrint P115 b and click See what s printing Click Printer and make sure Use Printer Offline is unchecked For Windows Server 2012 Move your mouse to the lower right corner of your desktop When the menu bar appears click Settings and then click Control Panel In the Hardware group click View devices ...

Page 76: ...nting or prints unexpectedly Press and hold for about 2 seconds until all the LEDs light up and then release it The machine will cancel the print job and clear it from the memory The printout may be incomplete Printing difficulties continued Difficulties Suggestions ...

Page 77: ...nces any type of spray or an organic solvent liquid containing alcohol or ammonia to clean the inside or outside of the machine Doing so could cause a fire or electrical shock Instead use only a dry lint free cloth See Product Safety Guide Operational Safety When cleaning this product use the designated cleaning materials exclusive to it Other cleaning materials may result in poor performance of t...

Page 78: ...ed and the power cord is plugged in c While holding down open and close the top cover once d Release Make sure that all the LEDs turn off e Press eight times Make sure that all the LEDs light up to indicate the machine has been reset to its factory default settings The machine will restart Settings Reset A This operation will reset all the machine settings back to the settings that were set at the...

Page 79: ...LPAm 51 dB A Sound Power Printing LWAd 6 6 B A Temperature Operating 10 to 32 5 C Storage 0 to 40 C Humidity Operating 20 to 80 without condensation Storage 10 to 90 without condensation Interface USB Full Speed USB 2 0 4 5 It is recommended you use a USB 2 0 cable Type A B that is no more than 2 0 metres long Support OS Windows Windows XP Home Edition Windows XP Professional Windows XP Profession...

Page 80: ...er that has a USB 1 1 interface 5 Third party USB ports are not supported 6 Approx cartridge yield is declared in accordance with ISO IEC 19752 7 Drum life is approximate and may vary by type of use Consumables Toner Cartridge Inbox Approx 1 000 pages A4 or Letter page 6 Toner Cartridge Standard Approx 1 000 pages A4 or Letter page 6 Model Name CT202137 Drum Unit Approx 10 000 pages A4 or Letter p...

Page 81: ... DocuPrint P115 b Paper Input Paper Tray Paper Type Plain paper Recycled paper Paper Size A4 Letter Legal Folio only 1 Paper Weight 64 to 105 g m2 Maximum Paper Capacity Up to 150 sheets of 80 g m2 Plain paper Paper Output Face Down Output Tray Up to 50 sheets of 80 g m2 Plain paper face down delivery to the face down output paper tray ...

Page 82: ...per can be classified into two types long grain and short grain Long grain paper fibers run in the same direction as the long edge of the paper Short grain paper fibers run perpendicular to the long edge of the paper Though most plain paper for copying is long grain some is short grain We recommend that you use long grain paper for this machine Short grain paper is too weak for the paper transport...

Page 83: ...inuous printing or repeating small print jobs In cooling down mode the machine pauses for a while and then prints a few pages and repeats Please see Page 36 Control Panel LEDs indication for Cooling Down 2 From Ready mode Model DocuPrint P115 b Resolution Up to 600 600 dpi Print Speed 1 Single side print Up to 20 ppm A4 size Up to 21 ppm Letter size First Print Time 2 Less than 10 seconds at 23 C ...

Page 84: ...omer will provide appropriate assistance to Telephone Support personnel to resolve issues such as restoration of the operating system software program and drivers to their default configuration and settings verification of functionality of Fuji Xerox supplied products replacement of customer replaceable units clearing paper misfeeds and cleaning the unit and other prescribed routine and preventati...

Page 85: ... registering your details on our website at http www fujixerox com support docuprint Fuji Xerox Online Support Assistant provides instructions and troubleshooting guides to resolve your printer problems It is an easy to use searchable online Help To find out more please visit our online support at http www fujixerox com support docuprint ...

Page 86: ...5 M Macintosh 5 Manual 2 sided printing 4 Media specifications 63 Memory 61 P Paper 2 64 size 2 type 2 Paper jams 53 Password 16 Power off mode 43 Print difficulties 57 Macintosh Printer driver 26 Windows 2 sided printing 10 Booklet printing 11 Printer driver 7 Print Profiles 19 Print quality 49 Printer driver 5 23 33 S Sleep mode 36 42 Status Monitor Macintosh 34 Windows 24 Support 22 T Toner Set...

Page 87: ...DocuPrint P115 b User s Guide ME6361E2 1 Edition 1 June 2013 d t L o C x o r e X i j u F y b 3 1 0 2 t h g i r y p o C d t L o C x o r e X i j u F ...

Reviews: