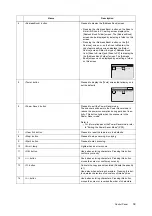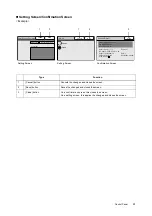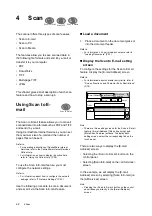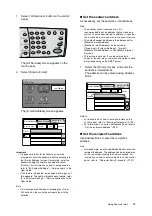
Configuring the Settings for Scan to PC
29
IE
IE
Configuring the
Settings for Scan to
PC
The following explains the settings required to use
the Scan to PC feature.
Important
• In order to use Windows Vista as the save destination,
it is recommended to update the scanner firmware.
Getting Ready
To use the Scan to PC feature, the following
system environment is necessary:
When using a FTP server
When using this feature on an FTP server, one of
the following FTP services and an account to the
server (login name and password) are required.
• Microsoft
Windows NT
Server 4.0 Option
Pack
IIS 4.0 FTP service
• Microsoft
Windows NT
Workstation 4.0
Personal Web Server
IIS 4.0 FTP service
• Microsoft
Windows
2000 Server, Windows
2000 Professional
IIS 5.0 FTP service
• Microsoft
Windows
XP Professional
IIS 5.1 FTP service
• Microsoft
Windows Server
2003 Service
Pack 1
IIS 6.0 FTP service
• Microsoft
Windows Vista™
IIS 6.0 FTP service
• NetWare
5.11, 5.12
FTP service standard for your OS
For instructions on how to setting up each service,
refer to the manual provided for the software.
When using an SMB server
When using this feature on an SMB server, one of
the following operating systems is required. The
following operating systems provide a shared
folder feature.
• Microsoft
Windows
98
• Microsoft
Windows
Me
• Microsoft
Windows NT
4.0
• Microsoft
Windows
2000
• Microsoft
Windows
XP
• Microsoft
Windows Server
2003
• Microsoft
Windows Vista™
Important
• If using Windows NT
4.0, DocuWorks files cannot be
displayed in thumbnail view on DocuScan Manager.
Creating a Folder on a Server
Create a folder to which scanned data is to be
transferred.
When using an FTP server
Create a folder on a server to be logged in.
Note
• For details, contact your system administrator.
When using an SMB server
Create a folder on your computer and enable its
sharing.
Refer to
• For information on how to create a folder and enable
its sharing, refer to the Windows online help.
Note
• Use the following procedure to create a shared folder
manually. A shared folder can also be created
automatically if you use the Easy Setup mode on
DocuScan Manager. For more information, refer to "7
DocuScan Manager" in the User Guide.
Use the following procedure to enable sharing of
the folder:
1.
On Windows, open [My Computer].
2.
Display the icon of the folder you created.
3.
Right-click the icon and select [Sharing and
Security...] from the displayed menu.
4.
On the dialog box displayed, select [Share
this folder].
5.
Click [Permissions].
6.
On the [Permissions for New Folder] dialog
box, select [Allow] under [Change], and click
[OK].
The icon of the folder changes as follows:
Scan to PC


