background image

72

73

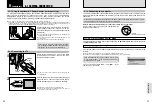
Settings

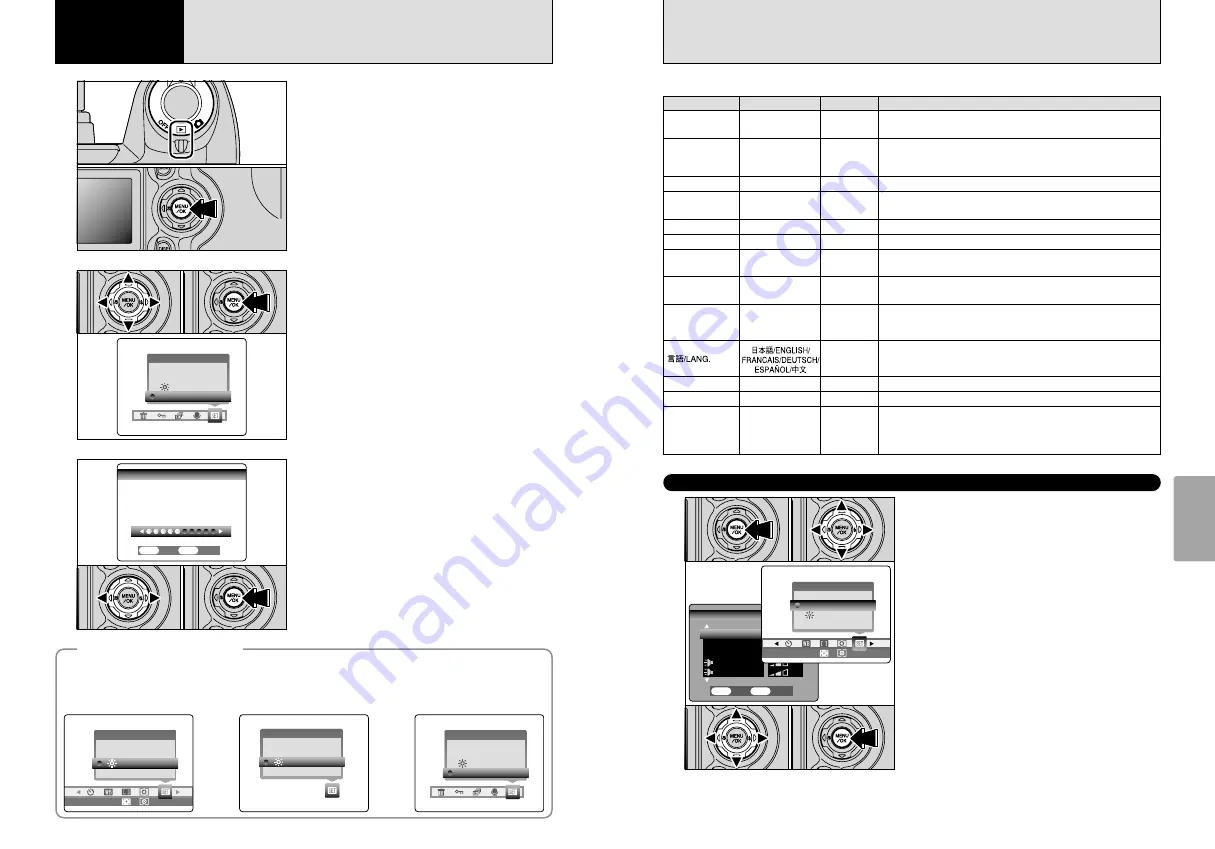
1

1

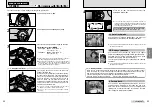
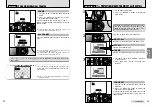
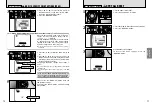
Set the Power switch to “

q

” or “

w

”.

2

Press the “MENU/OK” button to display the
menu screen.

2

3

1

Press “

d

” or “

c

” to select “

F

” OPTION and

then press “

a

” or “

b

” to select “

6

EVF/LCD” or

“VOLUME”.

2

Press the “MENU/OK” button.

OPTION

OPTION

SET−UP

SET−UP

EVF/LCD

EVF/LCD

VOLUME

VOLUME

BRIGHTNESS

BRIGHTNESS

SET

SET

CANCEL

CANCEL

OK

OK

BACK

BACK

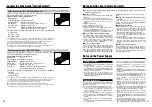
SET–UP menu options 

The options available in the “

F

” menu vary depending on whether the “

q

”, “

w

” or “

r

” mode is

selected.

1

Press “

d

” or “

c

” to adjust the monitor

brightness or the volume.

2

Press the “MENU/OK” button to confirm the new
setting.

OPTION

OPTION

SET−UP

SET−UP

EVF/LCD

EVF/LCD

OFF

OFF AUTO

AUTO

OPTION

OPTION

SET−UP

SET−UP

EVF/LCD

EVF/LCD

OPTION

OPTION

SET−UP

SET−UP

EVF/LCD

EVF/LCD

VOLUME

VOLUME

0

1

0

2

0

1

0

2

0

1

0

2

h

q

” Still photography mode

h

r

” Movie mode

h

w

” Playback mode

6

ADJUSTING THE MONITOR BRIGHTNESS/

ADJUSTING THE VOLUME

4

Settings

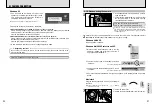
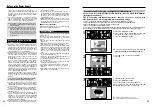
1

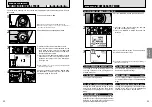
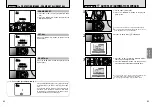
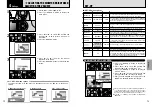
Press the “MENU/OK” button to display the
menu screen.

2

Press “

d

” or “

c

” to select “

F

” OPTION and

then press “

a

” or “

b

” to select “SET–UP”.

3

Press the “MENU/OK” button to display the
SET–UP screen.

4

Press “

a

” or “

b

” to select a menu option and

then press “

d

” or “

c

” to change the setting.

5

After you have modified the settings, press the
“MENU/OK” button to confirm the changes.

SET−UP

SET−UP

1/3

1/3

POWER SAVE

POWER SAVE
FORMAT

FORMAT

2 MIN

2 MIN

IMAGE DISP.

IMAGE DISP.

ON

ON

SET

SET

CANCEL

CANCEL

OK

OK

BACK

BACK

OK

OK

BEEP

BEEP
SHUTTER

SHUTTER

SET–UP

F

USING THE SET–UP SCREEN

!

Always switch the camera off when replacing the batteries. If
you open the battery cover or disconnect the AC power
adapter without switching the camera off, the camera settings
may revert to the factory default values set at shipment.

!

Press “

c

” for “FORMAT”, “DATE/TIME”, “DISCHARGE”,

q

RESET”.

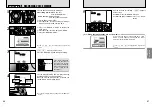
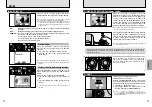
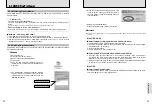
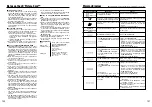
SET–UP menu options

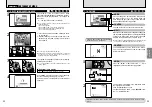
IMAGE DISP.

ON/OFF/PREVIEW

ON

Use this option to specify whether the preview images (the photographed
image) is displayed after you take a shot. See P.74 for details.

POWER SAVE

2 MIN/5MIN/OFF

2 MIN

Use this option to specify whether the camera’s power consumption
is reduced and the camera is subsequently switched off automatically
when it is not being used. See P.75 for details.

FORMAT

OK

Erases all files. See P.75 for details.

§

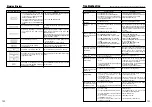
BEEP

OFF/1/2/3

2

Sets the volume of the tone emitted when the camera controls are
used.

§

SHUTTER

OFF/1/2/3

2

Sets the volume of the sound emitted when the shutter operates.

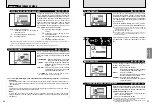
DATE/TIME

SET

Use this option to correct the date or time. See P.14 for details.

FRAME NO.

CONT./RENEW

CONT.

Specifies whether frame numbers are assigned consecutively from
previous numbers or begin again. See P.76 for details.

USB MODE

/

q

PC

Selects whether “

” DSC mode or “

q

PC” PC Camera mode is used

when the camera is connected to a computer. See P.87 for details.

CCD-RAW

OFF/ON

OFF

Sets the image quality to CCD-RAW. Because no image processing
is performed on the camera for CCD-RAW images, they must be
processed on a computer.

日本語/ENGLISH/

FRANCAIS/DEUTSCH/

ESPANOL/中文

ENGLISH

Use this setting to specify the language used for monitor display.

VIDEO SYSTEM

NTSC/PAL

Specifies whether video output is set to NTSC or PAL.

q

RESET

OK

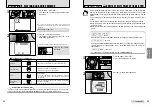
Resets all the camera settings (other than the DATE/TIME, LANG.
and VIDEO SYSTEM) to the factory default values set at shipment.
A confirmation message appears when you press “

c

”. To reset the

camera settings, press the “MENU/OK” button again.

Settings

Display

Factory default

Explanation

0

1

0

3

0

2

0

4

0

5

OPTION

OPTION

SETーUP

SETーUP

EVF/LCD

EVF/LCD

OFF

OFF AUTO

AUTO

DISCHARGE

OK

Discharges rechargeable batteries. See P.99 for details.

Summary of Contents for FinePix S5000

Page 1: ...ow you how to use your FUJIFILM DIGITAL CAMERA FinePix S5000 correctly Please follow the instructions carefully BL00260 200 1 Getting Ready Using the Camera Advanced Features Software Installation Settings Viewing Images ...

Page 2: ...led Software for FinePix SX which is provided to you together with this Agreement b Software means the software which is recorded on Media c Documentation means the operation manuals of Software and other related written materials which are provided to you together with Media d Product means Media including Software and Documentation collectively 2 Use of Software FUJIFILM grants to you a nontrans...

Page 3: ...D Picture Card 23 USING AF AE LOCK 24 AF ASSIST ILLUMINATOR 25 USING THE ZOOM OPTICAL ZOOM DIGITAL ZOOM 25 BEST FRAMING 26 VIEWING YOUR IMAGES PLAYBACK 27 Single frame playback Fast forwarding through your images Multi frame playback 27 Single frame playback Playback zoom Panning Trimming 28 ERASING IMAGES ERASE FRAME 29 PLAYBACK MODE STILL PHOTOGRAPHY MODE 2 Using the Camera B STILL IMAGE y QUALI...

Page 4: ...lush your mouth thoroughly with water Drink large quantities of water and induce vomiting Then seek medical assistance Notes on Electrical Interference If the camera is to be used in hospitals or aircrafts please note that this camera may cause interference to other equipment in the hospital or aircraft For details please check with the applicable regulations Handling Your Digital Camera This came...

Page 5: ...P 45 1 1 2003 1 1 2003 2000 2000 F2 8 F2 8 P 100ー0001 100ー0001 1 1 2003 12 00AM 1 1 2003 12 00AM AF AF ISO 800 ISO 800 99999 99999 Number of remaining shots Camera shake warning Date FinePix COLOR AF warning Battery level warning Battery level warning Quality mode AF frame Exposure compensation indicator Exposure compensation Photography mode Shutter speed Zoom bar Sensitivity Aperture setting dis...

Page 6: ...teries or new and used batteries together h Do not use manganese or Ni Cd batteries h Soil such as fingermarks on the poles of the batteries can significantly reduce the amount of time for which the batteries can be used h The time for which AA size alkaline batteries referred to hereafter simply as alkaline batteries can be used varies depending on the brand and some alkaline batteries may stop p...

Page 7: ...sted The display will shortly go blank and the camera will stop working Replace or recharge the batteries Blinking red Lit red 1 2 3 No icon 12 2 Indicator Indicator 1 3 Align the indicators on the xD Picture Card slot and xD Picture Card and then push the card firmly all the way into the slot The xD Picture Card will not slide fully into the slot if it is inserted facing the wrong way Be careful ...

Page 8: ...TIME NOT SET DATE TIME DATE TIME 7 21 2003 7 21 2003 SET SET CANCEL CANCEL OK OK BACK BACK 12 00 PM 12 00 PM MM DD YYYY MM DD YYYY DATE TIME DATE TIME 01 1 2003 01 1 2003 12 00 AM 12 00 AM MM DD YYYY MM DD YYYY SET SET CANCEL CANCEL OK OK BACK BACK SWITCHING ON AND OFF SETTING THE DATE AND TIME 3 Turn the Power switch to turn the camera on and off When you switch the camera on the indicator lamp l...

Page 9: ...OK button to display the menu screen 2Press a b d or c to select SET UP from the F OPTION menu 3Press the MENU OK button 1The SET UP screen appears Press a or b to select 2Press c to select ENGLISH FRANCAIS DEUTSCH ESPAÑOL or You can cycle through the language settings by pressing c 3Always press the MENU OK button after you complete the settings The screens in this manual are shown in English See...

Page 10: ... button Instructions for the next step in the procedure are displayed at the bottom of the screen Press the button indicated For example to crop the image as shown in the figure at right press the MENU OK button In the Owner s Manual the up down left and right directions on the 4 direction button are indicated by black triangles Up or down is shown as a or b and left or right is shown as d or c Di...

Page 11: ...e appears see P 101 102 TAKING PICTURES AUTO MODE STILL PHOTOGRAPHY MODE 0 2 0 1 If you want to zoom in on your subject press T telephoto To widen the angle of your shot press W wide angle When you do this the zoom bar is displayed on the screen h Optical zoom focal length 35 mm camera equivalent Approx 37 mm to 370 mm Max zoom scale 10 Zooming pauses briefly when it switches between optical zoom ...

Page 12: ... below In such cases the image may be out of focus h Very shiny subjects such as a mirror or car body h Subjects photographed through glass h Subjects that do not reflect well such as hair or fur h Subjects with no substance such as smoke or flames h When the subject is dark h When there is very little contrast between the subject and the background such as white walls or subjects dressed in the s...

Page 13: ...s on a subject that is off to one side of the image or if you want to set the exposure before you compose the final shot lock the AF and AE settings and then compose and shoot your picture to get the best results USING THE ZOOM OPTICAL ZOOM DIGITAL ZOOM Press the T or W button to zoom in and out The digital zoom can be used with the 3 2 and 1 quality mode setting When zooming switches between opti...

Page 14: ...o scan forward through your images and d to scan backwards When you set the Power switch to w your last shot is played back If the lens is extended during playback the lens automatically retracts as a protective measure if the camera is not used for approx 6 seconds Fast forwarding through your images You can scan quickly through your images by holding down d or c for approx 1 second during playba...

Page 15: ...MING 1M 1M REC 0K REC 0K REC REC CANCEL CANCEL OK OK BACK BACK 3 Best for A5 to A4 size prints 2 Best for A6 to A5 size prints 1 Best for A6 size prints ERASING IMAGES ERASE FRAME PLAYBACK MODE 1 Set the Power switch to w 2 3 1Press the MENU OK button during playback to display the menu 2Press d or c to select o ERASE BACK BACK ERASE ERASE FRAME FRAME ALL ALL FRAMES FRAMES Note that mistakenly era...

Page 16: ...o changes P 23 Quality settings in Still photography mode QUALITY QUALITY 19 19 33 FRAMES 33 FRAMES 10 10 25 25 STD STD AUTO AUTO Quality setting in High sensitivity mode If you try to select a quality setting other than 1 when the camera is set to High sensitivity mode is displayed blinking and the quality cannot be changed 0 1 0 2 Printing at A4 size or printing part of the image cropped at A5 o...

Page 17: ...switch to q 2Set the Mode dial to Still photography mode 3Press the Photo mode p button 2 1Press d or c to select the J FinePix COLOR setting and then press a or b to change the setting 2Press the MENU OK button to confirm the setting p CHROME may have little visible effect with some subjects such as close up shots of people portraits Because the effects on the image differ depending on the scene ...

Page 18: ...le maintaining the same exposure level h When the exposure is decreased by one step the shutter speed also decreases by one step the dot moves up and left h When the exposure is increased by one step the shutter speed also increases by one step the dot moves down and right h Combinations that result in the shutter speed or aperture being outside the available range of settings cannot be selected w...

Page 19: ...nge the White balance setting in the photography menu To avoid missing snapshot opportunities Take pictures in AUTO mode see Using the Camera To prevent the subject from being overexposed or underexposed and to show the substance and textures of the subject clearly Use exposure compensation Select if the background is pale and if the background is dark d Flash f Continuous shooting selections x Au...

Page 20: ... d Night scene This is the best mode for evening and night scenes This mode allows you to take shots where priority is given to slow shutter speeds of up to 2 seconds To prevent camera shake always use a tripod c n B AUTO SCENE POSITION STILL PHOTOGRAPHY FUNCTIONS N PROGRAMMED AUTO STILL PHOTOGRAPHY FUNCTIONS Set the Mode dial to N This is an automatic mode that allows you to specify any of the se...

Page 21: ...rs select a faster shutter speed up to 1 1000 sec APERTURE PRIORITY AUTO STILL PHOTOGRAPHY FUNCTIONS Set the Mode dial to This is an automatic mode that allows you to set the aperture You can use this mode for shots where you want to have the background out of focus large aperture or have both near and far objects in focus at the same time small aperture A 9999 9999 500 500 F5 6 F5 6 Aperture ISO ...

Page 22: ...2 8 to F8 in 1 3 EV steps Telephoto F3 2 to F9 in 1 3 EV steps M 33 33 500 500 F5 6 F5 6 ISO 200 ISO 200 Setting the shutter speed You can set the shutter speed by pressing the a or b In shots with long exposures noise dots may appear on the image When pictures are taken with a fast shutter speed 1 2000 sec smearing white stripes may appear in the image P 107 At fast shutter speeds 1 2000 sec the ...

Page 23: ...f the available light The available Flash modes are limited depending on the Photography mode selected P 37 If you are shooting in Suppressed flash mode in dark conditions use a tripod to prevent camera shake See P 23 101 for information on the camera shake warning d Forced flash Use this mode to photograph backlit scenes such as a subject against a window or in the shade of a tree or to obtain th...

Page 24: ...nfirms your selection 3 When you set the Continuous shooting mode except for OFF the selected mode appears on the screen f Top 5 frame continuous shooting j Auto bracketing k Final 5 frame continuous shooting h Long period continuous shooting with 1280 960 pixel mode 500 F5 6 500 F5 6 OFF OFF 33 33 P 500 500 F5 6 F5 6 ISO 200 ISO 200 33 33 P 500 500 F5 6 F5 6 ISO 200 ISO 200 0 1 0 2 Notes on using...

Page 25: ...ing is also restored to its previous value STORING STORING In this mode you can shoot up to 5 frames at intervals as short as 0 2 seconds When you take the shots the photographed images are displayed in sequence from the left and automatically recorded The maximum file recording time is 4 2 seconds for 5 frame continuous shooting j Auto bracketing STORING STORING A B C BRACKETING BRACKETING 1 EV 1...

Page 26: ...nt mode changes Frame the shot so that the subject fills the entire AF frame The camera continues to focus on the main subject in the AF frame Press the Shutter button down halfway AF AE lock and then without releasing the button press the button down fully to take the shot This allows you to shorten the focusing time The AF mode is forcibly reset to AF CENTER 33 33 ISO 200 ISO 200 P 500 500 F5 6 ...

Page 27: ...item and a or b to change the setting 2Press the MENU OK button to confirm the selection When you enable the setting an icon appears in the top left corner of the screen The settings available in the menu screen vary depending on the Still photography mode PHOTOGRAPHY MENU OPERATION 0 1 0 20 3 0 1 0 2 0 1 0 2 SELF TIMER PHOTOGRAPHY The self timer is used for taking pictures such as group shots whe...

Page 28: ...cus or brightness exposure being obtained Bebeep Click ISO 200 ISO 200 33 33 P 500 500 F5 6 F5 6 2 500 500 F5 6 F5 6 Self timer lamp display Lit for 5 seconds Blinking for 5 seconds 0 1 0 2 AF MODE AF MODE MULTI MULTI CENTER CENTER AREA AREA OFF OFF AUTO AUTO 33 33 P 500 500 F5 6 F5 6 ISO 200 ISO 200 AREA You can change the position on the screen where the camera focuses Use this feature when you ...

Page 29: ... outside the camera s control range the shot is not taken with the specified setting increments Flash photography cannot be used This feature always takes 3 shots However if there is insufficient space on the xD Picture Card for 3 shots no picture will be taken 1 After setting the exposure for bracketing hold down the f button 1 and press d or c 2 to select j 2 OFF OFF 33 33 P 500 500 F5 6 F5 6 IS...

Page 30: ...TANDBY 26s 26s STANDBY STANDBY 26s 26s DPC 16 16 MB Quality mode 30 frames per second 26 sec DPC 32 32 MB 54 sec DPC 64 64 MB 109 sec DPC 128 128 MB 219 sec DPC 256 256 MB 7 3 min DPC 512 512 MB 14 6 min Recording times for xD Picture Card Available recording times are for xD Picture Card formatted in the camera 5 A counter displayed in the top right corner of the screen during shooting shows the ...

Page 31: ...this button pauses the movie Stops playback Press d or c while movie playback is stopped to go back to the previous file or advance to the next file respectively Press these during playback to skip forwards or backwards through the movie Each time you press d or c when the movie is paused the movie advances or goes back one frame 0 1 0 2 When paused Rewind Fast forward 1 1Set the Power switch to w...

Page 32: ...stop the procedure immediately some frames files will be erased CANCEL CANCEL ALL FRAMES ALL FRAMES BACK BACK 0 2 0 1 o ERASING SINGLE ALL FRAMES PLAYBACK MENU 1 1Set the Power switch to w 2Press the MENU OK button to display the menu screen 2 Press d or c to select i PROTECT 3 1Press a or b to select FRAME SET ALL or RESET ALL 2Press MENU OK button to confirm your selection FRAME FRAME PROTECT PR...

Page 33: ...T OK UNPROTECT OK YES YES CANCEL CANCEL OK OK BACK BACK FRAME FRAME 100 0009 100 0009 Press the MENU OK button to protect all the frames files SET ALL YES YES CANCEL CANCEL OK OK BACK BACK SET ALL OK SET ALL OK IT MAY TAKE A WHILE IT MAY TAKE A WHILE SET ALL SET ALL 100 0009 100 0009 Press the MENU OK button to unprotect all the frames files RESET ALL YES YES CANCEL CANCEL OK OK BACK BACK 100 0009...

Page 34: ...VOICE MEMO VOICE MEMO REC STANDBY REC STANDBY START START 30s 30s CANCEL CANCEL OK OK BACK BACK The remaining recording time is displayed during recording and the self timer lamp blinks When the time remaining reaches 5 seconds the self timer lamp starts blinking quickly 100 0009 100 0009 VOICE MEMO VOICE MEMO RECORDING RECORDING REC REC 25s 25s REーREC REーREC OK OK BACK BACK 0 1 0 2 0 10 3 0 2 If ...

Page 35: ...o These buttons do not function while playback is paused 0 1 0 2 0 1 0 2 Take care not to block the speaker Speaker Rewind Fast forward u HOW TO SPECIFY PRINT OPTIONS DPOF p PHOTO MODE PLAYBACK DPOF stands for Digital Print Order Format and refers to a format that is used for recording printing specifications for images shot using a digital camera on media such as an xD Picture Card The recorded s...

Page 36: ...ITH DATE the date is imprinted on your prints 2Press the MENU OK button DPOF DPOF WITH WITH DATE DATE WITHOUT WITHOUT DATE DATE When DPOF settings were specified on another camera When the data includes a frame file with DPOF settings that were specified on another camera is displayed Pressing the MENU OK button or the Photo mode p button erases all of the DPOF settings already specified for each ...

Page 37: ...ault values set at shipment Press c for FORMAT DATE TIME DISCHARGE qRESET SET UP menu options IMAGE DISP ON OFF PREVIEW ON Use this option to specify whether the preview images the photographed image is displayed after you take a shot See P 74 for details POWER SAVE 2 MIN 5MIN OFF 2 MIN Use this option to specify whether the camera s power consumption is reduced and the camera is subsequently swit...

Page 38: ...g erases all the files Initialize the xD Picture Card for use in the camera You should copy important files that you do not want to be erased to your computer or other media 1Press d or c to select OK 2Pressing the MENU OK button erases all the files and initializes the xD Picture Card If the å ƒ or message appears refer to P 101 102 before formatting the xD Picture Card and take the appropriate m...

Page 39: ... to perform the processing on a computer Conversion using RAW FILE CONVERTER LE also provides a simple way to create TIFF format images To rebuild images FinePixViewer on the bundled CD ROM must be installed on your computer The functions listed below cannot be used in CCD RAW mode During shooting Digital zoom continuous shooting and FinePix Photo mode image quality sensitivity ISO 800 and FinePix...

Page 40: ...rrectly if the connection is faulty i Additional USB interface board is not guaranteed i Windows 95 and Windows NT cannot be used i Operation is not guaranteed on home built computers or on computers running updated operating system software i If your Internet connection is via a router or via a LAN connecting machines on the LAN to the Internet you cannot use videoconferencing i If you are using ...

Page 41: ...tion An Internet connection and E mail transmission software i Connection speed 56 k or better recommended 1 Models with a USB port as a standard feature 2 This software does not run correctly in the Mac OS X Classic environment 3 Turn virtual memory on if necessary 4 Required to use the FinePix Internet Service The software can still be installed even if you do not have an Internet connection Not...

Page 42: ... 300 MB minimum Minimum 1 GB when RAW FILE CONVERTER LE is used Display 800 600 pixels or better at least 32 000 colors Internet connection 3 i To use the FinePix Internet Service or mail attachment function An Internet connection and E mail transmission software i Connection speed 56 k or better recommended Hardware and software requirements To run this software you must have the hardware and sof...

Page 43: ...e icon This operation is not required on version 10 2 or later 5 Enter the administrator name and password Then click the OK button The window displayed in Mac OS X is slightly different 6 Click the Continue button 7 Quit any other programs that are running and then click the Continue button 9 Select the Mac OS X startup disk as the installation destination and click the Continue button 10 Click t...

Page 44: ...s function allows you to conduct videoconferencing sessions between PCs connected to the Internet Videoconferencing PictureHello is not supported on Macintosh computers Connection is only possible with a FUJIFILM camera equipped with a PC Camera function qPC PC CAM PC Camera mode Connecting the AC power adapter does not allow you to charge the Ni MH batteries Use the optional charger P 95 to charg...

Page 45: ... computer 3Switch the camera on USE AT DSC MODE Indicator Indicator FRAME NO FRAME NO USB MODE USB MODE CONT CONT DATE TIME DATE TIME SET SET 2 3 2 3 CCD RAW CCD RAW OFF OFF ENGLISH ENGLISH 言語 言語 LANG LANG SET UP SET UP SET SET CANCEL CANCEL OK OK BACK BACK 0 1 0 3 0 20 4 The Windows CD ROM may also be required during installation In this event switch CD ROMs as directed by the on screen instructi...

Page 46: ...This procedure differs depending on the operating system software or PC you are using No PC operation is needed Windows Me 2000 Professional XP 1Right click the removable disk icon in the My Computer window and select Eject This step is only required in Windows Me Even when Copying is no longer displayed on the computer the camera and the computer may still be exchanging data Always check that the...

Page 47: ...ash Then select Empty Trash in the Special menu 2After you have exited FinePixViewer and DP Editor drag the installed FinePixViewer folder to the Trash Then click Empty Trash in the Special menu To remove the driver software To remove FinePixViewer 6 2 USING FinePixViewer For all information on FinePixViewer functions refer to How to Use FinePixViewer in the Help menu for details Example Looking u...

Page 48: ...camera against dirt dust and light knocks while you are carrying it h Image Memory Card Reader DPC R1 The DPC R1 provides a quick and easy way to transfer images back and forth between your PC and an image memory card xD Picture Card and SmartMedia The DPC R1 uses the USB interface for high speed file transfer h Compatible with Windows 98 98 SE Windows Me Windows 2000 Professional Windows XP or iM...

Page 49: ...this occurs switch the camera off and wait an hour before using the camera Condensation may also form on the xD Picture Card In this event remove the xD Picture Card and wait a short time before using it again When the camera is unused for long periods If you do not intend to use the camera for a long period of time remove the battery and the xD Picture Card before storing the camera Cleaning your...

Page 50: ... s DC input terminal To disconnect take hold of the plug and pull it out do not disconnect it by pulling on the cord h Do not use this AC power adapter with any device except the specified device h During use this AC power adapter will become hot to the touch but this is normal h Do not disassemble the AC power adapter Doing so could be dangerous h Do not use this device in a place with high tempe...

Page 51: ... Picture Card that has been used on a PC format the xD Picture Card on your camera h When you format an xD Picture Card in the camera and then shoot and record images a directory folder is automatically created Image data is then recorded in this directory h Do not change or delete the directory folder names or file names on the xD Picture Card from your PC as this will make it impossible to use t...

Page 52: ... shooting option in the Photography menu is set to Long period Continuous Shooting i The subject is too far away i Your finger was covering the flash flash control sensor i The lens is dirty i The photographed subject was too dark i You photographed scenery with Macro mode selected i You took a close up shot without selecting Macro mode i You are shooting a subject that is not suited to autofocusi...

Page 53: ...e switching the camera off Troubleshooting eIf you think the camera is faulty check the following once more Specifications System Model Digital camera FinePix S5000 Number of effective pixels 3 1 million pixels CCD sensor 1 2 7 inch Super CCD HR in an interwoven pattern Number of total pixels 3 14 million pixels Number of recorded pixels Still image 2816 2120 pixels 2048 1536 pixels 1600 1200 pixe...

Page 54: ...riginal level of performance cannot be achieved DPOF Digital Print Order Format DPOF is a format used for recording information on a storage media image memory card etc that allows you to specify which of the frames shot using a digital camera are to be printed and how many prints are made of each image EV A number that denotes Exposure Value The EV is determined by the brightness of the subject a...

Page 55: ...ries cover the battery terminals with insulation tape h Contact with other metallic objects or batteries could cause the batteries to ignite or burst Keep xD Picture Cards out of the reach of small children Because xD Picture Cards are small they can be accidentally swallowed by small children Be sure to store xD Picture Cards out of the reach of small children If a child accidentally swallows an ...

Page 56: ......
Page 57: ...Printed in Japan FGS 305106 FG Printed on recycled paper 26 30 Nishiazabu 2 chome Minato ku Tokyo 106 8620 Japan http home fujifilm com products digital ...

Reviews: