background image


Quick Reference Guide 

QRG-03 

R-02 


Splice Operation


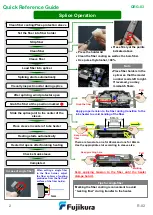
Clean fiber coating/Place protection sleeve


Set the fiber into fiber holder


Strip fiber


Clean fiber


Splicing starts automatically


Visually inspect monitor during splice


After splicing, wind protector open


Slide the splice joint to the center of the 

sleeve.


Place sleeve in center of tube heater


Heater lid opens after finishing heating


Check shrunk sleeve


Cleave fiber


Heating starts automatically


Grab the fiber at the position marked 

◆ 


Load fiber into splicer


Completed


Marking the fiber coating is convenient to avoid 
“twisting fiber” during transfer to the heater.   

Tips for single fiber 


Clean the fiber coating as well as the bare fiber. 


Use pure ethyl alcohol, >99%. 

Press the holder lid 


Place fiber holders in the 

splicer so that the model 

number reads left to right. 

If reversed, you may 

mismatch fibers. 

Note 

Press firmly at the points 

indicated above 

In case of single fiber


When  setting  a  single  fiber 
in  the  fiber  holder,  adjust 
the fiber so 3mm of coating 
protrudes from the flat front 
surface of the fiber holder. 

3mm 

Grab the fiber 

Pull 


Keep holding 
fiber


60mm 

40mm 

Apply proper tension to the fiber during transition to the 
tube heater to avoid bending of the fiber.


There are two slots, one for 40mm and one for 60mm. 
Use the appropriate slot according to sleeve size.


Keep  applying  tension  to  the  fiber  until  the  heater 
clamps hold it.


Pull 

Keep pinching here 


Marking 

Summary of Contents for QRG-03

Page 1: ...g the devices are always paired Communication between splicer cleaver and stripper resumes automatically even after power cycling Refer to the setting guide SG 03 or instruction manual for wireless communication function details LED Turning ON Press key until green LED turns on Turning OFF Press key until red LED turns on Select the adequate heater mode according to the sleeve The READY screen sho...

Page 2: ... heater Tips for single fiber Clean the fiber coating as well as the bare fiber Use pure ethyl alcohol 99 Press the holder lid Place fiber holders in the splicer so that the model number reads left to right If reversed you may mismatch fibers Note Press firmly at the points indicated above In case of single fiber When setting a single fiber in the fiber holder adjust the fiber so 3mm of coating pr...

Page 3: ...es in Maintenance Menu Using properly cleaned or new V grooves simplifies fiber viewing and handling when loading ribbons into the splicer After extended use or improper splicer care excessive glass particles and debris will accumulate on the V grooves making them impossible to clean This splicer has replaceable V grooves to solve this problem Instead of returning for maintenance users can resume ...

Page 4: ...de database Cleave Shape NG Bad fiber end face Clean and check the condition of the fiber cleaver If the blade is worn rotate the blade to a new position If dirty clean clamp pads anvil or blade High Estimated Loss Dust or dirt is on the fiber surface Bad fiber end face Unstable arc discharge Completely prepare the fiber again strip clean and cleave Check the condition of the fiber cleaver If the ...

Reviews: