background image


OLIRU Trading Pty Ltd


Web:    www.oliru .com.au


Model

FUJ 2.6 P 


User Manual of Air conditioner


Fujin 

Air Conditioning 


Summary of Contents for FUJ 2.6 P

Page 1: ...OLIRU Trading Pty Ltd Web www oliru com au Model FUJ 2 6 P User Manual of Air conditioner Fujin Air Conditioning ...

Page 2: ...ng Regulations of the country 240V 50Hz The minimum distance between the product and the wall shall be 60cm when it is used The air outlet inlet of the product should not be covered when running Internal electric current fuse of the product is 240V 2A Correctly insert the power plug before usage When in use the product shall be fitted with reliable earth grounding Users shall not start or stop the...

Page 3: ...r s service agent or a professional with the relevant qualifications Apart from t air filter he User shall not maintain the product internally Don t use the product with corrosive or explosive gases around Keep the product away from the TV or radio by at least 1 meter in order to prevent electromagnetic interference Don t place the product in direct sunlight for fear the surface will discolour Dur...

Page 4: ...ntroduction 1 Parts Description 2 Accessories 3 Button Features Description Operating Guides 4 6 Installation Usage Instructions 7 12 Maintenance 13 Service and maintenance 14 Attention and Warranty 15 16 ...

Page 5: ...ater over the coil This will ensure an efficient cooling capacity in high temperature environments to a maximum of 40 degrees C whilst the air conditioner can be used as a spot cooler it is more efficient if the unit is placed inside and the hot air ducted outside This will allow the cool air to be cycled internally This air conditioner is not only applicable for use inside camper trailers caravan...

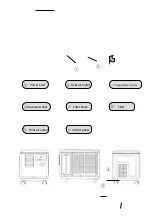
Page 6: ...odel FUJ 2 6 P Function Cold Heat Heating output W 2600 Heating capacity W 2700 Rated voltage V Hz 220 240v 50Hz Refrigerating Rated Power W A 980 4 2 Rating power of heat W A 1020 4 4 Wind rate m3 hr 320 Applicable environment 5 40 Applicable space M2 10 18 Net weight Kg 27 Dimension of product mm Length Width Height 520 340 420 1 Parts of the air conditioner ...

Page 7: ... Temperature Sensor Power cord Rear air outlet Filter Filter block Universal wheel Control panel Front air outlet ...

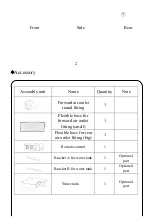
Page 8: ... Forward air outlet round fitting 1 Flexible hose for forward air outlet fitting small 1 Flexible hose for rear air outlet fitting big 1 Remote control 1 Bracket A for water tank 1 Optional part Bracket B for water tank 1 Optional part Water tank 1 Optional part ...

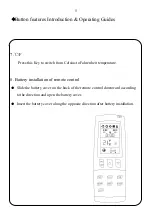
Page 9: ...part 3 Button features Introduction Operating Guides 1 ON OFF Press the button once to turn on the air conditioner press it again to turn it off When the power is connected the power indicating light is red 2 Fan speed adjusting button Indicator light Display Control buttons ...

Page 10: ...e automatic indicating light will be green When the ambient temperature is 24 it will choose cooling mode automatically and will display on the remote control When the ambient temperature is 18 it will choose heating mode automatically And will display on the remote control Choose cooling mode when set temperature is ambient temperature the minimum set temperature is 18 the cooling indicating ligh...

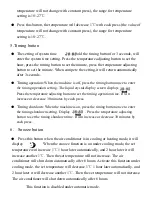
Page 11: ...o set the timing operation time It will increase or decrease 30 minutes by each press Timing shutdown When the machine is on press the timing button once to enter the timing shutdown setting Display Press the temperature adjusting button to set the timing shutdown time It will increase or decrease 30 minutes by each press 6 Snooze button Press this button when the air conditioner is in cooling or ...

Page 12: ...rom Celsius to Fahrenheit temperature 8 Battery installation of remote control Slide the battery cover on the back of the remote control downward according to the direction and open the battery cover Insert the battery cover along the opposite direction after battery installation ...

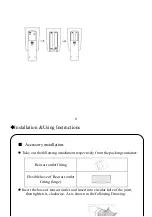
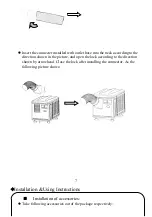
Page 13: ...following attachment respectively from the packing container Rear air outlet fitting Flexible hose of Rear air outlet fitting large Insert the hose of rear air outlet and insert into circular hole of the joint then tighten it clockwise As is shown in the following Drawing ...

Page 14: ...tion shown in the picture and open the lock according to the direction shown by arrowhead Close the lock after installing the connector As the following picture shows 7 Installation Using Instructions Installation of accessories Take following accessories out of the package respectively ...

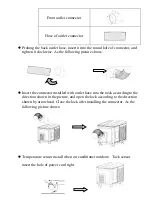
Page 15: ...cture shows Insert the connecter installed with outlet hose into the neck according to the direction shown in the picture and open the lock according to the direction shown by arrowhead Close the lock after installing the connector As the following picture shows Temperature sensor install when air conditioner outdoor Tack sensor insert the hole of power cord right ...

Page 16: ...tachments from the packing container Wind pipe connection A Flexible hose of forward air outlet fitting small Wind pipe connection B Connector A insert Connector B and towards anticlockwise spin Tack 2 connectors A one connector inset other connector A and towards Anticlockwise spin ...

Page 17: ...ner Operation methods of air conditioner applied in the open air is shown as follows Place the air conditioner in the open air or outside the tent or camper trailer connect the fitting of the forward air outlet and draw out the flexible hose of exhaust air then stretch the flexible hose into the room Connect the rear air outlet with the rear air out fitting ...

Page 18: ...nt Install the back outlet properly prolong the outlet hose Put the hose out of the room or tent 10 Installation Operating Instructions Continuous drainage Clean drainage Continuous drainage There has one small outlet at the side of the air Outdoor Indoor Outdoor Indoor Outdoor Indoor Outdoor Indoor ...

Page 19: ...r or else the water will not be drained away Clean drainage All the water in the air conditioner shall be drained away during the no use and mobilize of the product There has one outlet on the side of the air conditioner stuffed with water plug you can unplug it and then restore it after the tank is drained Attention Never unplug the water plug during the operation of the air conditioner and condu...

Page 20: ...Lift up the air conditioner and put the trundle in the slot of the bracket A for water tank with the wheel putting into the chuck of bracket B Be sure that the wheel is put into the slot or chuck Warning The main function of water tank is to store the condenser water of air conditioner When the air conditioner is running continuously for more than 24 hours please empty the tank to avoid the overfl...

Page 21: ... Turn off the air conditioner and pull out the plug from the socket when cleaning the air conditioner in case of electric shock hazard Never get the air conditioner wet or it may lead to electric shock hazard Make sure you never flush air conditioner You can only clean the shell of the air conditioner with soft dry cloth or damp cloth and neutral detergent ...

Page 22: ...elow Clean the filter Clean the filter with a vacuum cleaner or rinse with water If the filter is very dirty if there is oil it can be cleaned with mild detergent dissolved in warm water 45 and then put it in a shade place to dry Note Do not clean it with hot water with temperature higher than 45 in order to avoid fading or deformation 13 ...

Page 23: ...ure lower than the set temperature b Defrost status c Automatic mode with environment temperature between 18 24 degrees a Turn down the setting temperature b Will recover after the completion of defrost c Adjust to refrigeration mode Not heating a Temperature exceeds the setting temperature b Anti cold wind protection c Defrost status a Turn up the set temperature b Heating temperature reaches set...

Page 24: ...age to the product malfunction or failure caused by incorrect voltage alteration accident neglect abuse vermin misjudgment lightning strike transport hail flood water seepage fire infestation lack of maintenance corrosion or other conditions beyond the control of Oliru Trading tampering by unauthorized persons faulty interfaces allowing any foreign matter to enter or obstruct the product cleaning ...

Page 25: ...owever arisen This warranty does not cover any consumable or accessory unless the item is proven to be defective at the time of purchase and does not cover damage caused by the use or exhausted leaking or used batteries 15 www oliru com au Warranty Registration NB Please retain this as a record and store in a safe place should it be required Fujin Model Number Serial Number Purchase Date Purchased...

Reviews: