Design and specifications are subject to change without notice.
HF8XA-1F/HF12XA-1F/HF16XA-1F
/HF25XA-1F/HF35XA-1F
C-Mount Fixed focal lens
Before using this product, please read this operation manual carefully, and keep the manual handy for future use.
FUJINON HF-XA-1F is a fixed focal lens with C-mount and locking iris/focus for machine vision applications.
Model
HF8XA-1F
HF12XA-1F
HF16XA-1F
HF25XA-1F
HF35XA-1F
Compatible sensor size
Typical
2/3" (3.45 um)
Maximum
2/3" (3.45 um)
1/1.2” (4.5 um)
Focal Length
8mm
12mm
16mm
25mm
35mm
Focus Range (from front of lens)
∞~ 0.1 m
∞~ 0.15 m
∞~ 0.3 m
IRIS Value
(F-number)
Standard Plate (No engraved mark)
F1.6
F1.9
Plate C (Engraved mark “C” )
F4
F4.6
F5.2
Plate E (Engraved mark “E” )
F8
F9.2
F10.4
Field angle (H × V)
Typical
58.4°× 44.6°
40.1°× 30.3°
31.4°× 23.7°
19.9°× 15.0°
14.2°× 10.7°
Maximum
58.4°× 44.6°
48.4°× 36.7°
38.0°× 28.7°
24.2°× 18.3°
17.3°× 13.0°
Iris Operation
Fixed (Plate interchangeable)
Focus Operation
Fixed
Mount
C-Mount
Filter Screw
M25.5 × 0.5 mm
Dimension
φ 34 mm × 60.2 mm
φ 34 mm × 58.7 mm
φ 34 mm × 54.0 mm
φ 34 mm × 55.4 mm
φ 34 mm × 50.3 mm
Operating Temperature
-10℃~ +50℃
Mass (Approx.)
97 g
99 g
94 g
87 g
75 g
*1 The standard plate (no engraved mark) is assembled in the lens at the factory before shipment.
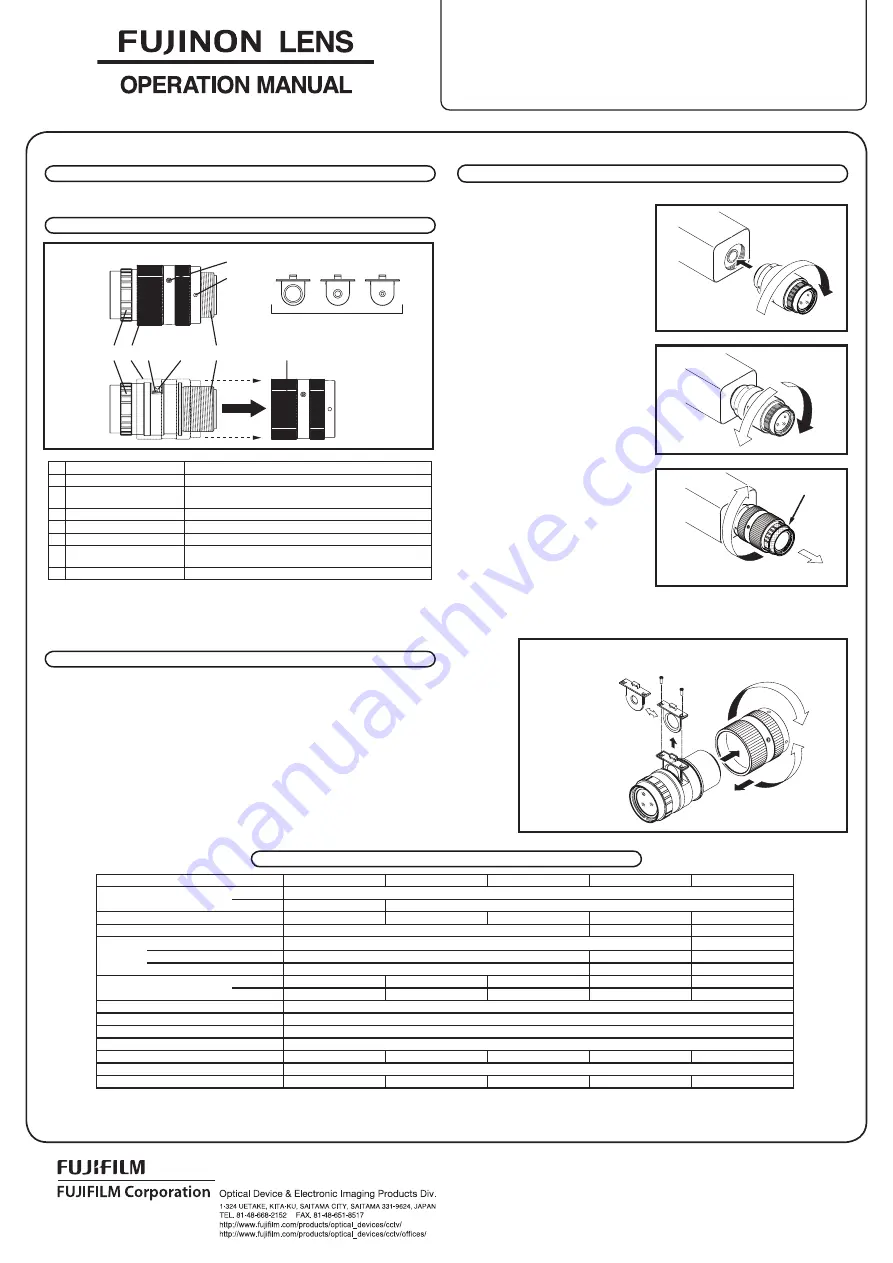
When this product is attached to the camera, the focus adjustment is performed at the same time.
The focus is adjusted depending on the extent to
which this product is screwed into the camera mount.
Use the following procedure to attach this product to
the camera.
1. Align the C-mount thread of the lens with the
mount thread of the camera, and then slowly
rotate the lens body clockwise to screw it into the
camera mount.
2. Rotate the lens body while lightly pulling it and
adjust the focus.
Rotate the lens body clockwise to set the focus on
the near side and rotate it counterclockwise to set
the focus on the infinity side.
3. After the focus is set, rotate the mount lock ring
clockwise while lightly pulling the lens body.
Tighten the mount lock ring until the lens body is
firmly attached to the camera.
Note 1. When the mount lock ring is tightened,
make sure to firmly hold the lens body so
that it does not rotate. If the lens body is
pulled insufficiently or the mount lock ring
is loosely tightened, the lens focus is likely
to deviate or may cause rattling or
looseness in relation to the camera mount,
after the lens is attached to the camera.
Note 2. Loosening of the mount lock ring can be
prevented by making use of three threaded
holes (M2 × 2.5 mm) on the mount lock
ring. You need to procure (on your own)
the screws to be used to prevent the
mount lock ring from being loosened.
Note 3. The lock hole can be used to retighten the
mount lock ring. Use a rod measuring less than φ 1.9 mm as the locking device.
The lens F-number setting (IRIS Value) can be changed using the interchangeable iris diaphragm plate supplied with this lens.
Use the following procedure to change the iris diaphragm plate.
① Detach the mount lock ring from the lens body.
② Use a Phillips screwdriver to remove the iris mounting screws.
③ Pull out the iris diaphragm plate to detach it from the lens body.
④ Insert another iris diaphragm plate into the lens body.
⑤ Use a Phillips screwdriver to attach the iris mounting screws.
⑥ Attach the mount lock ring to the lens body.
Note 1.
Two iris mounting screws are supplied as spares. Make sure to keep the spare screws in a safe place.
Note 2.
Carefully tighten the iris mounting screws and make sure they are not tightened with excessive torque. If the screws
are tightened with excessive torque, the lens may become deformed or damaged. (Recommended tightening torque: 0.1
N ・ m)
Note 3.
When replacing the plate, be careful not to let foreign matter such as dust get inside.
GENERAL DESCRIPTION
SPECIFICATIONS
PART NAMES
INSTALLATION
Item
Function
①
LENS BODY
Main body of lens.
②
MOUNT LOCK RING
The tightening ring for fixing the camera mount also serves as an
exterior part of the lens.
③
IRIS MOUNTING SCREW
Screw for mounting an iris diaphragm plate. (Two places)
④
IRIS DIAPHRAGM PLATE
Diaphragm plate used to change the lens F-number setting.
⑤
C-MOUNT THREAD
C-mount used for attaching the lens to the camera.
⑥
LOCK RING FIXING THREADED
HOLE (M2)
Threaded hole used for fixing the mount lock ring.
⑦
LOCK HOLE ( φ 2.0mm)
Hooking hole used for retightening the mount lock ring.
*1 The standard iris diaphragm plate (no engraved mark) is assembled in the lens at the factory before shipment.
Change the standard iris diaphragm plate with other supplied plates (engraved marks “C” and “E” ) as
required.
*2 Two spare iris mounting screws supplied.
①
③
④
④
⑤
②
②
C
E
⑥
⑦
×3
×4
×2
No engraved
mark
Engraved
mark “C”
Engraved
mark “E”
Lens Body
Camera
C-Mount
Infinity Side
Near Side
Pull
Tighten the lens toward
the camera side.
Do not rotate
the lens.
② Remove the iris mounting screws.
① Detach the mount lock ring.
Lens Body
④ Insert the desired
iris diaphragm
CHANGING THE IRIS DIAPHRAGM PLATE
⑥ Attach the mount lock ring.
⑤ Attach the iris mounting screws.
③ Remove the iris
diaphragm plate.


