background image

6

1

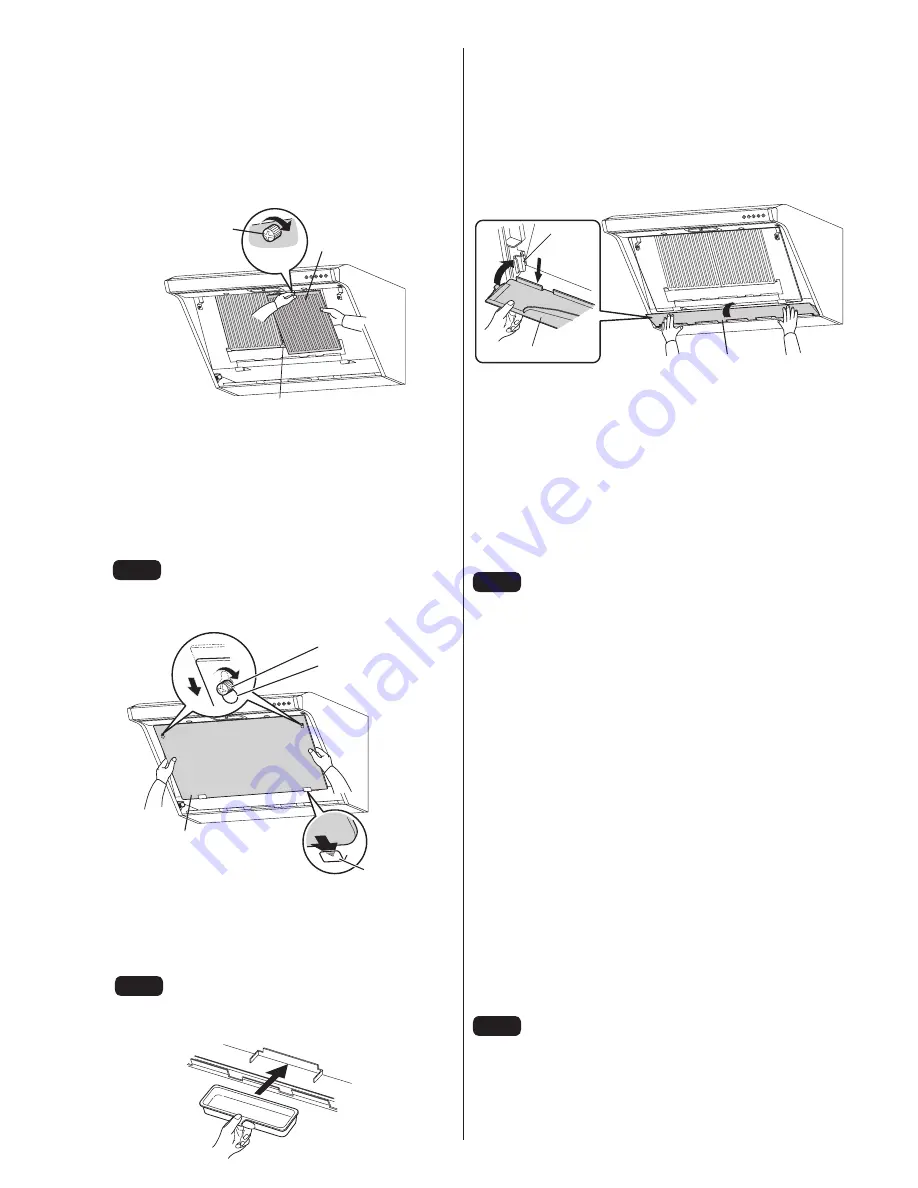
Baffle Filter

Align the baffle filter by placing the bottom of the 
baffle filter in the catches, hold it in place with 
one hand, and use the other hand to fasten each 
filter screw at the top firmly (turn clockwise to 
fasten).

* When cleaning is finished, be sure to return the 

power supply as before; connect the power plug to 
the wall receptacle, or switch on the breaker.

2

Rectifier Panel

Holding the rectifier panel with both hands, place 
the bottom of the panel in bottom of the catches 
and in line with the rectifier panel mounting guide 
holes.
Tighten the rectifier panel screw to attach the 
panel firmly.

Attaching Cleaned Parts

3

Oil Tray

Hold the tab and set the oil tray on the guide rail 
of the cooker hood, then push it completely to 
the end.

Note

Make sure that the rectifier panel is fixed securely. It 
may be a cause of dropping if not fixed firmly.

 Note

If the oil tray is not installed properly, it may result in 
oil-drip, injury by dropping, etc.

Filter screw

Tighten

Baffle filter

Catch

Rectifier panel

Catch

Rectifier panel 

mounting guide hole

Rectifier panel screw

4

Oil receiving cover

Holding the oil receiving cover with one hand at 
each end, align the slits on the bottom panel of 
the body with the slits on the cover. Swivel the 
top part of the cover up and to the body in the 
direction shown by the arrow. Make sure that the 
catches at both ends of the oil receiving cover 
are firmly latched.

Oil receiving cover

Catch

Oil recieving cover

Replacing the Lamp

This range hood is fitted with Philips Tornado Spiral 
energy-saving light bulbs (8W [40W], E14, Cool 
daylight). 

When the lamp in use burns out, please replace the 
light bulb with a commercially purchased compact 
fluorescent light bulb or mini light bulb described 
below. 

Compact Fluorescent light bulb:
Philips Tornado Spiral energy-saving light bulb (8W 
[40W], E14, Cool daylight)  or equivalent product 
(rated voltage: 220/230/240V; in the base diameter 
14mm) (dimension limits for mounting: length of 
100mm or less; diameter of 47mm or less). 

Mini light bulb:
Rated voltage of 220/230/240V; in the base diameter 
14mm.

Note

Before replacing the lamp, be sure to disconnect the power 
plug from the wall receptacle,


or switch off the breaker.

Note

When replacing, be sure to use a same voltage bulb 
with the power voltage supplied.

Summary of Contents for GFP-600

Page 1: ...ales shop installer After installing please give this manual to the user without fail Cooker Hood Operation Manual Safety Precautions 2 3 Cautions on Use 3 Preparation 4 Name of Parts 4 Prior to Use 4 Switches 4 Care and Maintenance 4 7 Caution for Maintenance 4 Detaching Cleaning Parts 5 Cleaning 5 Attaching Cleaned Parts 6 Replacing the Lamp 6 7 Other Information 7 8 Specifications 7 Circuit Dia...

Page 2: ...pe off well Fire may result in Don t spray water on the electric parts Fire or electric shock may result in When there may be a gas leak in your gas hob don t switch on or off the cooker hood Gas explosion may result in Choose a mounting location where sufficient air flow is maintained CO poisoning may result if not ventilated adequately while using a natural vent type stove etc Wipe off dust Spra...

Page 3: ... by dropping Never use the product in a wet place such as bath room etc Use a ventilation fan for bath room It may be cause of fire or failure if used Disconnect by holding the plug When disconnecting the power plug hold the plug itself Don t pull the cord anyway The cord may be damaged and fire or electric shock may result in Cautions on Use Operate the cooker hood without fail when using cooking...

Page 4: ...d as many times as possible especially clean the filter once every month as it will become very dirty For a family size of 4 to 5 people and cooking twice a day clean the filter once every two weeks If the cooker hood is left unattended for a long time much oil is accumulated and it will become difficult to remove the hardened grease Caution for Maintenance Do not spray liquid of any type detergen...

Page 5: ...r Remove each filter screw fixing the baffle filters by turning in the counterclockwise direction and remove the baffle filters Filter screw Loosen Baffle filter Baffle Filter and Oil Tray After immersing the baffle filter and oil tray in a tepid water with a neutral detergent dissolved for 30 to 40 minutes wash them with a toothbrush or the like to remove dirt Cleaning Note Baffle filters can be ...

Page 6: ...nting guide hole Rectifier panel screw 4 Oil receiving cover Holding the oil receiving cover with one hand at each end align the slits on the bottom panel of the body with the slits on the cover Swivel the top part of the cover up and to the body in the direction shown by the arrow Make sure that the catches at both ends of the oil receiving cover are firmly latched Oil receiving cover Catch Oil r...

Page 7: ...ion air flow and noise level are measured according to JIS C 9603 GFP 600 700 900 ventilating with recycling unit optional Rated Voltage V Revolution Frequency Hz Power Consumption W Power Consumption with Lamp W Air Flow m3 h Noise dB 220V Hi 50 160 168 785 55 Me 50 125 133 660 52 Lo 50 80 88 440 40 230V Hi 50 170 178 805 56 Me 50 135 143 690 53 Lo 50 85 93 470 41 240V Hi 50 180 188 825 57 Me 50 ...

Page 8: ...hased your cooker hood 1 Whether the fuse in the circuit breaker has been burnt out 2 Whether the power plug is not in proper contact with the receptacle When consulting the shop inform the shop the type model of cooker hood requiring repair and the date when it was purchased The minimum retention period of performance parts for repairing the cooker hood is 5 years after termination of manufacturi...

Reviews: