7
Care and Maintenance
1
Rectifier Panel
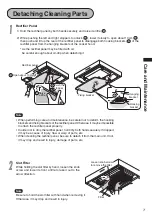
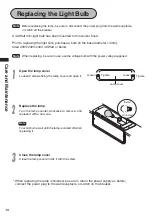
1) Hold the rectifier panel by both hands securely and raise it a little (
1
).
2
Slot Filter
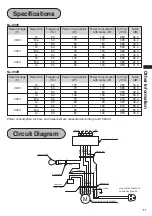
While holding the slot filter by hand, loosen the knob
screw and lower its front a little to take it out to the
arrow direction.
Detaching Cleaning Parts
Note
When performing care and maintenance, be careful not to deform the hooking
brackets and fixing brackets of the rectifier panel. Otherwise, it may be impossible
to attach the rectifier panel properly.
In order not to drop the rectifier panel, hold it by both hands securely. If dropped,
it may be a cause of injury, flaw or warp of parts, etc.
When cleaning the rectifier panel, be sure to detach it from the main unit. If not,
it may drop and result in injury, damage of parts, etc.
Filter
Loosen knob screw
to remove the filter
2) While pushing the left and right stoppers to unlock (
2
), lower it slowly to open about 10cm (
3
),
then push and lift up the rear of the rectifier panel to disengage both hooking brackets (
4
) of the
rectifier panel from the hanging brackets of the cooker hood.
* As the rectifier panel may be filled with oil,
be careful enough about oil-drip when detaching it.
Note
Be sure to hold the slot filter with hand when removing it.
Otherwise, it may drop and result in injury.
Fixing bracket
Hanging
bracket
Hooking
bracket
4
Rectifier panel
Open about 10cm
Push the
stopper
Raise
a little
3
1
2


