background image

NL-900R

TABLE OF CONTENTS

1F03 0581

Thank you very much for your purchase of our cooker hood.

Before installing the cooker hood, please read this Manual thoroughly.

Keep this manual in a convenient place for future reference.

To the sales shop/installer:

After installing, please give

this manual to the user

without fail.

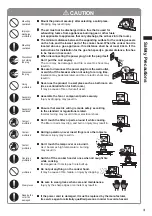
Safety Precautions .......................... 2, 3
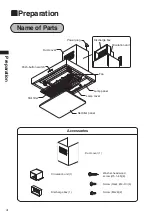
Preparation .......................................... 4

Name of Parts ..............................................4

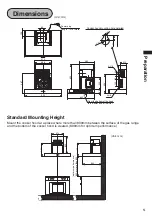
Dimensions ..................................................5

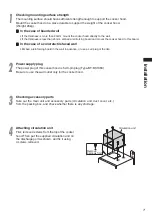
Installation ..................................... 6~11

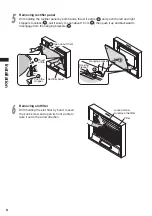
Preparation and Check before Mounting ......6

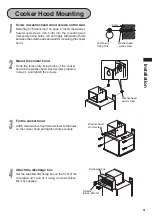
Cooker Hood Mounting ................................9

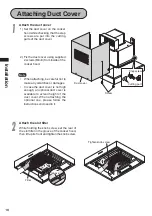
Attaching Duct Cover .................................10

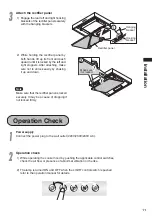
Operation Check ........................................11

Installation Manual

 Cooker Hood

Summary of Contents for NL-900R

Page 1: ...his manual in a convenient place for future reference To the sales shop installer After installing please give this manual to the user without fail Safety Precautions 2 3 Preparation 4 Name of Parts 4 Dimensions 5 Installation 6 11 Preparation and Check before Mounting 6 Cooker Hood Mounting 9 Attaching Duct Cover 10 Operation Check 11 Installation Manual Cooker Hood ...

Page 2: ...eir emergency and severity Pay attention and strictly observe the instructions as they are critical for safety WARNING Alerts possible risk of death or heavy injury if not observed CAUTION Alerts possible risk of injury or physical damage if not observed WARNING means prohibition It indicates actions if any that mustn t be done Left symbol Disassembly prohibited means forcible execution It indicat...

Page 3: ...esult in Assembly cautioned Contact prohibited Contact prohibited Be sure to wear gloves when care and maintenance Injury by the sharp edges or corners may result in Ensure that electric wiring is made safely according to the standard or regulations related Incorrect wiring may result in fire or electrical shock Don t touch the lamp cover or around it As it becomes high temperature burning may res...

Page 4: ...harge box Circulation unit Duct cover Push button switch Rectifier panel Lamp cover Slot filter Lamp panel Power plug Fan Accessories Discharge box 1 Circulation unit 1 Washer head wood screw 5 1 45 8 Screw black M4 10 4 Duct cover 1 Screw M4 8 2 ...

Page 5: ...hole detailed 410 386 From the bottom of the hood to the lower end of the filter Unit mm Standard Mounting Height Mount the cooker hood at a place where more than 800mm between the surface of the gas range and the bottom of the cooker hood is cleared 800mm for optimum performance 453 453 600 640 410 800 or more than 800 optimum performance Unit mm ...

Page 6: ...he cooker hood is located above a gas appliance this distance shall be at least 80cm If the instructions for installation for the gas hob specify a greater distance this has to be taken into account 5 Use a gas range having a narrower width than that of the cooker hood 6 Avoid using the cooker hood with changes in the specification for instance with modifing the switch 7 Do not install the cooker ...

Page 7: ...strength enough to support the cooker hood Mount the cooker hood on a place durable to support the weight of the cooker hood Weight 26kg In the case of boarded wall If the thickness is more than 20mm mount the cooker hood directly to the wall If the thickness is less than 20mm embed a reinforcing board and mount the cooker hood to this board In the case of a concrete tile faced wall Embed a reinfo...

Page 8: ...er panel With holding the rectifier panel by both hands thrust it a little 1 and push the left and right stoppers to unlock 2 pull it slowly to open about 10 cm 3 then push it up and backward to disengage from the hanging brackets 4 6 Removing slot filter With holding the slot filter by hand loosen the knob screw and open its front a little to take it out to the arrow direction ...

Page 9: ...he screws 4 Attach the discharge box Set the supplied discharge box on the front of the circulation unit and fix it using 4 screws black M4 10 supplied Discharge box Screws black M4 10 Cooker Hood Mounting 1 Screw in washer head wood screws on the wall Referring to Dimensions on page 5 insert the washer head wood screws 5 1 45 into the mounting wall temporary fixing holes left and right Allow abou...

Page 10: ... on the cooker hood while checking that the step screws are put into the cutting parts of the duct cover 2 Fix the duct cover using supplied 2 screws M4 8 from inside of the cooker hood Note When attaching be careful not to make any scratches or damages In case the duct cover is not high enough an optional duct cover is available to extend height of the duct cover When attaching the optional one p...

Page 11: ... down 2 Make sure it is locked Rectifier panel 1 Hanging bracket Hooking bracket Note Make sure that the rectifier panel is locked securely It may be a cause of dropping if not locked firmly 1 Power supply Connect the power plug to the wall outlet 220V 230V 240V AC 2 Operation check 1 While operating the cooker hood by pushing the applicable control switches check the air flow or presence of abnor...

Page 12: ......

Reviews: