background image

Colour monitor C779 / 172E

2 - English

A26361-K823-Z100-1-5E19

2

Important notes

!

In this chapter you will find information regarding safety which is essential to take note of
with your monitor.

Safety

This device complies with the relevant safety regulations for data processing equipment, including
electronic office machines for use in an office environment. If you have any questions, contact your
sales outlet or our Help Desk.

• 

If the device is brought into the installation site from a cold environment, condensation can
form. Before operating the device, wait until it is absolutely dry and has reached approximately
the same temperature as the installation site.

• 

During installation and before operating the device, observe the instructions on environmental
conditions in the chapter "

Technical data

".

• 

To ensure adequate ventilation the monitor may only be operated with the monitor foot
installed.

• 

The colour monitor must not be exposed to strong magnetic fields (e. g. caused by magnetic
paper clip holders or loudspeakers). Strong magnetic fields could result in a permanent blotchy
image.

• 

The monitor is automatically degaussed when switched on. This results in a magnetic field
around the metal edge of the picture tube, which may damage the data on data carriers nearby.
Therefore, never keep magnetic data carriers near the monitor.

• 

The device automatically sets itself to the correct voltage within the range from 100 V to 240 V.
Ensure that the local mains voltage lies within these limits.

• 

The device must be installed in such a way that the user has good access to the appliance
socket.

• 

The ON/OFF switch does not disconnect the device from the mains voltage. To disconnect the
electricity supply completely, remove the power plug from the socket.

• 

Lay all cables so that nobody can stand on them or trip over them. When attaching the device,
observe the relevant notes in the chapter "

Connecting the monitor

".

• 

No data transmission cable should be connected or disconnected during a thunderstorm.

• 

Please ensure that no objects (e. g. necklaces, paperclips etc.) or liquids can get into the
interior of the device (this may cause an electrical shock or short circuit).

• 

In emergencies (e. g. damaged casing, elements or cables, penetration of liquids or foreign
matter), switch off the unit, disconnect the power plug and contact your sales outlet or our Help
Desk.

• 

Only qualified technicians should repair the device. Unauthorised opening and incorrect repair
may greatly endanger the user (electric shock, fire risk).

• 

Tampering with the device, in particular adjusting the high voltage or installing a different type
of CRT tube, may result in a large amount of X-ray radiation being emitted. Devices modified in
this way no longer comply with their licence and may not be used.

• 

You may set only those resolutions and refresh rates specified in the "

Technical data

" chapter.

Otherwise you may damage your monitor. If you are in any doubt, contact your sales outlet or
our Help Desk.

Summary of Contents for 172E

Page 1: ...9 172E C779 172E C779 172E Bildschirm Moniteur Monitor Sk rm Beeldscherm BETRIEBSANLEITUNG BETRIEBSANLEITUNG BETRIEBSANLEITUNG BETRIEBSANLEITUNG OPERATING MANUAL OPERATING MANUAL OPERATING MANUAL OPER...

Page 2: ...zu unseren Produkten Tipps Updates usw finden Sie im Internet http www fujitsu siemens com Are there any technical problems or other questions you need clarified Please contact our Help Desk see Warra...

Page 3: ......

Page 4: ...eciclado Questo manuale stato stampato su carta da riciclaggio Denna handbok r tryckt p recyclingpapper Dit handboek werd op recycling papier gedrukt Herausgegeben von Published by Fujitsu Siemens Com...

Page 5: ...onitor Moniteur couleur Monitor de color Monitor a colori F rgsk rm Kleurenbeeldscherm Betriebsanleitung Operating Manual Deutsch English Fran ais Espa ol Italiano Svenska Nederlands TCO 99 Ausgabe Fe...

Page 6: ...Dieses Handbuch wurde erstellt von cognitas Gesellschaft f r Technik Dokumentation mbH www cognitas de VESA DDC and DPMS are registered trademarks of Video Electronics Standards Association Copyright...

Page 7: ...certificate 5 X ray radiation 5 Notes on power management 6 Connecting the monitor 6 Monitor C779 7 Monitor 172E 7 Operation of the monitor 8 Activating the OSD menu 8 Exiting the OSD menu 8 OSD menu...

Page 8: ......

Page 9: ...start up and run your monitor The monitor interacts closely with the graphics card screen controller of your computer The monitor processes the data supplied to it by the screen controller The screen...

Page 10: ...orrect voltage within the range from 100 V to 240 V Ensure that the local mains voltage lies within these limits The device must be installed in such a way that the user has good access to the applian...

Page 11: ...pliance Statement The following statement applies to the products covered in this manual unless otherwise specified herein The statement for other products will appear in the accompanying documentatio...

Page 12: ...ath or on the insulation of one of the inner conductors For devices which are mounted on a desk or table type SVT or SJT cable sets may be used For devices which sit on the floor only SJT type cable s...

Page 13: ...OFF mode With this new power management the C779 172E qualifies for the U S Environmental Protection Agency s EPA Energy Star Computers award The EPA estimates that computer equipment uses 5 percent o...

Page 14: ...the power management system of the computer For detailed information on how energy saving mode operates refer to the Operating Manual or Technical Manual of your computer i The service life of your mo...

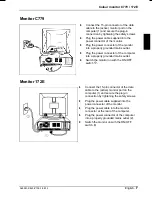
Page 15: ...outlet Plug the power connector of the computer into a properly grounded mains outlet Switch the monitor on with the ON OFF switch Monitor 172E Connect the 15 pin connector of the data cable to the ac...

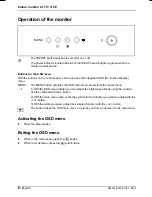
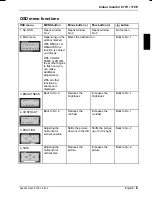
Page 16: ...U button activates the OSD main menu and selects the marked icon 1 With the OSD menu hidden you can adjust the brightness directly using the button and the contrast with the button 2 With the main men...

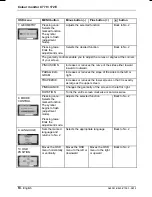
Page 17: ...to flash and you can make additional adjustments With all other functions a submenu is displayed Marks the desired icon Back to No 1 3 BRIGHTNESS Back to No 2 Reduces the brightness Increases the bri...

Page 18: ...creases or reduces the slope of the sides to the left or right TRAPEZOID Increases or reduces the lower screen so that it is exactly as large as the upper screen PINBALANCE Changes the geometry of the...

Page 19: ...de Selects the desired function Back to No 11 13 ZOOM Pressing once Selects the marked function The symbol begins to flash adjustment mode Reduces the horizontal and vertical picture size Increases th...

Page 20: ...ue positive 0 7 Vpp 75 Ohm Synchronisation H V separate TTL positive negative H V composite TTL positive negative Horizontal frequency 30 kHz 72 kHz multi scanning Refresh rate 50 Hz 160 Hz Maximum pi...

Page 21: ...d Fujitsu Siemens MCM 171E C776 174V 173V C777 C775 Siemens MCM 171V MCM 1755 MCM 1754 MCM 1503 Fujitsu C771 Preset operating modes i The picture position and size have been set to optimum values at t...

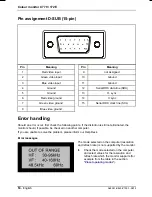
Page 22: ...8 Blue video ground Error handling Should an error occur first check the following points If the distortion is still not eliminated the monitor should if possible be checked on another computer If yo...

Page 23: ...ing or unstable Check whether the data cable for the monitor is correctly attached to the monitor and the monitor port on the computer Check the mode selected on the computer and select values for the...

Reviews: