background image

Color monitor 21P3

4 - English

A26361-K618-Z100-2-5E19

FCC Class B Compliance Statement

If there is an FCC statement on the device, then:
The following statement applies to the products covered in this manual, unless otherwise specified
herein. The statement for other products will appear in the accompanying documentation.

NOTE:

This equipment has been tested and found to comply with the limits for a "Class B" digital device,
pursuant to Part 15 of the FCC rules and meets all requirements of the Canadian Interference-
Causing Equipment Regulations. These limits are designed to provide reasonable protection against
harmful interference in a residential installation. This equipment generates, uses and can radiate
radio frequency energy and, if not installed and used in strict accordance with the instructions, may
cause harmful interference to radio communications. However, there is no guarantee that
interference will not occur in a particular installation. If this equipment does cause harmful
interference to radio or television reception, which can be determined by turning the equipment off
and on, the user is encouraged to try to correct the interference by one or more of the following
measures:

• 

Reorient or relocate the receiving antenna.

• 

Increase the separation between equipment and the receiver.

• 

Connect the equipment into an outlet on a circuit different from that to which the receiver is
connected.

• 

Consult the dealer or an experienced radio/TV technician for help.

Fujitsu Siemens Computers GmbH is not responsible for any radio or television interference caused
by unauthorized modifications of this equipment or the substitution or attachment of connecting
cables and equipment other than those specified by Fujitsu Siemens Computers GmbH The
correction of interference caused by such unauthorized modification, substitution or attachment will
be the responsibility of the user.

The use of shielded I/O cables is required when connecting this equipment to any and all optional
peripheral or host devices. Failure to do so may violate FCC rules.

Important note on power cable

To guarantee safe operation, use the cable supplied. Use the following guidelines if it is necessary
to replace the original cable set.

• 

The female/male receptacles of the cord set must meet CEE-22 requirements.

• 

The cable has to be HAR-certified or VDE-certified. The mark HAR or VDE will appear on the
outer sheath or on the insulation of one of the inner conductors.

• 

For devices which are mounted on a desk or table, type SVT or SJT cable sets may be used.
For devices which sit on the floor, only SJT type cable sets may be used.

• 

The cable set must be selected according to the current rating for your device.

Summary of Contents for 21P3

Page 1: ...3 21P3 21P3 21P3 Bildschirm Moniteur Monitor Sk rm Beeldscherm BETRIEBSANLEITUNG BETRIEBSANLEITUNG BETRIEBSANLEITUNG BETRIEBSANLEITUNG OPERATING MANUAL OPERATING MANUAL OPERATING MANUAL OPERATING MANU...

Page 2: ...zu unseren Produkten Tipps Updates usw finden Sie im Internet http www fujitsu siemens com Is there any technical problem or other question you need clarified Please contact our Help Desk see Guarant...

Page 3: ......

Page 4: ...ciclado Questo manuale stato stampato su carta da riciclaggio Denna handbok r tryckt p recyclingpapper Dit handboek werd op recycling papier gedrukt Herausgegeben von Published by Fujitsu Siemens Comp...

Page 5: ...monitor Moniteur couleur Monitor de color Monitor a colori F rgsk rm Kleurenbeeldscherm Betriebsanleitung Operating Manual Deutsch English Fran ais Espa ol Italiano Svenska Nederlands TCO 99 Ausgabe...

Page 6: ...oder GM Eintragung Lieferm glichkeiten und technische nderungen vorbehalten Copyright Fujitsu Siemens Computers GmbH 2000 VESA DDC and DPMS are registered trademarks of Video Electronics Standards As...

Page 7: ...ecking the contents of the consignment 6 Installing an ergonomic video workstation 7 Connecting the monitor 7 Operation of the monitor 9 Switching the monitor on 9 Switching the monitor off 9 Notes on...

Page 8: ......

Page 9: ...the data supplied to it by the screen controller The screen controller the associated driver software is responsible for setting the modes resolution and refresh rate Target group You don t need to be...

Page 10: ...he user has good access to the appliance socket The ON OFF switch does not disconnect the device from the line voltage To disconnect the line voltage completely remove the power plug from the socket L...

Page 11: ...losion Manufacturer s notes Energy Star The Fujitsu Siemens Computers color monitor 21P3 is designed to conserve electricity by dropping to less than 8 W when it goes into standby suspend mode and to...

Page 12: ...crease the separation between equipment and the receiver Connect the equipment into an outlet on a circuit different from that to which the receiver is connected Consult the dealer or an experienced r...

Page 13: ...g from the cord and discard Carefully prepare the end of the supply cord and fit a suitable plug WARNING THIS APPLIANCE MUST BE EARTHED IMPORTANT The wires in this mains lead are coloured in accordanc...

Page 14: ...rs after production of that device has discontinued If you have any questions on disposal please contact your local office our Help Desk or Fujitsu Siemens Computers GmbH Recyclingcenter D 33106 Pader...

Page 15: ...90 Position the monitor for optimum viewing The viewing distance to the monitor should be approximately 50 cm Keep ventilated areas clear Remember to maintain correct posture Connecting the monitor S...

Page 16: ...e a data cable with BNC connectors instead of the supplied data cable you should perform the following step Connect the BNC connectors of the data cable to the appropriate BNC connectors on the monito...

Page 17: ...Operation of the monitor 3 2 1 1 Control panel with buttons for screen setting 2 Power indicator 3 ON OFF switch Switching the monitor on Press the ON OFF switch 3 The power indicator 2 lights up gre...

Page 18: ...e power indicator of the monitor changes color to indicate the status change If there is still no input power consumption is further reduced OFF mode The power indicator glows orange Once an input is...

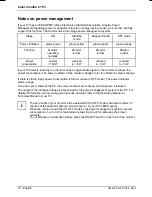
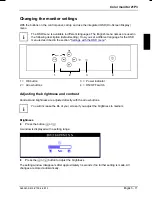
Page 19: ...ibed in the section Settings with the OSD menu 2 3 4 INPUT A B OK 1 1 OK button 2 Arrow buttons 3 Power indicator 4 ON OFF switch Adjusting the brightness and contrast Contrast and brightness are adju...

Page 20: ...proximately 3 seconds if no further setting is made All changes are stored automatically Settings with the OSD menu To set the OSD menu perform the following steps Briefly press the OK button to activ...

Page 21: ...ain menu are described in the following Setting language for the OSD menu Setting language for the OSD menu LANGUAGE You can choose from English default setting German French Italian and Spanish Setti...

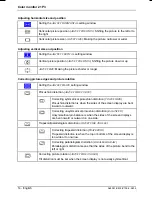
Page 22: ...ushion distortion ADJUST SIDE CURVE Correcting symmetrical pincushion distortion PINCUSHION Pincushion distortion is when the sides of the screen display are bent inward or outward Correcting unsymmet...

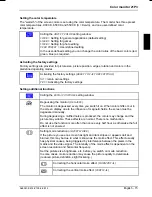
Page 23: ...onitor DEGAUSS The monitor is degaussed every time you switch it on When color shifts occur in the screen display due to the influence of magnetic fields the screen must be degaussed manually During d...

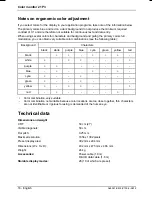
Page 24: ...table color combinations see the following table Background Characters black white purple blue cyan green yellow red black white purple blue cyan green yellow red Color combination very suitable Color...

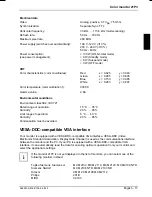
Page 25: ...onment class 3K2 IEC 721 Rated range of operation 15 C 35 C Humidity 20 85 Limit range of operation 5 C 40 C Humidity 20 85 Condensation must be avoided VESA DDC compatible VGA interface Your monitor...

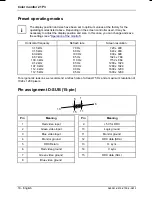
Page 26: ...kHz 68 7 kHz 100 3 kHz 91 2 kHz 107 0 kHz 112 4 kHz 112 5 kHz 70 Hz 60 Hz 100 Hz 85 Hz 110 Hz 85 Hz 100 Hz 90 Hz 85 Hz 720 x 400 640 x 480 800 x 600 1024 x 768 1152 x 864 1280 x 1024 1280 x 1024 1600...

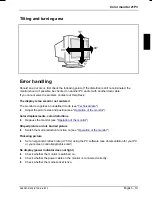
Page 27: ...mode see Technical data Adjust the picture size and position see Operation of the monitor Color displacements color distortions Degauss the monitor see Operation of the monitor Striped picture or dull...

Page 28: ...nnection of the system unit used is active Check whether the correct video signal D SUB BNC is selected in the OSD menu see Operation of the monitor and change the video signal in the OSD menu or by s...

Reviews: