background image

Colour monitor 3815 FA

A26361-K833-Z100-1-5E19

English - 3

• 

In emergencies (e.g. damaged casing, elements or cables, penetration of liquids or foreign
matter), switch off the unit, disconnect the power plug and contact your sales outlet or our Help
Desk.

• 

The screen background lighting contains mercury. You must observe the applicable handling
and disposal safety regulations for fluorescent tubes.

• 

If the LCD monitor is damaged (for example the glass is broken), avoid letting any liquids that
may escape coming into contact with any part of your body (skin, mouth, nose) or foodstuffs.
Clean parts of the body and clothing that have already come into contact with such liquids with
plenty of soap and water.
Do not breathe in any of the escaping vapours. You should contact your doctor if you have
breathed in fumes or come into contact with the liquid.

• 

Only qualified technicians should repair the device. Unauthorised opening and incorrect repair
may greatly endanger the user (electric shock, fire risk).

• 

You may set only those resolutions and refresh rates specified in the "Technical data" chapter.
Otherwise you may damage your monitor. If you are in any doubt, contact your sales outlet or
our Help Desk.

• 

Keep this operating manual together with your device. If you pass on the device to third parties,
you should include this manual.

Cleaning

• 

Always pull out the power plug before you clean the monitor.

• 

Do not clean any interior parts yourself, leave this job to a service technician.

• 

Do not use any cleaning agents that contain abrasives or may corrode plastic.

• 

Ensure that no liquid will run into the system.

• 

Ensure that the ventilation areas of the monitor are free.

• 

The display surface of the LCD monitor is sensitive to pressure and scratches. Clean it only
using a soft, slightly moistened cloth.

Wipe the monitor housing with a dry cloth. If the monitor is particularly dirty, use a cloth which has
been moistened in mild domestic detergent and then carefully wrung out.

Transport

• 

Transport the monitor with care and only in its original packaging or another corresponding
packaging fit to protect it against knocks and jolts.

• 

Never drop the LCD monitor (danger of glass breakage).

Summary of Contents for 3815 FA

Page 1: ...5 FA 3815 FA 3815 FA LCD Bildschirm Moniteur Monitor Sk rm Beeldscherm BETRIEBSANLEITUNG BETRIEBSANLEITUNG BETRIEBSANLEITUNG BETRIEBSANLEITUNG OPERATING MANUAL OPERATING MANUAL OPERATING MANUAL OPERAT...

Page 2: ...king the contents of the consignment 7 Installing an ergonomic video workstation 7 Connecting the monitor 8 Height adjustment and ability to turn 9 Tilting and turning area 10 Operation of the monitor...

Page 3: ......

Page 4: ...hole spacing plug play capability power management for reducing power consumption when the computer system is not in use compliance with the recommendations in accordance with TCO 99 compliance with t...

Page 5: ...ace so as to avoid lasting damage Newton rings scratches If the device is brought into the installation site from a cold environment condensation can form Before operating the device wait until it is...

Page 6: ...ire risk You may set only those resolutions and refresh rates specified in the Technical data chapter Otherwise you may damage your monitor If you are in any doubt contact your sales outlet or our Hel...

Page 7: ...and that this is growing rapidly If all desktop computers and peripherals enter a low power mode when not in use the overall savings in electricity could amount to 2 thousand million annually These sa...

Page 8: ...between equipment and the receiver Connect the equipment into an outlet on a circuit different from that to which the receiver is connected Consult the dealer or an experienced radio TV technician for...

Page 9: ...in the mains lead of this appliance may not correspond with the coloured markings identifying the terminals in your plug proceed as follows The wire which is coloured Green and Yellow must be connect...

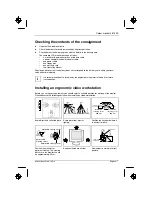
Page 10: ...ed not to throw away the original packing material Keep it for future transportation Installing an ergonomic video workstation Before you set up your equipment you should select a suitable position fo...

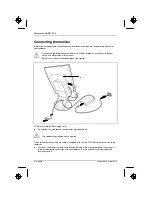
Page 11: ...al Do not cover the ventilation openings of the monitor 2 3 4 1 a a Security slots for Kensington Lock Be sure that the monitor and the computer are switched off The computer power plug must be pulled...

Page 12: ...u start working with your monitor for the first time you should install the appropriate graphics drivers for your application software Details of how to do this are provided in the documentation on yo...

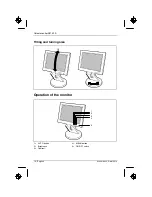
Page 13: ...Colour monitor 3815 FA 10 English A26361 K833 Z100 1 5E19 Tilting and turning area 5 15 Operation of the monitor 1 2 3 4 5 1 AUTO button 2 Brightness 3 Contrast 4 MENU button 5 ON OFF switch...

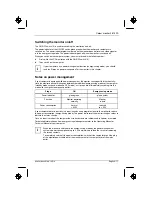
Page 14: ...odes of the computer standby mode suspend mode and OFF mode as it is capable of immediately switching into the mode with the highest energy saving effect Stage ON Energy saving mode Power indicator gl...

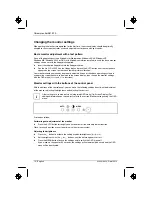
Page 15: ...e to the screen display then change the monitor settings with the OSD menu Focus and Clock functions Monitor settings with the buttons of the control panel With the buttons of the control panel you ca...

Page 16: ...ng English With the OSD function Language you can select another language MENU AUTO To set the OSD menu perform the following steps Press the MENU button to activate the OSD menu The main menu appears...

Page 17: ...ntrast If the black value is too low it is not possible to distinguish between dark shades Setting the focus picture definition Focus Eliminate picture noise and improve focus Setting the clock pictur...

Page 18: ...displayed rotated by 90 portrait mode see Height adjustment and ability to turn Notes on ergonomic colour adjustment If you select colours for the display in your application programmes take note of...

Page 19: ...Storable display modes 18 Electrical data Rated mains voltage Frequency 100 V 240 V 10 50 Hz 60 Hz 5 Video analogue positive 0 7 Vpp 75 Synchronisation Separate Sync TTL positive or negative Horizont...

Page 20: ...tically for the operating modes listed below Depending on the screen controller used it may be necessary to adjust the display position and scanning In this case you can change and save the settings s...

Page 21: ...ollowing points If the distortion is still not eliminated the monitor should if possible be checked on another computer If you are unable to solve the problem please inform our Help Desk The display i...

Page 22: ...lated in the stringent international standard ISO 13406 2 Class II Example a 15 flat screen monitor with a resolution of 1024 x 768 has 1024 x 768 786432 pixels Each pixel consists of three subpixels...

Page 23: ...running continuously and thereby consumes a lot of energy What does labelling involve This product meets the requirements for the TCO 99 scheme which provides for international and environmental label...

Page 24: ...e printed circuit boards since no substitutes are available Cadmium 2 Cadmium is present in rechargeable batteries and in the colour generating layers of certain computer displays Cadmium damages the...

Reviews: