background image

Color monitor 4612 FA

16 - English

A26361-K628-Z100-1-5E19

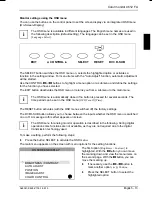
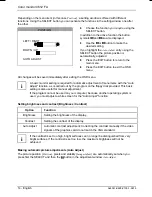
Switching full-screen mode on or off (Expansion Mode)

If your graphic card is only capable of displaying a resolution lower than 1280 x 1024, the scaling
process of the monitor can display up to 1280 x 1024 pixels by determining intermediate values
(with interpolation).

Option

Function

Full Screen

Switch on the full-screen mode. The display area is stretched to the full picture
size (1,280 pixels, side ratio 5:4). As a result, the display may appear distorted.

Keep Aspect

Switch on the proportional full-screen mode: The display area is expanded to
the maximum picture size while maintaining the side ratio (either full picture
width or full picture height).

Expansion Off

Switching the full-screen mode off. At resolutions lower than 1280 x 1024 a
display with a black border appears.

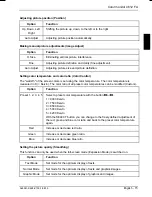
Setting automatic video signal detection (video detect)

With this function the selection of the video input can be controlled with the monitor is connected to
two computers.

Option

Function

None

Switch off the automatic video signal detection. The switch-over between the
video inputs is not automatic, but instead must be carried out manually with the
DVI/D-SUB button.

First Detect

Switch on the "First Detect" mode. As long as a signal is present at the current
video input, the monitor remains set to this video input, regardless of whether
or not a signal appears at the other video input. If no signal is present at the
current video input, the monitor switches over to the other input.

Last Detect

Switch on the "Last Detect" mode. As soon as a signal appears at a video
input, the monitor switches over to that input.

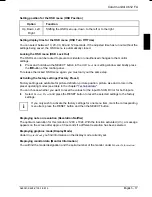
Selecting signals for DVI connection (DVI select)

The DVI connection enables operation with analog or digital signals. With this function you can
(depending on the graphics card you use) switch over between the analog and the digital mode.

Option

Function

Digital

Switch on the digital mode. The monitor processes the signals of the digital
port.

Analog

Switch on the analog mode. The monitor processes the signals of the analog
port.

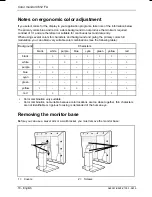
Setting the language for the OSD menu (Language Select)

The OSD menu can be displayed in various languages. You can choose from English (default
setting), German, French, Spanish, Italian, Swedish, and Japanese.

Summary of Contents for 4612 FA

Page 1: ...2 FA 4612 FA 4612 FA LCD Bildschirm Moniteur Monitor Sk rm Beeldscherm BETRIEBSANLEITUNG BETRIEBSANLEITUNG BETRIEBSANLEITUNG BETRIEBSANLEITUNG OPERATING MANUAL OPERATING MANUAL OPERATING MANUAL OPERAT...

Page 2: ...zu unseren Produkten Tipps Updates usw finden Sie im Internet http www fujitsu siemens com Is there any technical problem or other question you need clarified Please contact our Help Desk see Guarant...

Page 3: ......

Page 4: ...eciclado Questo manuale stato stampato su carta da riciclaggio Denna handbok r tryckt p recyclingpapper Dit handboek werd op recycling papier gedrukt Herausgegeben von Published by Fujitsu Siemens Com...

Page 5: ...chirm LCD monitor Moniteur LCD Monitor LCD Monitor LCD LCD sk rm LCD beeldscherm Betriebsanleitung Operating Manual Deutsch English Fran ais Espa ol Italiano Svenska Nederlands TCO 99 Ausgabe Mai 2000...

Page 6: ...oder GM Eintragung Lieferm glichkeiten und technische nderungen vorbehalten Copyright Fujitsu Siemens Computers GmbH 2000 VESA DDC and DPMS are registered trademarks of Video Electronics Standards As...

Page 7: ...an ergonomic video workstation 8 Connecting the monitor 8 Connecting cables to the monitor 9 Connecting cables to the computer 10 Operation of the monitor 10 Adjusting height rake and rotation 10 Adju...

Page 8: ......

Page 9: ...wer management for reducing power consumption when the computer system is not in use compliance with the recommendations in accordance with TCO 99 In normal screen mode dark characters against a light...

Page 10: ...should therefore be careful with the display surface so as to avoid lasting damage Newton rings scratches If the device is brought into the installation site from a cold environment condensation can...

Page 11: ...or if you have breathed in fumes or come into contact with the liquid Only qualified technicians should repair the device Unauthorized opening and incorrect repair may greatly endanger the user electr...

Page 12: ...cate the receiving antenna Increase the separation between equipment and the receiver Connect the equipment into an outlet on a circuit different from that to which the receiver is connected Consult t...

Page 13: ...on a desk or table type SVT or SJT cable sets may be used For devices which sit on the floor only SJT type cable sets may be used The cable set must be selected according to the rated current for your...

Page 14: ...d it is growing rapidly If all desktop computers and peripherals enter a low power mode when not in use the overall savings in electricity could amount to 2 billion annually These savings could also p...

Page 15: ...ry agrees with the details in the delivery note The complete LCD monitor package includes one monitor two data cables one power cable one floppy disk one warranty card this Operating Manual Should you...

Page 16: ...sition the monitor for optimum viewing The viewing distance to the monitor should be approximately 50 cm Keep ventilated areas clear Remember to maintain correct posture Depending on the situation the...

Page 17: ...r computer Connect the DVI connector of the data cable to the DVI connector on the monitor 3 and secure the plug in connection by tightening the safety screws i If instead of the data cables supplied...

Page 18: ...following possibilities that enable it to be optimally adjusted for the respective user and the respective situation Adjusting height rake and rotation The monitor height can be adjusted within a rang...

Page 19: ...Buttons for the OSD menu On Screen Display The ON OFF switch 1 is used for switching the monitor on and off The power indicator 2 glows green when the monitor and computer are switched on The power i...

Page 20: ...echnical Manual of your computer i When the monitor is switched to the energy saving mode by the power management system a power consumption of up to 5 W is maintained to feed the circuit for redrawin...

Page 21: ...ton is pressed for several seconds The time period can be set in the OSD menu OSD Turn Off Time The RESET button activates with the OSD menu switched off the factory settings The DVI D SUB button allo...

Page 22: ...tems with the Auto Adjust function as is carried out by the program on the floppy disk provided This basic setting is also useful for manual adjustment If the program cannot be used on your computer b...

Page 23: ...vin The color ratio of all preset color temperatures can be modified Custom Option Function Preset 1 2 3 4 5 Select a preset color temperature with the button or 1 9300 Kelvin 2 7500 Kelvin 3 6500 Kel...

Page 24: ...f the automatic video signal detection The switch over between the video inputs is not automatic but instead must be carried out manually with the DVI D SUB button First Detect Switch on the First Det...

Page 25: ...s are available for picture definition picture position picture size and colors in the preset operating modes see table in the chapter Technical data You can choose whether you want to reset the value...

Page 26: ...for characters and background and giving the primary colors full modulation you can obtain very suitable color combinations see the following table Background Characters black white purple blue cyan...

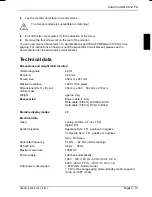
Page 27: ...mm Screen size 359 mm x 287 mm Maximal resolution 1280 x 1024 pixels Dimensions W x H x D incl monitor base 454 mm x 462 562 mm x 218 mm Weight approx 9 kg Accessories Power cable 1 8 m Data cable 5...

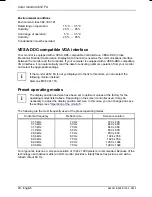
Page 28: ...can select the following monitor instead Siemens MCF 4611 TA Preset operating modes i The display position and size have been set to optimum values at the factory for the operating modes listed above...

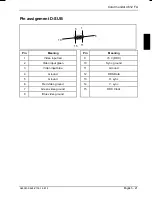
Page 29: ...nment D SUB 1 5 6 10 11 15 Pin Meaning Pin Meaning 1 Video input red 9 5 V DDC 2 Video input green 10 Sync ground 3 Video input blue 11 Ground 4 Ground 12 DDC Data 5 Ground 13 H sync 6 Red video groun...

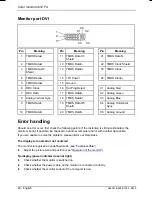
Page 30: ...C4 Analog Horizontal Sync 10 TMDS Data1 20 TMDS Data5 C5 Analog Ground Error handling Should an error occur first check the following points If the distortion is still not eliminated the monitor shou...

Page 31: ...on installed is used the monitor can be adjusted with the floppy disk supplied Permanently unlit or lit pixels Pixel faults in the form of permanently lit or unlit pixels can occur with TFT displays U...

Reviews: