background image

A26361-K708-Z100-2-5E19

English - 1

Introduction

Your new LCD (Liquid Crystal Display) monitor 461V FA offers numerous features and functions, for
example:

• 

TFT display (Thin Film Transistor; active matrix)

• 

minimal space requirements thanks to slim housing

• 

optimum ergonomic characteristics (totally distortion-free, excellent picture definition and colour
purity right into the corners)

• 

high degree of brightness and good contrast

• 

high resolution (1280x1024) for displaying the information content of a conventional 21-inch
screen with CRT (Cathode Ray Tube)

• 

presentation of up to 16.7 million colours (in conjunction with an appropriate graphics card)

• 

automatic scanning of horizontal frequencies from 31 to 82 kHz and refresh rates (vertical
frequencies) from 56 to 85 Hz (absolutely flicker-free)

• 

digital screen controller with microprocessor for storing 28 different display modes

• 

freely adjustable colour alignment for matching the screen colours to the colours of various
input and output devices

• 

convenient operation via integrated OSD (On-Screen-Display) menu

• 

VESA-DDC compatibility

• 

VESA-FPMPMI compatibility (Flat Panel Monitor Physical Mounting Interface) - mechanical
interface to swivel arm and wall bracket)

• 

plug&play capability

• 

power management for reducing power consumption when the computer system is not in use

• 

compliance with the recommendations in accordance with TCO ’99

In normal screen mode (dark characters against a light background) the monitor satisfies the
ergonomic requirements for the GS symbol.

This Operating Manual contains important information you require to start up and run your LCD
monitor.

A graphics card (screen controller) with VGA interface or a digital graphics card with DVI interface is
required to control the 461V FA LCD monitor. The monitor processes the data supplied to it by the
screen controller. The screen controller/the associated driver software is responsible for setting the
modes (resolution and refresh rate).

When putting the monitor into operation for the first time, the screen display should be optimally
adapted to the screen controller used and adjusted in accordance with your needs (see section
"

Changing the monitor settings

" in chapter "

Operation of the monitor

").

Target group

You don't need to be an "expert" to perform the operations described here. Do, however, read the
chapter "

Important notes

" in the Operating Manual of the computer and in this Operating Manual.

In the event of any problems occurring, please contact your sales outlet or our Help Desk.

Further information

Details of how you set the resolution and refresh rate are provided in the documentation on your
screen controller/the associated driver software.

Summary of Contents for 461V FA

Page 1: ...V FA 461V FA 461V FA LCD Bildschirm Moniteur Monitor Sk rm Beeldscherm BETRIEBSANLEITUNG BETRIEBSANLEITUNG BETRIEBSANLEITUNG BETRIEBSANLEITUNG OPERATING MANUAL OPERATING MANUAL OPERATING MANUAL OPERAT...

Page 2: ...u unseren Produkten Tipps Updates usw finden Sie im Internet http www fujitsu siemens com Are there any technical problems or other questions you need clarified Please contact our Help Desk see Guaran...

Page 3: ......

Page 4: ...ciclado Questo manuale stato stampato su carta da riciclaggio Denna handbok r tryckt p recyclingpapper Dit handboek werd op recycling papier gedrukt Herausgegeben von Published by Fujitsu Siemens Comp...

Page 5: ...LCD monitor Moniteur LCD Monitor LCD Monitor LCD LCD sk rm LCD beeldscherm Betriebsanleitung Operating Manual Deutsch English Fran ais Espa ol Italiano Svenska Nederlands TCO 99 Ausgabe Dezember 2000...

Page 6: ...Dieses Handbuch wurde erstellt von cognitas Gesellschaft f r Technik Dokumentation mbH www cognitas de VESA DDC and DPMS are registered trademarks of Video Electronics Standards Association Copyright...

Page 7: ...consignment 7 Installing an ergonomic video workstation 8 Connecting the monitor 8 Connecting cables to the monitor 9 Connecting cables to the computer 10 Operation of the monitor 10 Adjusting rake an...

Page 8: ......

Page 9: ...anagement for reducing power consumption when the computer system is not in use compliance with the recommendations in accordance with TCO 99 In normal screen mode dark characters against a light back...

Page 10: ...should therefore be careful with the display surface so as to avoid lasting damage Newton rings scratches If the device is brought into the installation site from a cold environment condensation can...

Page 11: ...doctor if you have breathed in fumes or come into contact with the liquid Only qualified technicians should repair the device Unauthorised opening and incorrect repair may greatly endanger the user el...

Page 12: ...etween equipment and the receiver Connect the equipment into an outlet on a circuit different from that to which the receiver is connected Consult the dealer or an experienced radio TV technician for...

Page 13: ...ug from the cord and discard Carefully prepare the end of the supply cord and fit a suitable plug WARNING THIS APPLIANCE MUST BE EARTHED IMPORTANT The wires in this mains lead are coloured in accordan...

Page 14: ...ssure that production units of the same equipment will continue to comply with the Commissions requirements Energy Star Guidelines The Fujitsu Siemens LCD colour monitor 461V FA is designed to conserv...

Page 15: ...ur local office our Help Desk or Fujitsu Siemens Computers GmbH Recyclingcenter D 33106 Paderborn Tel 49 5251 81 80 10 Fax 49 5251 81 80 15 Checking the contents of the consignment Unpack all the indi...

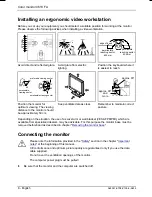
Page 16: ...on the monitor for optimum viewing The viewing distance to the monitor should be approximately 50 cm Keep ventilated areas clear Remember to maintain correct posture Depending on the situation the use...

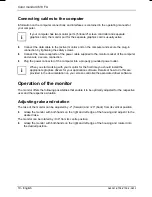
Page 17: ...ector or if you want to connect the monitor to a second computer proceed as follows Connect the DVI D connector of the data cable to the DVI D connector on the monitor 4 and secure the plug in connect...

Page 18: ...a properly grounded power outlet i When you start working with your monitor for the first time you should install the appropriate graphics drivers for your application software Details of how to do t...

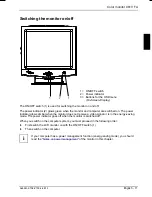
Page 19: ...re switched on The power indicator glows amber when the monitor does not receive a video signal or is in the energy saving mode The power indicator goes off when the monitor is switched off When you s...

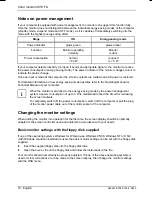
Page 20: ...echnical Manual of your computer i When the monitor is switched to the energy saving mode by the power management system a power consumption of up to 5 W is maintained to feed the circuit for redrawin...

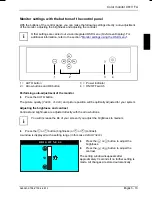
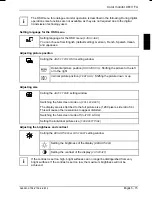
Page 21: ...4 ON OFF switch Performing auto adjustment of the monitor Press the AUTO button The picture quality PHASE CLOCK and picture position will be optimally adjusted for your system Adjusting the brightnes...

Page 22: ...TIMIZATION ADJUST COLOR OSD SETTINGS PRODUCT INFORMATION RESET TO FACTORY SETTINGS INPUT SELECTION EXIT MAIN CONTROLS MOVE SELECTION THEN i OK The first symbol LANGUAGE is highlighted If necessary pre...

Page 23: ...o the right Vertical picture position VERTICAL Shifting the picture down or up Adjusting size Calling the ADJUST SIZE setting window Switching the full screen mode on FULL SCREEN The display area is s...

Page 24: ...g for general applications default setting 9300K FOR CAD CAM USE Setting for CAD CAM programmes 6500K FOR IMAGE MANAGEMENT Setting for example for image processing or playing DVDs USER PRESET User def...

Page 25: ...nds Please proceed in the same manner to release the locked OSD menu again Notes on ergonomic colour adjustment If you select colours for the display in your application programs take note of the info...

Page 26: ...Remove the four screws 2 on the rear of the monitor You can now mount a swivel arm or a wall bracket as per VESA FPMPMI with 100 mm hole spacing For instructions on how to mount the swivel arm or wal...

Page 27: ...end mode and OFF mode Environmental conditions Environment class 3K2 IEC 721 Rated range of operation Humidity 15 C 35 C 20 85 Limit range of operation Humidity 5 C 35 C 20 85 Condensation must be avo...

Page 28: ...31 5 kHz 37 5 kHz 37 9 kHz 46 9 kHz 48 4 kHz 60 0 kHz 64 0 kHz 80 0 kHz 70 Hz 60 Hz 75 Hz 60 Hz 75 Hz 60 Hz 75 Hz 60 Hz 75 Hz 720 x 400 640 x 480 640 x 480 800 x 600 800 x 600 1024 x 768 1024 x 768 12...

Page 29: ...g Detect 24 TMDS Clock Error handling Should an error occur first check the following points If the distortion is still not eliminated the monitor should if possible be checked on another computer and...

Page 30: ...umber of pixels faults is stipulated in the stringent international standard ISO 13406 2 Class II Example a 17 or 18 flat screen monitor with a resolution of 1280 x 1024 has 1280 x 1024 1310720 pixels...

Reviews: