background image

Colour monitor 5110 FA

8 - English

A26361-K872-Z100-1-5E19

Connecting the monitor

!

Observe the "Safety" in the "Important notes" chapter in this operating manual.

CE conformance and optimum picture quality are guaranteed only if you use the data
cable supplied.

Do not cover the ventilation openings of the monitor.

The computer power plug must be pulled out!

Ê


Be sure that the monitor and the computer are switched off.

Connecting cables to the monitor

The monitor ports are protected by a cover.

Ê


Remove the cover.

ANALOG

DIGITAL

AUDIO

POWER

Fujitsu Siemens Computers

Bgm. -Ulrich-Str. 1 00
86199  Augs burg /  Germa ny

Colo r Mo nitor 5110 FA
S26361-K872-V150

100-240VAC ,  2A  , 60/50Hz

This device comp lies wit h Part  15 of  the FC C Rul es. Operation  i s subject to the

foll owing two cond itions : (1) This dev ice m ay not cause harmf ul interferenc e, 
and ( 2) this  device must  accep t any  interfer ence r ecei ved, incl udi ng 

interfe rence  that m ay causeun desired oper ation

Rev.:

M ade  in  Taiw an

Seri al No.:

          TÜ V 

     R hei nl and
Pr o duc t  S af e ty

ge pr üf te

Si ch er hei t

            TÜ V 

    Rh ein lan d

Pr od uct  S af et y

ISO

1 3406-2

L ISTED I.T .E. 

C

US

E 168207,7Z 85

T este d  T o  Com p ly
With  FC C Stan d ar ds

F OR HO ME O R OF F ICE USE

Fu jitsu Si emen s
Comput e rs

511 0  FA

1936-1100 -4240

Apparatet m a kun tilkopl es jord et stik kontakt.
Apparaten s kall an slutas  til l jor dat
uttag när den ans luts ti ll  ett nätverk.

1

2

3

4

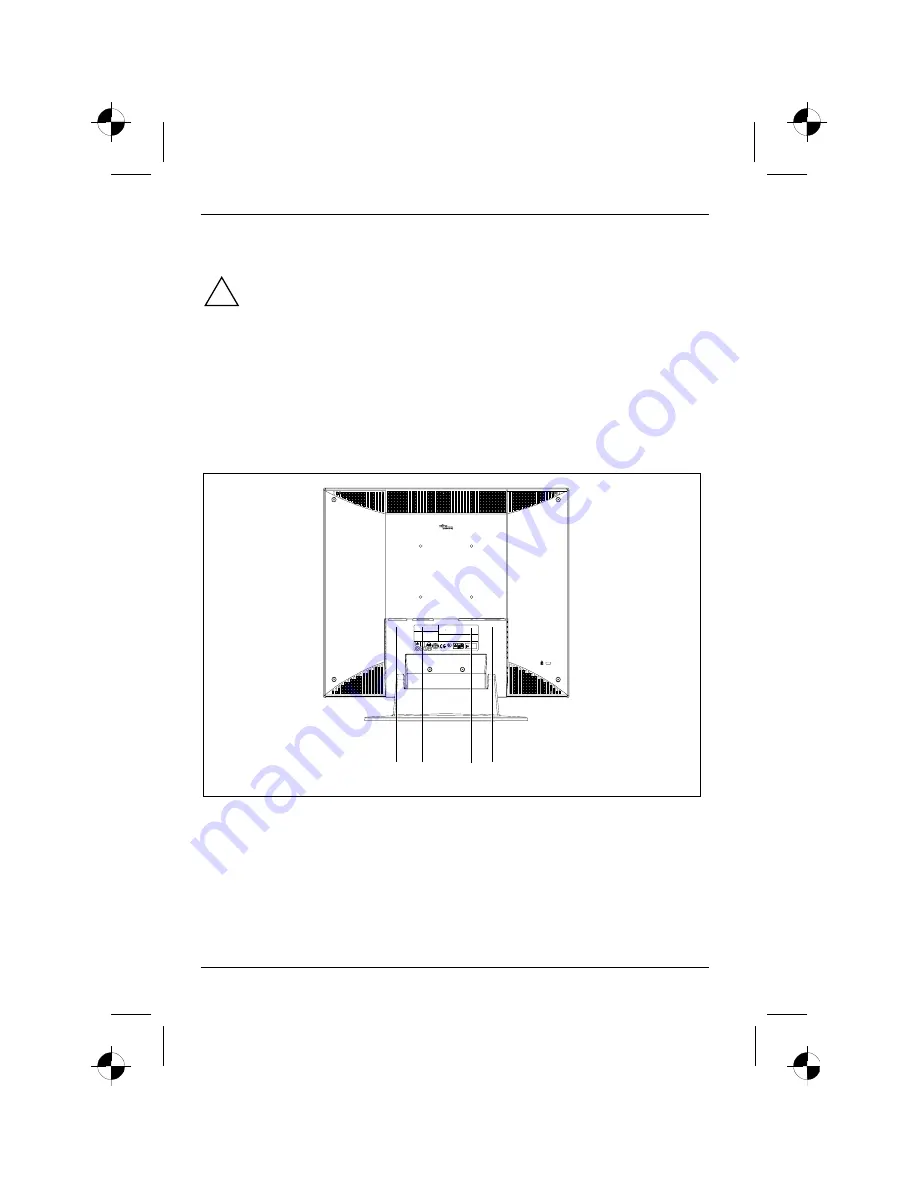
1 =   D-SUB connector (ANALOG)
2 =   DVI-D connector (DIGITAL)

3 =   AUDIO IN socket
4 =   Power connector

The data cable supplied has two 15-pin D-SUB connectors for the D-SUB connector of the monitor
and of the computer.

Ê


Connect one of the D-SUB connectors of the data cable to the D-SUB connector on the
monitor (1) and secure the plug-in connection by tightening the safety screws.

Summary of Contents for 5110 FA

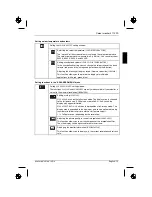
Page 1: ...signment 6 Installing an ergonomic video workstation 7 Connecting the monitor 8 Connecting cables to the monitor 8 Connecting cables to the computer 9 Operation of the monitor 9 Adjusting rake and rot...

Page 2: ......
Page 3: ...racket plug play capability power management for reducing power consumption when the computer is not in use compliance with the recommendations in accordance with TCO 99 In normal screen mode dark cha...

Page 4: ...contact your sales outlet or our Help Desk The display surface of the LCD monitor is sensitive to pressure and scratches You should therefore be careful with the display surface so as to avoid lasting...

Page 5: ...air may greatly endanger the user electric shock fire risk You may set only those resolutions and refresh rates specified in the Technical data chapter Otherwise you may damage your monitor If you are...

Page 6: ...device pursuant to Part 15 of the FCC rules and meets all requirements of the Canadian Interference Causing Equipment Regulations These limits are designed to provide reasonable protection against ha...

Page 7: ...rade name and model number specified above was tested confirming to the applicable FCC Rules under the most accurate measurement standards possible and that all the necessary steps have been taken and...

Page 8: ...ffice our Help Desk or Fujitsu Siemens Computers GmbH Recyclingcenter D 33106 Paderborn Tel 49 5251 818 010 Fax 49 5251 818 015 Checking the contents of the consignment Unpack all the individual parts...

Page 9: ...reaching sector 600 mm edge of desk permissible reaching sector 600 mm Avoid direct and reflected glare Avoid glare from electric lighting Position the keyboard where it is easiest to reach 30 30 65 6...

Page 10: ...1 This device may not cause harmf ul interference and 2 this device must accep t any interference received incl uding interfe rence that may causeun desired operation Rev Made in Taiw an Seri al No T...

Page 11: ...le to the active monitor port on the computer and secure the plug in connection by tightening the safety screws Insert the other plug of the audio line in the audio input of the computer Plug the conn...

Page 12: ...e monitor is switched on and operating The power indicator glows amber The monitor is in the energy saving mode The power indicator is dark The monitor is switched off When you switch the computer sys...

Page 13: ...ical Manual of the computer i When the monitor is switched to the energy saving mode by the power management system a power consumption of up to 3 W is maintained to feed the circuit for redrawing the...

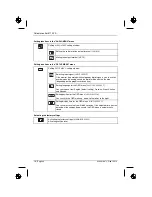
Page 14: ...ion you want to set Press the 6 or 5 button to adjust the selected function Press the A button to exit the setting window Selecting input signal The monitor can be operated with analogue or digital si...

Page 15: ...played IMAGE AD J U S T AU T O T U N E H V P OS IT ION H S IZ E P H AS E Z OOM E XIT A S E L E CT B The first icon AUTO TUNE is highlighted If necessary press the 6 or 5 button to mark the next icon P...

Page 16: ...ontrast is set too low the maximum brightness will not be achieved Adjusting size and position Calling the IMAGE ADJUST setting window Performing auto adjustment AUTO TUNE The optimal values for the f...

Page 17: ...CED MENU menu Calling ADVANCED MENU setting window The functions SCALING and SHARPNESS are only made available if your monitor is not set to the maximal resolution 1600x1200 Setting scaling SCALING FI...

Page 18: ...gue and the digital mode with this function depending on the graphics card you use Setting language for the OSD menu LANGUAGE SELECT You can choose from English default setting German French Italian a...

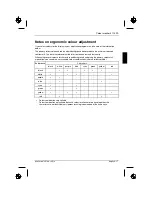
Page 19: ...able for continuous text and data entry When using several colours for characters and background and giving the primary colours full modulation you can obtain very suitable colour combinations see the...

Page 20: ...e rence that may causeun desired operation Rev Made in Taiw an Seri al No T V R hei nl and Pr o duc t S af e t y ge pr f t e Si ch er hei t T V Rh ei n l an d Pr od uct S af et y ISO 1 3406 2 L ISTEDI...

Page 21: ...s Power cable 1 8 m Data cable D SUB 1 8 m Data cable DVI D 1 8 m Storable display modes 22 preset Power connector Rated mains voltage Frequency 100 V 240 V 10 2 A 50 Hz 60 Hz 5 Electrical data Video...

Page 22: ...611 FA 4612 FA or 461 V for DVI digital or Siemens or Siemens Nixdorf x178 19P2 19T2 only for the resolution 1600 x 1200 60 Hz Preset operating modes i The picture position and size have been set to o...

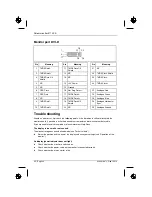
Page 23: ...and Zoom Pan i From a technical point of view it is preferable to set a refresh rate of above 60 Hz on an LCD monitor with a TFT display Pin assignment D SUB 1 5 6 10 11 15 Pin Meaning Pin Meaning 1...

Page 24: ...TMDS Data1 20 NC C5 Analogue Ground Trouble shooting Should an error occur first check the following points If the distortion is still not eliminated the monitor should if possible be checked on anot...

Page 25: ...ith the floppy disk supplied Permanently unlit or lit pixels The standard of production techniques today cannot guarantee an absolutely fault free screen display A few isolated constant lit or unlit p...

Reviews: