background image

Colour monitor C384FA-M

2 - English

A26361-K826-Z100-2-5E19

Notational conventions

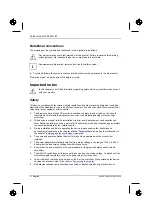
The meanings of the symbols and fonts used in this manual are as follows:

!

Pay particular attention to text marked with this symbol. Failure to observe this warning
endangers your life, destroys the device, or may lead to loss of data.

i

Supplementary information, remarks, and tips follow this symbol.

Ê 

Text which follows this symbol describes activities that must be performed in the order shown.

"Quotation marks" indicate names of chapters or terms.

Important notes

!

In this chapter you will find information regarding safety which is essential to take note of
with your monitor.

Safety

This device complies with the relevant safety regulations for data processing equipment, including
electronic office machines for use in an office environment. If you have any questions, contact your
sales outlet or our customer service centre.

• 

The display surface of the LCD monitor is sensitive to pressure and scratches. You should
therefore be careful with the display surface so as to avoid lasting damage (Newton rings,
scratches).

• 

If the device is brought into the installation site from a cold environment, condensation can
form. Before operating the device, wait until it is absolutely dry and has reached approximately
the same temperature as the installation site.

• 

During installation and before operating the device, please observe the instructions on
environmental conditions in the chapter entitled "

Technical data

as well as the instructions in

the chapter "

Installing an ergonomic video workstation

".

• 

To ensure adequate ventilation the monitor may only be operated with the monitor foot
installed.

• 

The power adapter automatically sets itself to a mains voltage in the range of 100 V to 240 V.
Ensure that the local mains voltage lies within these limits.

• 

Ensure that the power socket on the power adapter or the grounded mains outlet is freely
accessible.

• 

The ON/OFF switch does not disconnect the device from the mains voltage. To disconnect the
electricity supply completely, remove the power plug from the socket.

• 

Lay all cables so that nobody can stand on them or trip over them. When attaching the device,
observe the relevant notes in the chapter "

Connecting the monitor

".

• 

No data transmission cable should be connected or disconnected during a thunderstorm.

Summary of Contents for C384FA-M

Page 1: ...C384FA M LCD Bildschirm Moniteur Monitor Sk rm Beeldscherm BETRIEBSANLEITUNG OPERATING MANUAL...

Page 2: ...zu unseren Produkten Tipps Updates usw finden Sie im Internet http www fujitsu siemens com Are there any technical problems or other questions you need clarified Please contact our Help Desk see Warra...

Page 3: ......

Page 4: ...sobre papel reciclado Questo manuale stato stampato su carta da riciclaggio Denna handbok r tryckt p recyclingpapper Dit handboek werd op recycling papier gedrukt Herausgegeben von Published by Fujit...

Page 5: ...itor Moniteur LCD Monitor LCD Monitor LCD LCD sk rm LCD beeldscherm Farvebilledsk rm Betriebsanleitung Operating Manual Deutsch English Fran ais Espa ol Italiano Svenska Nederlands Dansk TCO 99 Ausgab...

Page 6: ...Dieses Handbuch wurde erstellt von cognitas Gesellschaft f r Technik Dokumentation mbH www cognitas de VESA DDC and DPMS are registered trademarks of Video Electronics Standards Association Copyright...

Page 7: ...ontents of the consignment 6 Installing an ergonomic video workstation 7 Connecting the monitor 7 Connecting cables to the monitor 8 Connecting cables to the computer 9 Connecting headphones 10 Operat...

Page 8: ......

Page 9: ...swivel arm and wall bracket plug play capability power management for reducing power consumption when the computer system is not in use compliance with the recommendations in accordance with TCO 99 In...

Page 10: ...g damage Newton rings scratches If the device is brought into the installation site from a cold environment condensation can form Before operating the device wait until it is absolutely dry and has re...

Page 11: ...ly endanger the user electric shock fire risk The power adapter may only be opened by authorised specialist personnel You may set only those resolutions and refresh rates specified in the Technical da...

Page 12: ...device pursuant to Part 15 of the FCC rules and meets all requirements of the Canadian Interference Causing Equipment Regulations These limits are designed to provide reasonable protection against ha...

Page 13: ...ates and Canada Cable type Size of conductors in cable Maximum current rating of the device SJT 18 AWG 16 AWG 14 AWG 10 Amps 12 Amps 12 Amps SVT 18 AWG 17 AWG 10 Amps 12 Amps For the United Kingdom Sh...

Page 14: ...nvironmentally damaging The device may be taken back after use to be recycled provided that it is returned in a condition that is the result of normal use Any components not reclaimed will be disposed...

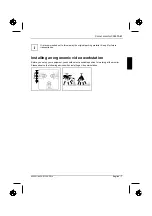
Page 15: ...away the original packing material Keep it for future transportation Installing an ergonomic video workstation Before you set up your equipment you should select a suitable position for working at th...

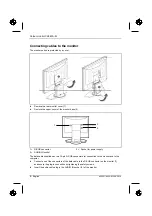
Page 16: ...2 1 2 3 DC IN12V 1 D SUB connector 2 AUDIO IN socket 3 Socket for power supply The data cable supplied has two 15 pin D SUB connectors for connection to the monitor and to the computer Connect one of...

Page 17: ...monitor base Connecting cables to the computer Information on the computer connections and interfaces is contained in the operating manual for your computer In order for the multimedia functions to b...

Page 18: ...e headphones port on the front of the monitor if desired If you connect headphones the built in loudspeakers are disabled automatically Operation of the monitor 1 2 3 4 7 5 6 1 Loudspeakers 2 Volume c...

Page 19: ...ed For detailed information on how energy saving mode operates refer to the Operating Manual or Technical Manual of your computer i When the monitor is switched to the energy saving mode by the power...

Page 20: ...ct a function symbol or submenu With the buttons 2 you enter the settings for the selected function To set the OSD menu perform the following steps Press the Fn Fn Fn Fn button to activate the OSD men...

Page 21: ...Colour monitor C384FA M A26361 K826 Z100 2 5E19 English 13...

Page 22: ...eset operating modes see table in the chapter Technical data Resetting all settings to the factory settings Recall Setting language for the OSD menu Setting language for the OSD menu Language You can...

Page 23: ...racters and background and giving the primary colours full modulation you can obtain very suitable colour combinations see the following table Background Characters black white purple blue cyan green...

Page 24: ...jack max 50 mW Environmental conditions Environment class 3K2 IEC 721 Rated range of operation Humidity 15 C 35 C 20 85 Limit range of operation Humidity 5 C 35 C 20 85 Condensation must be avoided V...

Page 25: ...6 kHz 37 88 kHz 48 08 kHz 46 87 kHz 48 36 kHz 56 48 kHz 60 02 kHz 70 00 Hz 70 00 Hz 70 00 Hz 60 00 Hz 72 80 Hz 75 00 Hz 56 20 Hz 60 30 Hz 72 20 Hz 75 00 Hz 60 00 Hz 70 10 Hz 75 00 Hz 640 x 350 640 x 4...

Page 26: ...ts If the distortion is still not eliminated the monitor should if possible be checked on another computer and or with another data cable If you cannot solve the problem contact our customer service c...

Page 27: ...olated constant lit or unlit pixels may be present The maximum permitted number of pixels faults is stipulated in the stringent international standard ISO 13406 2 Class II Example a 15 flat screen mon...

Reviews: