background image


A26361-K1018-Z120-1-7619, edition 1 

Introduction 

Your new LCD (Liquid Crystal Display) monitor SCALEOVIEW S17-2 / S19-2 offers numerous 
features and functions, for example: 


TFT display (Thin Film Transistor; active matrix) 


minimal space requirements thanks to slim casing 


optimum ergonomic characteristics (totally distortion-free, excellent picture definition and colour 
purity right into the corners) 


high degree of brightness and good contrast 


high resolution (1280 x 1024) 


size of the display area comparable to that of a 19" (S17-2) or 21" (S19-2) CRT (Cathode Ray 
Tube) monitor 


presentation of up to 16.2 million colours (in conjunction with an appropriate graphics card) 


automatic scanning of horizontal frequencies from 31 to 64 kHz (digital) or 31 to 80 kHz 
(analogue) and refresh rates (vertical frequencies) from 56 to 76 Hz (absolutely flicker-free) 


digital screen controller with microprocessor for storing 20 different display modes 


freely adjustable colour alignment for matching the screen colours to the colours of various 
input and output devices 


convenient operation via integrated OSD (On-Screen-display) menu 

 VESA-DDC 

compatibility 


VESA-FPMPMI compatibility (Flat Panel Monitor Physical Mounting Interface) - mechanical 
interface to swivel arm and wall bracket) 

 plug&play 

capability 


power management for reducing power consumption when the computer is not in use 


compliance with the recommendations in accordance with TCO’03 

In normal screen mode (dark characters against a light background) the monitor satisfies the 
ergonomic requirements for the GS symbol. 
This operating manual contains important information you require to start up and run your LCD 
monitor. 
A graphics card (screen controller) with VGA interface or a digital graphics card with DVI interface is 
required to control the SCALEOVIEW S17-2 / S19-2 LCD monitor. The monitor processes the data 
supplied to it by the screen controller. The screen controller/the associated driver software is 
responsible for setting the modes (resolution and refresh rate). 
When putting the monitor into operation for the first time, the screen display should be optimally 
adapted to the screen controller used and adjusted in accordance with your needs (see the 
"Changing the monitor settings" section in the "Operation of the monitor" chapter). 

Target group 

You don't need to be an "expert" to perform the operations described here. However, please observe 
the safety information given in the operating instructions of the computer and in this manual. 
In the event of any problems occurring, please contact your sales outlet or our help desk. 

Summary of Contents for FGSW-1602

Page 1: ...Monitor Operating Manual English SCALEOVIEW S17 2 S19 2...

Page 2: ...ems or other questions which you would like to be clarified Please contact our help desk see Warranty Booklet The latest information on our products tips updates etc can be found on the internet under...

Page 3: ......

Page 4: ...This manual was produced by cognitas Gesellschaft f r Technik Dokumentation mbH www cognitas de Published by Fujitsu Siemens Computers GmbH Order No A26361 K1018 Z120 1 7619 Edition 1 AG 0405 04 05...

Page 5: ...SCALEOVIEW S17 2 S19 2 LCD monitor Operating Manual April 2005 edition...

Page 6: ...ts including rights of translation reproduction by printing copying or similar methods in part or in whole are reserved Offenders will be liable for damages All rights including rights created by pate...

Page 7: ...base 9 Folding out monitor base 9 Removing monitor base 10 Installation Deinstallation of the loudspeaker module 10 Connecting the monitor 11 Connecting cables to the monitor 11 Connecting cables to t...

Page 8: ......

Page 9: ...Mounting Interface mechanical interface to swivel arm and wall bracket plug play capability power management for reducing power consumption when the computer is not in use compliance with the recommen...

Page 10: ...which is essential to take note of with your monitor Safety notes This device complies with the relevant safety regulations for data processing equipment including electronic office machines for use i...

Page 11: ...s paper clips etc or liquids get inside the device danger of electric shock short circuit The device is not waterproof Never immerse the device in water and protect it from spray water rain sea water...

Page 12: ...h a regular grounded 3 core mains lead Transport Transport the monitor with care and only in its original packaging or another corresponding packaging fit to protect it against knocks and jolts Never...

Page 13: ...mmunications However there is no guarantee that interference will not occur in a particular installation If this equipment does cause harmful interference to radio or television reception which can be...

Page 14: ...Computers GmbH has determined that this product meets the Energy Star guidelines for energy efficiency Disposal and recycling This device has been manufactured to the highest possible degree from mat...

Page 15: ...delivery note The complete LCD monitor package includes one monitor one data cable D SUB DVI I one data cable DVI D DVI D one power cable one audio cable one power adapter with power adapter cable a C...

Page 16: ...sector Position the keyboard where it is easiest to reach 30 30 65 65 0 60 1 2 2 1 2 1 Preferable viewing sector 2 Permissible viewing sector Position the monitor for optimum viewing The viewing dista...

Page 17: ...sceptible to scratching Therefore lay the monitor on a soft surface when mounting or removing the monitor base Folding out monitor base When delivered the lower part of the monitor base is folded in L...

Page 18: ...arm or wall bracket please see the documentation for the swivel arm or wall bracket The thermal dissipation on the rear wall of the casing must not prevented by shielding Therefore make sure that the...

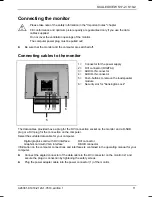
Page 19: ...AUDIO IN connector 5 Push buttons to remove the loudspeaker module 6 Security slot for Kensington Lock The data cables provided have a plug for the DVI connection socket on the monitor and a D SUB pl...

Page 20: ...port on the computer and secure the plug in connection by tightening the safety screws Connect the connector of the power cable supplied into a properly earthed mains outlet and ensure a secure conne...

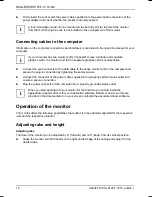
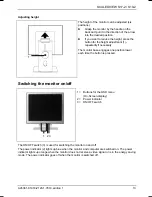
Page 21: ...ly if necessary The monitor base engages one position lower each time the button is pressed Switching the monitor on off 1 2 3 1 Buttons for the OSD menu On Screen display 2 Power indicator 3 ON OFF s...

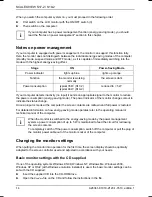
Page 22: ...ion energy saving mode The power indicator of the monitor changes colour to indicate the status change Once an input is made at the computer the screen contents are redrawn and full power is restored...

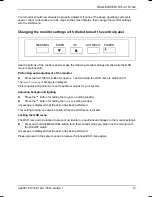
Page 23: ...d while the OSD menu is switched off The Auto Processing message is displayed Picture quality and position are set to optimum values for your system Adjusting background lighting Press the 5 button fo...

Page 24: ...you can select another language To set the OSD menu perform the following steps Press the MENU SEL button to activate the OSD menu The main menu appears on the screen on the left hand side with icons...

Page 25: ...g function from the OSD main menu All possible adjustments of the main menu are described in the following Adjusting the brightness and contrast Calling the Brightness Contrast setting window Brightne...

Page 26: ...function you fine tune your monitor to eliminate picture interference Adjusting the volume Calling the Audio setting window Volume Setting the volume for playback with the integrated loudspeakers Mut...

Page 27: ...a setting being made the OSD menu is automatically faded out Setting functions in the Advanced menu Calling the Advanced setting window Resolution Notifier Displaying monitor data The optimum resolut...

Page 28: ...itable for continuous text and data entry When using several colours for characters and background and giving the primary colours full modulation you can obtain very suitable colour combinations see t...

Page 29: ...e monitor port on the computer Press any key on the computer keyboard the computer may be in energy saving mode Alter the brightness and or contrast until you get a picture Message No Signal Check whe...

Page 30: ...comes darker The background lighting has a limited lifetime If your monitor display should become too dark the background lighting will have to be exchanged Please contact our help desk Permanently un...

Page 31: ...cable 1 8 m Data cable D SUB DVI I 1 8 m Data cable DVI D DVI D 1 8 m Power cable 1 8 m Power adapter with power adapter cable Storable display modes 20 9 of which are preset Electrical data Video ana...

Page 32: ...or instead S17 2 Fujitsu Siemens 43B1 B17 1 S7 S17 1 P17 1 S19 2 Fujitsu Siemens B19 1 S19 1 P19 1 Preset operating modes i The picture position and size have been set to optimum values at the factory...

Page 33: ...21 NC 2 TMDS Data2 12 NC 22 TMDS Clock Shield 3 TMDS Data 2 4 Shield 13 NC 23 Clock 4 NC Not connected 14 5V Power 24 Clock 5 NC 15 Earth 6 DDC Clock 16 Hot Plug Detect C1 Analogue R Video Out 7 DDC...

Reviews: